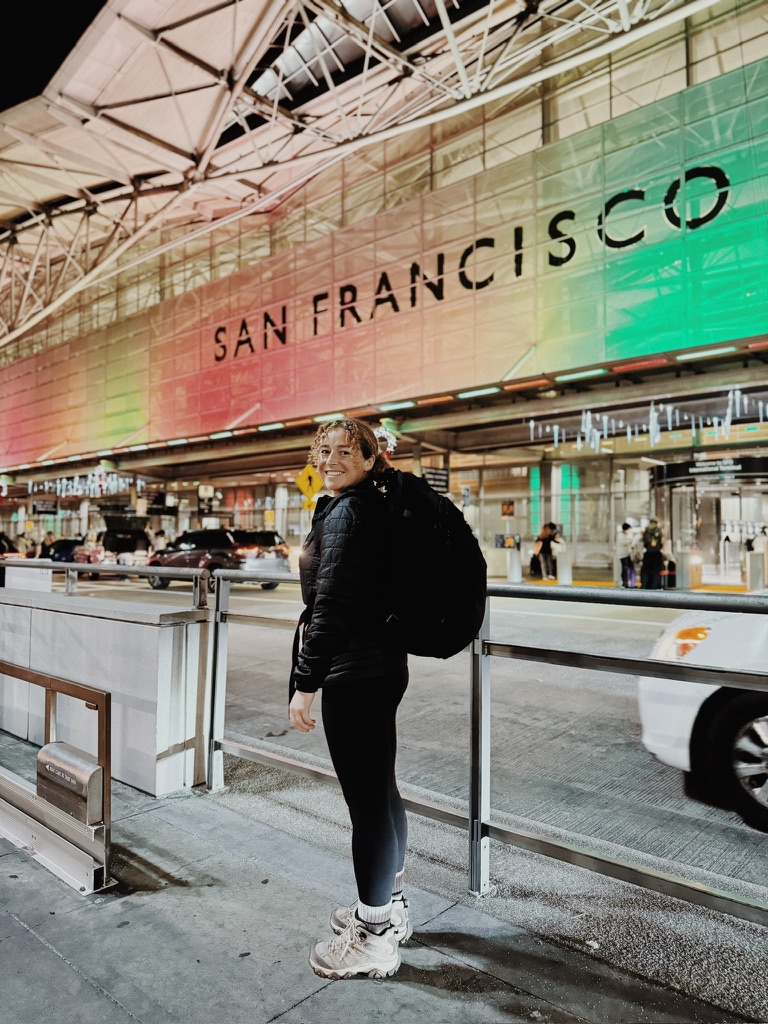
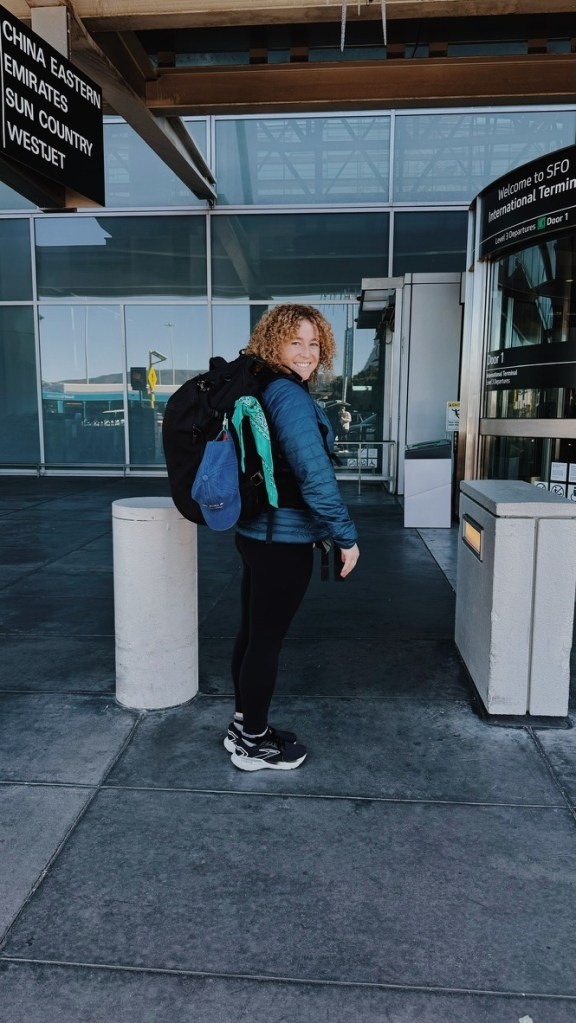
Well the epic adventure has officially come to a close! I am so unbelievably grateful that I got to spend so much time exploring this beautiful world – what an enormous privilege. As per usual, I tracked every penny of what I spent so here is the final installment of what I spent on this trip! See here for the original post of my 1 Year trip Cost Summary & the Two Year update. Also if you are considering doing a big trip, check out my best tips for planning an epic adventure here.
Some considerations:
This is only for one person (me)
I travel fairly cheaply (mostly staying in hostels) & in general don’t have expensive taste in food or transportation, but I also am saying yes to any experiences that I want to say yes to
I am traveling fairly quickly so taking lots of flights + moving locations every 3-5 days usually. It’s much cheaper to travel slower
I am not traveling in a super logical route. For example, while in Europe I went to England, then Northern Ireland, then France, then England, then Switzerland, then England, then Ireland… I was meeting up with different friends at different points so while it wasn’t logical, it made sense for what I was doing. However, again this is an area that one can make cheaper if they don’t travel in circles like I did haha
When in Europe, I did spend a decent number of nights staying for free with friends!
I am flying home to California quite often for Christmas, my 30th birthday, and for some weddings. Again this is driving up some inefficiencies.
I have spent both summers at home in CA (a total of about 5 months between the two summers). This has actually saved me some money as I don’t pay for accommodation while I am home (thanks Mom + Dad!)
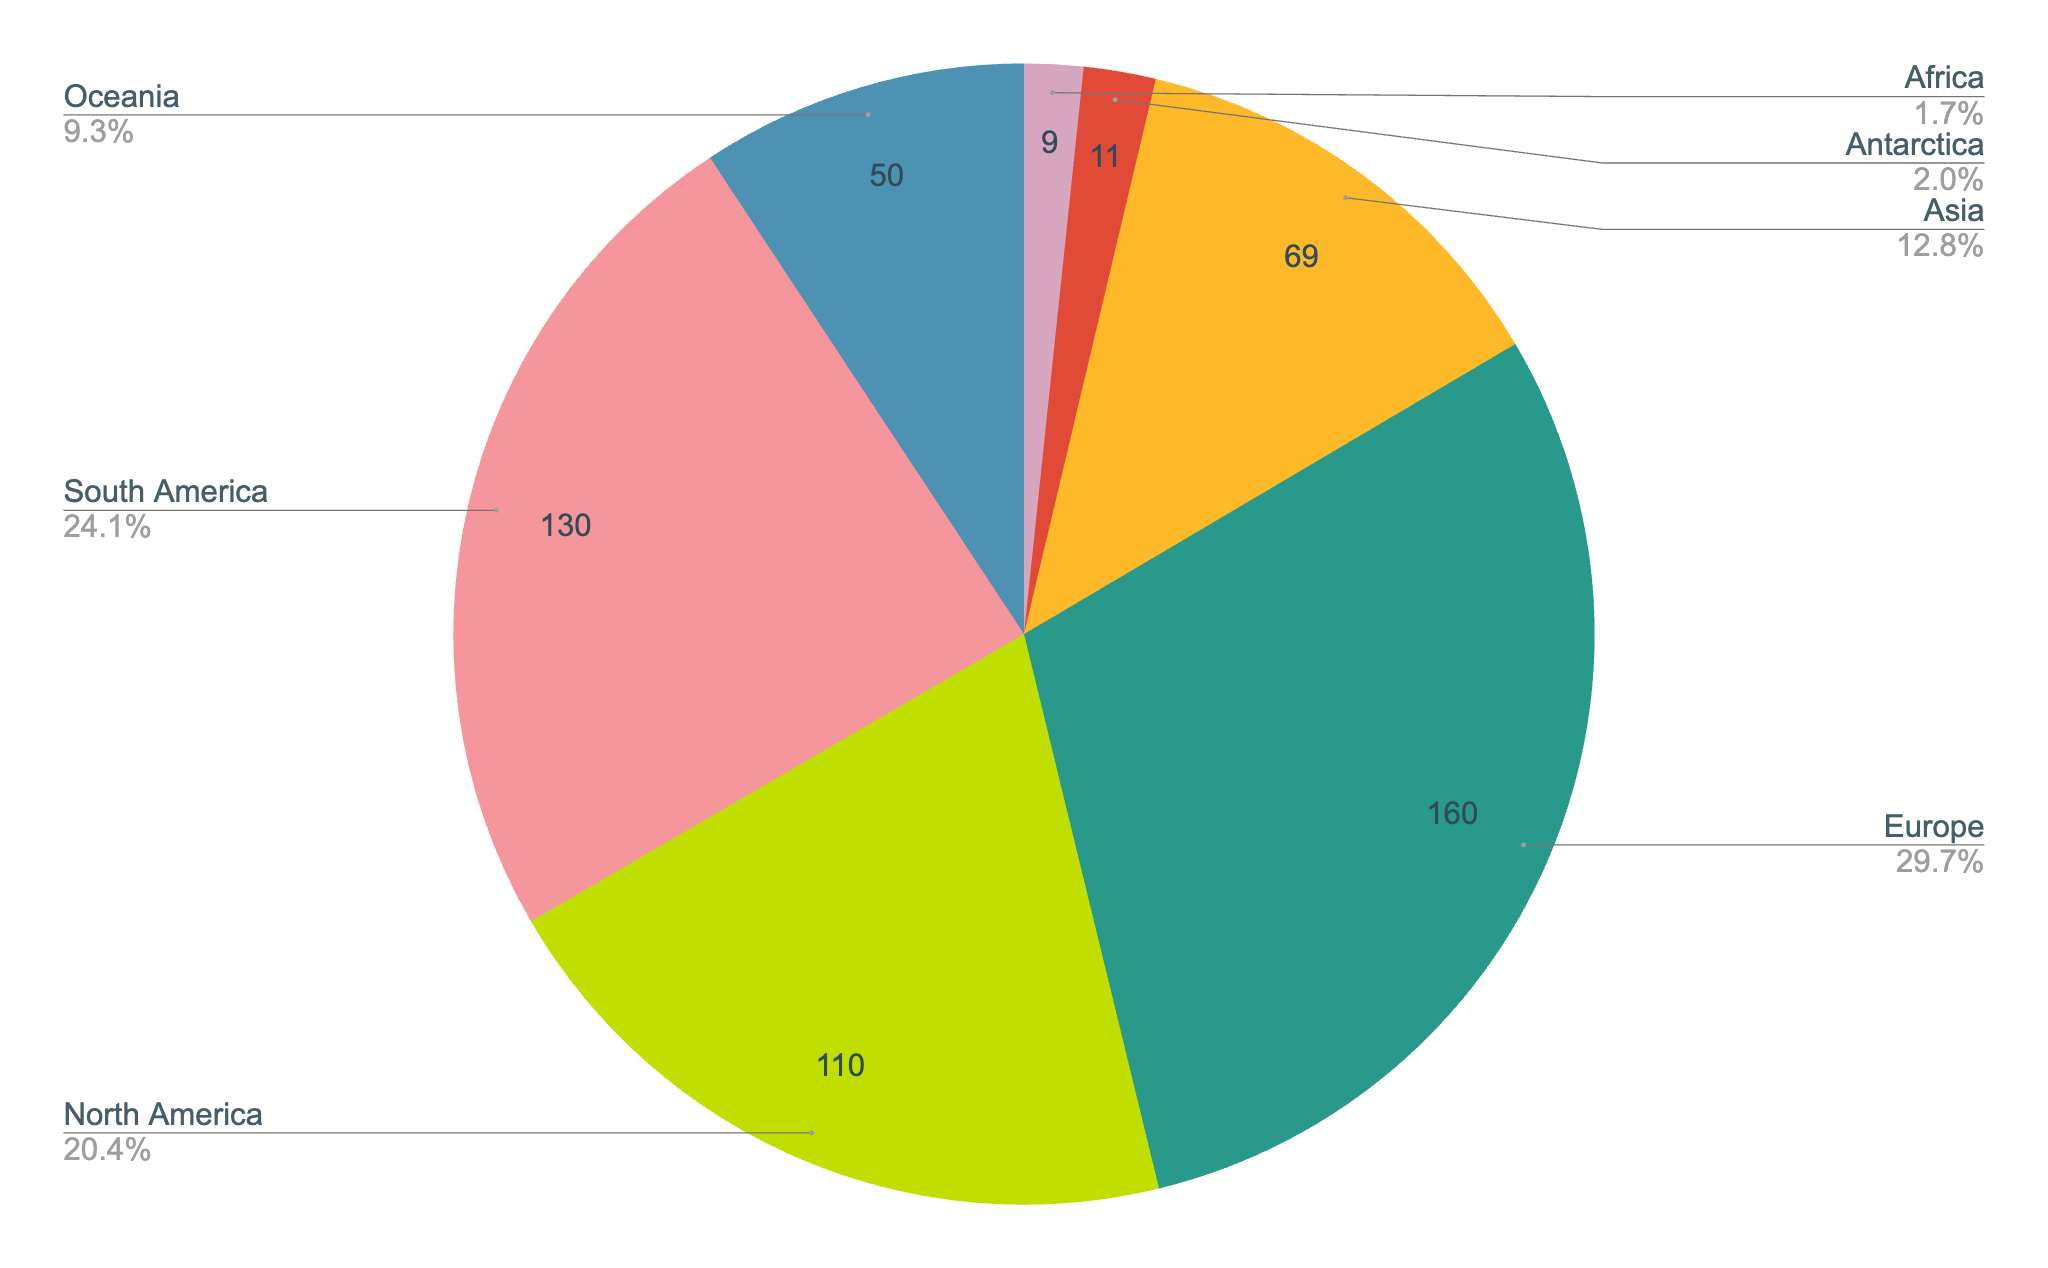
Here’s the trip summary leaving in June 2023, covering 54 countries across 7 continents:
6 months in Europe + Egypt – 19 countries
1 month Fiji & New Zealand with my family – 2 countries
3 months Southeast Asia + Japan – 6 countries
6 months Mexico + South America + Antarctica- 6 countries
1 month Australia + Vanuatu with my family – 2 countries
3.5 months in Central America – 7 countries
3.5 Months in Western Asia + Europe – 15 countries
Here’s how many days I spent on each continent in my 2.5 years of travel:
In full transparency, my parents kindly paid for Fiji, NZ, Australia, & Japan since I was with them for those four countries (very, very lucky!!) so this analysis will cover roughly 27 months (as the aforementioned countries were essentially free). This does include any spend I had while in CA, which is usually cheaper than traveling as I have no accommodation costs while at home.
Also, on this trip, I have tried to add what I spent in each country to its dedicated blog post so hopefully that’s helpful. For example: scroll to the bottom of this blog post to see how much I spent for 3 weeks in the Philippines!
One last caveat – I did not include my costs for going to Antarctica because I got a deal through Freestyle Adventure Travel & signed an agreement that I wouldn’t share what I spent. Check them out if you are ever interested in exploring the one of the coolest (pun intended) places I’ve been.
Here we go…
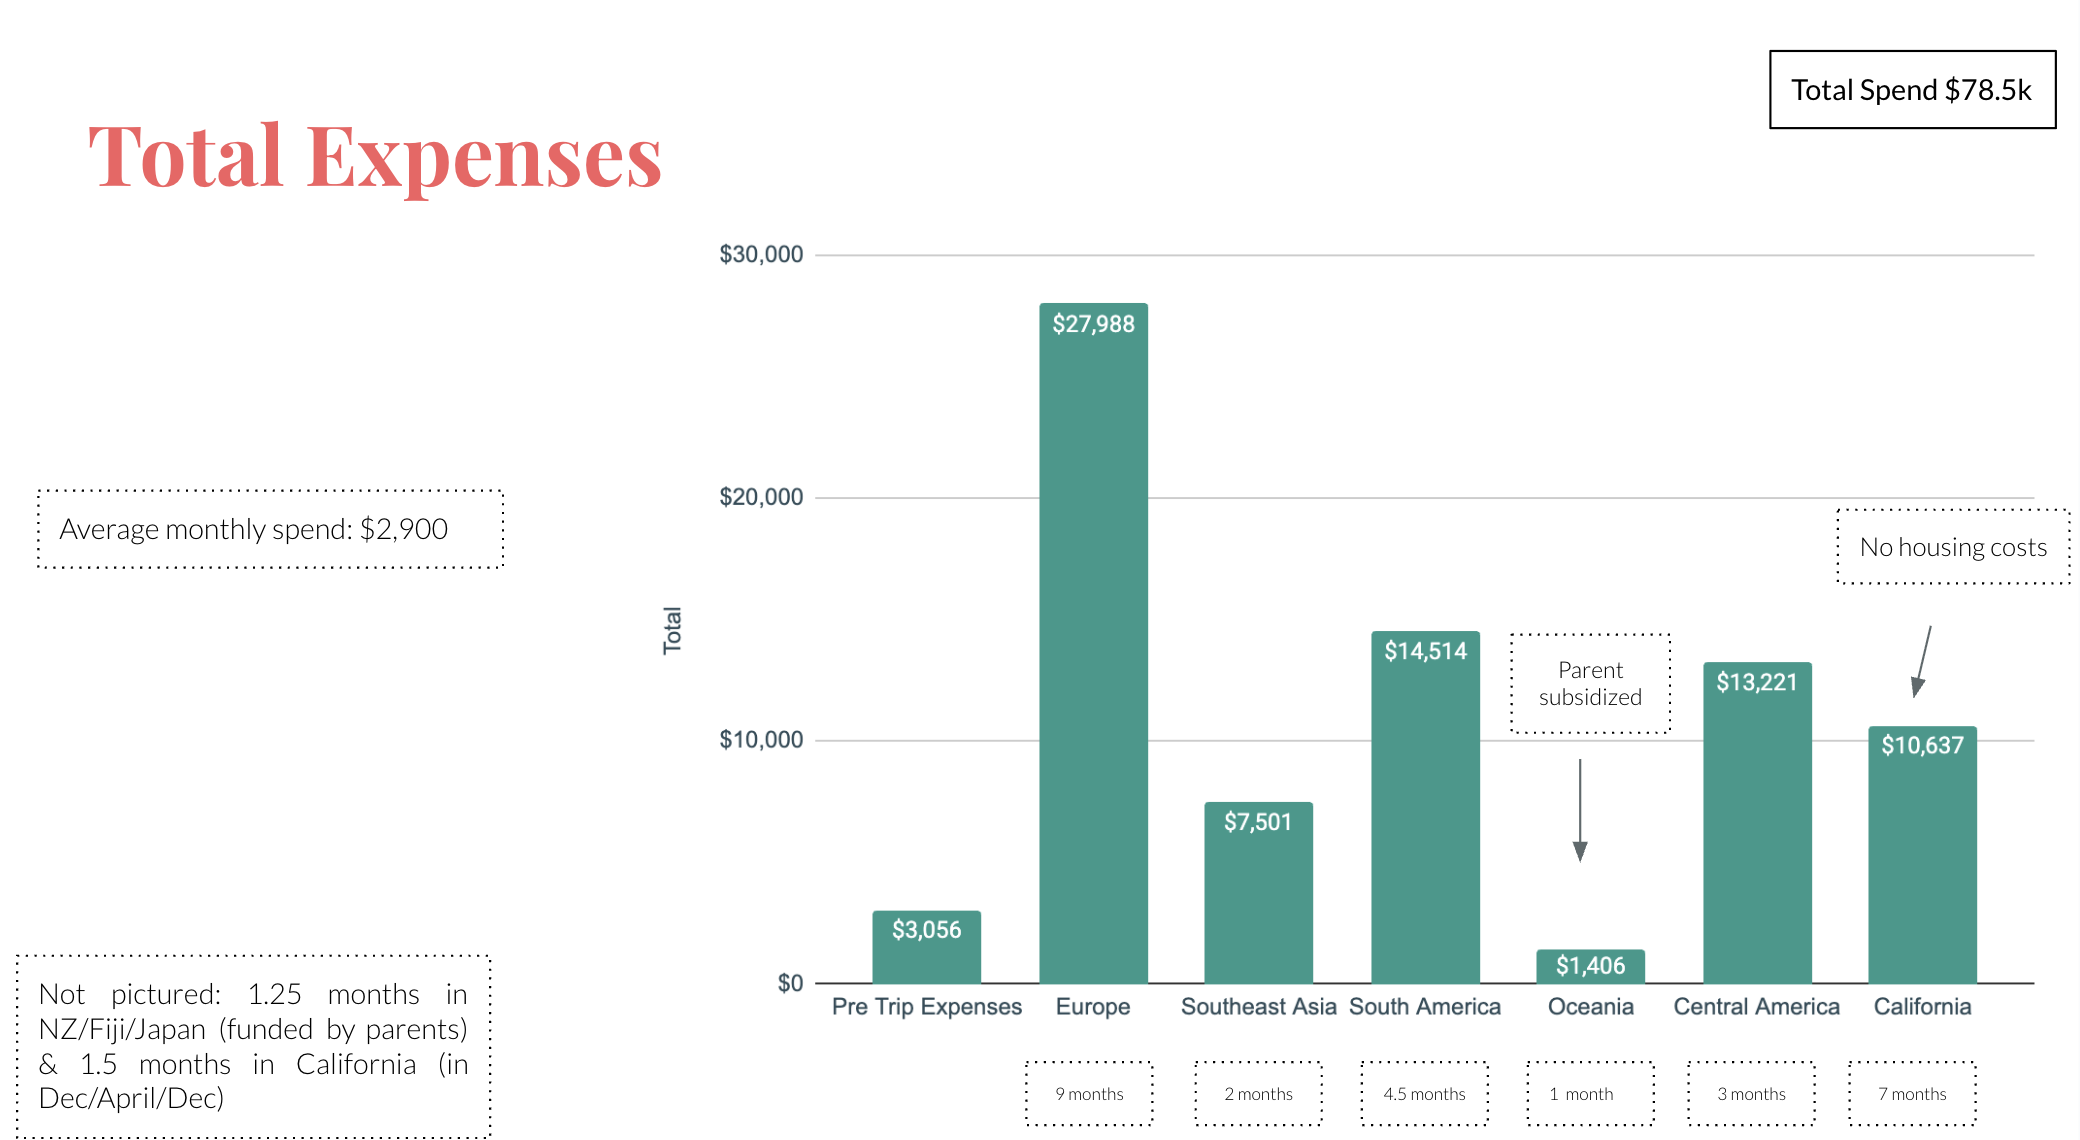
Total Spend: $78k USD
Overall this about what I expected to spend on this trip! I’m averaging just under $3k per month while really enjoying life. I haven’t really said no to too many things while on this trip. I spend an average of $40k per year in my “regular” life while living in San Francisco, CA, so I’ve spent about 25% less by traveling to 54 countries (over the same time period) – not bad!!
Spend by Segment
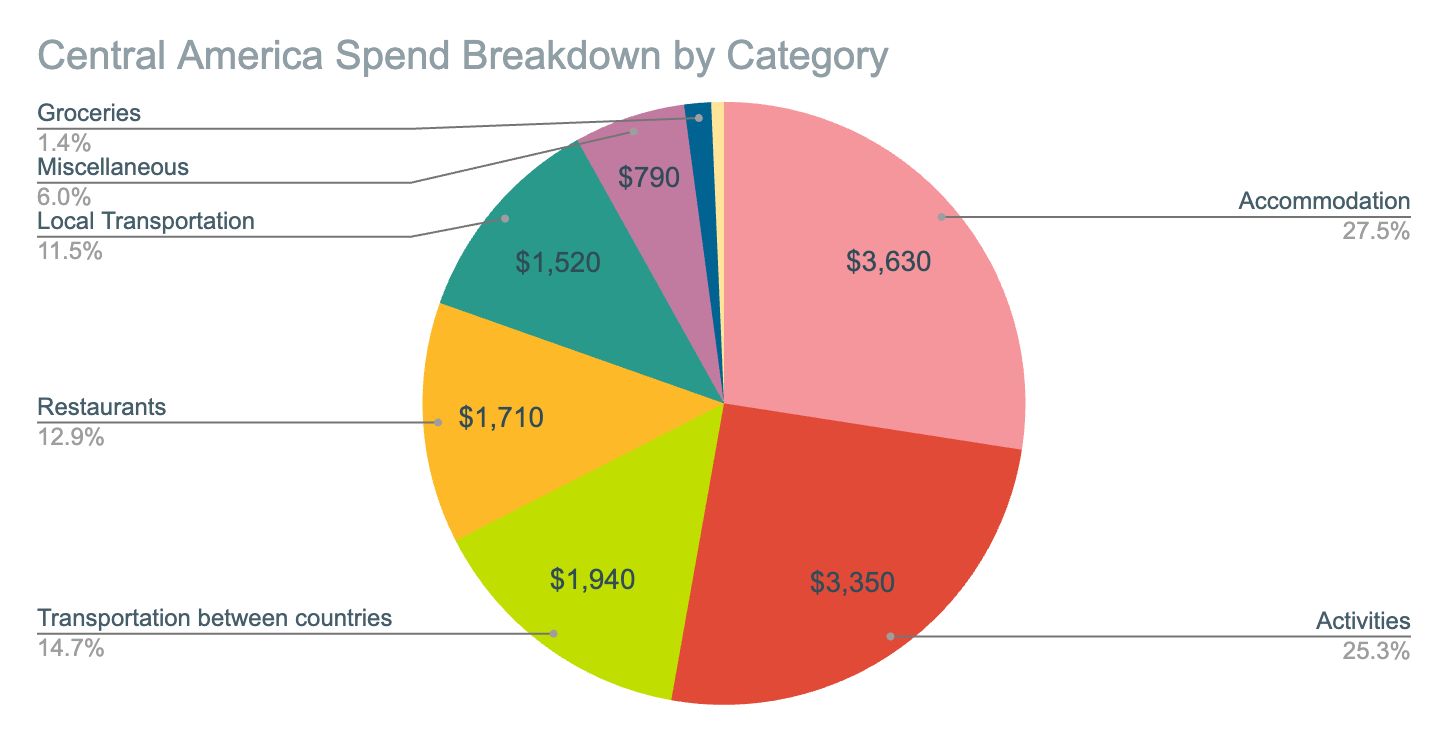
This shows a breakdown of the total spend by trip segment. Obviously Europe would be the most expensive since that was the longest segment of the trip by far (a total of 9 months spent there). Pre-trip expenses include: clothes, Workaway membership, initial flights, & electronics. Scuba diving really drove up costs in Central America.
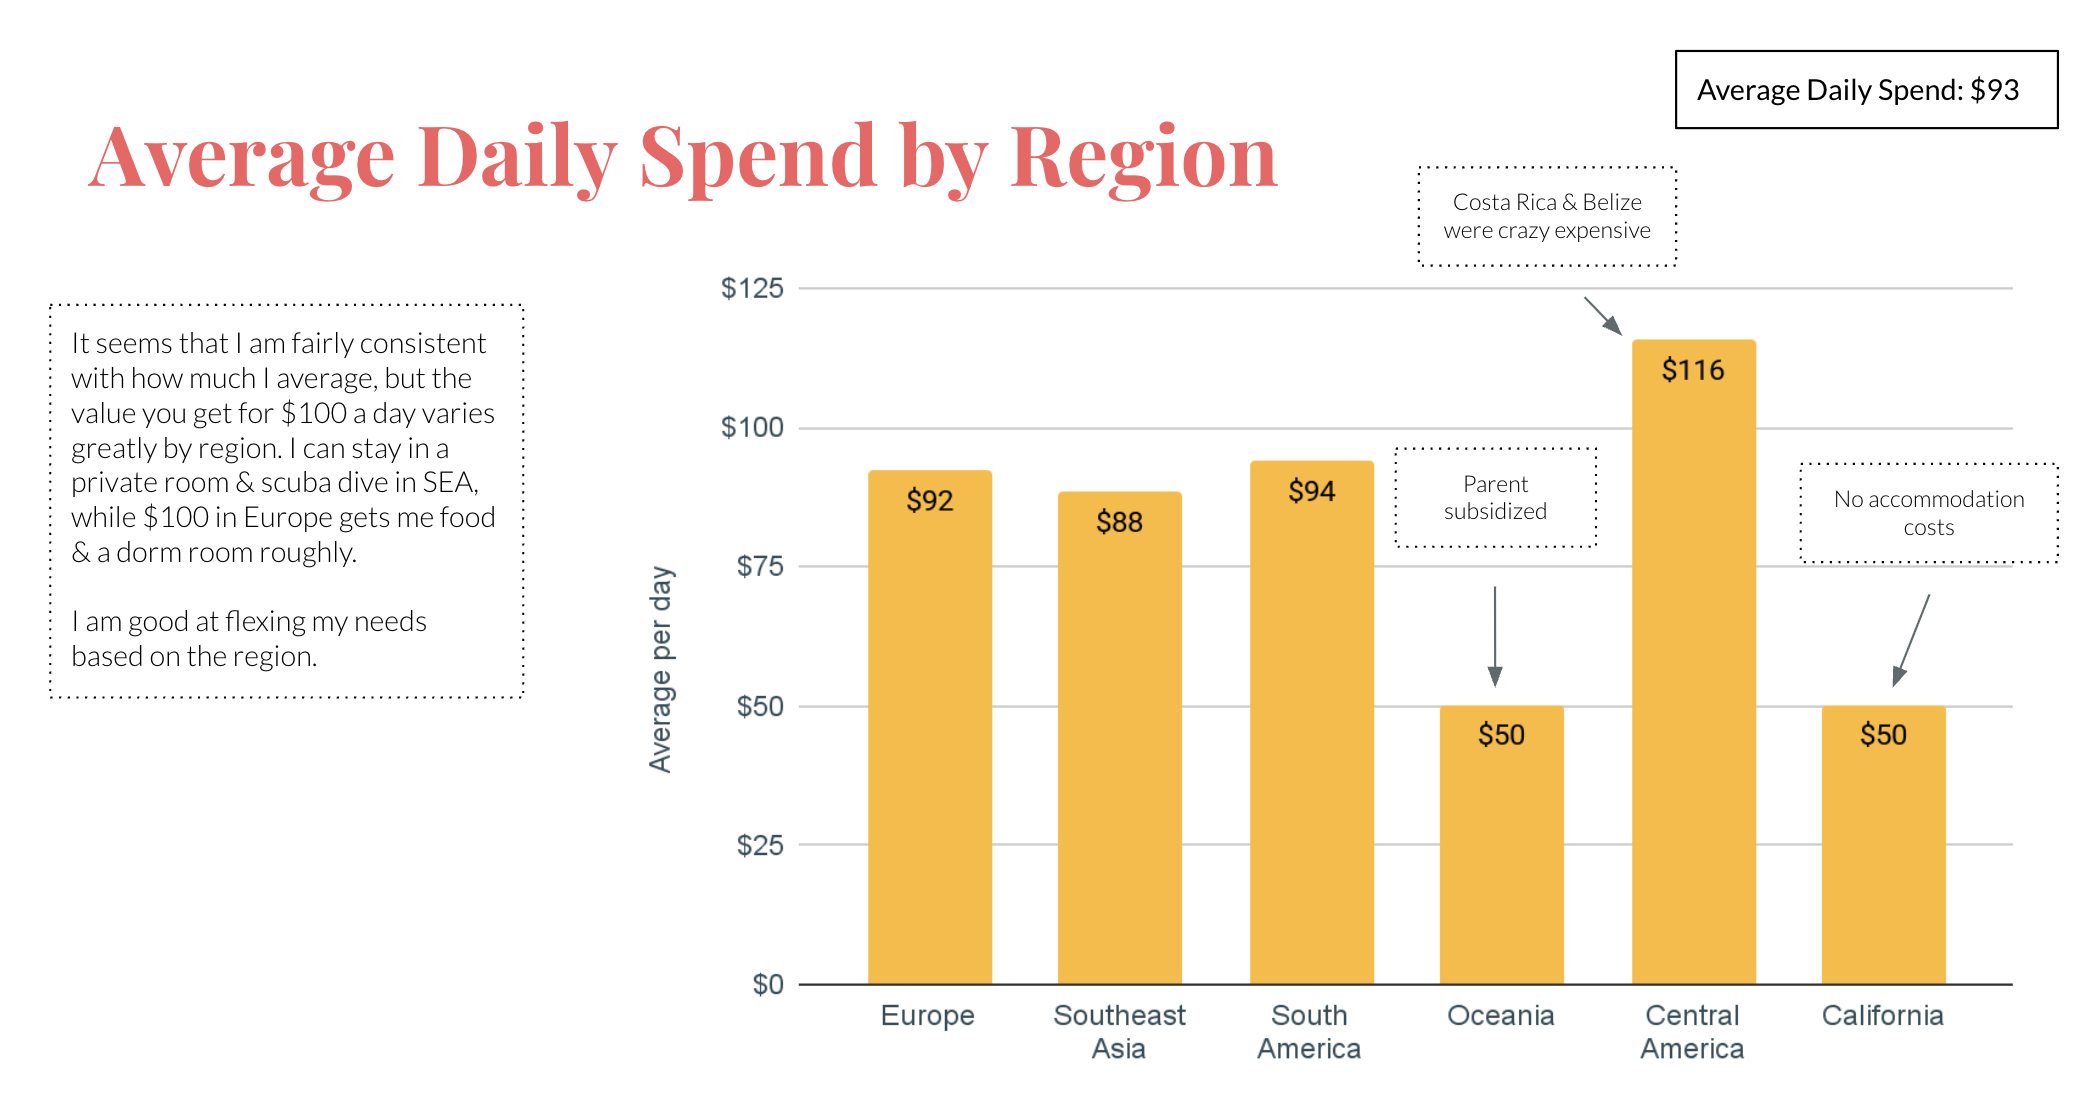
Average Daily Spend by Region
I was pleasantly surprised that I naturally (without too much oversight) maintained an average daily spend of less than $100, regardless of the region. Without scuba diving, Central America would have been far more affordable (perhaps the most affordable not including Oceania & CA, which are anomalies). If you are looking for bang for buck, it will be no surprise that Central America (outside of Costa Rica + Belize) & Southeast Asia would be my recommendations! You could also get great value in the northern parts of South America with Colombia, Bolivia & Peru.
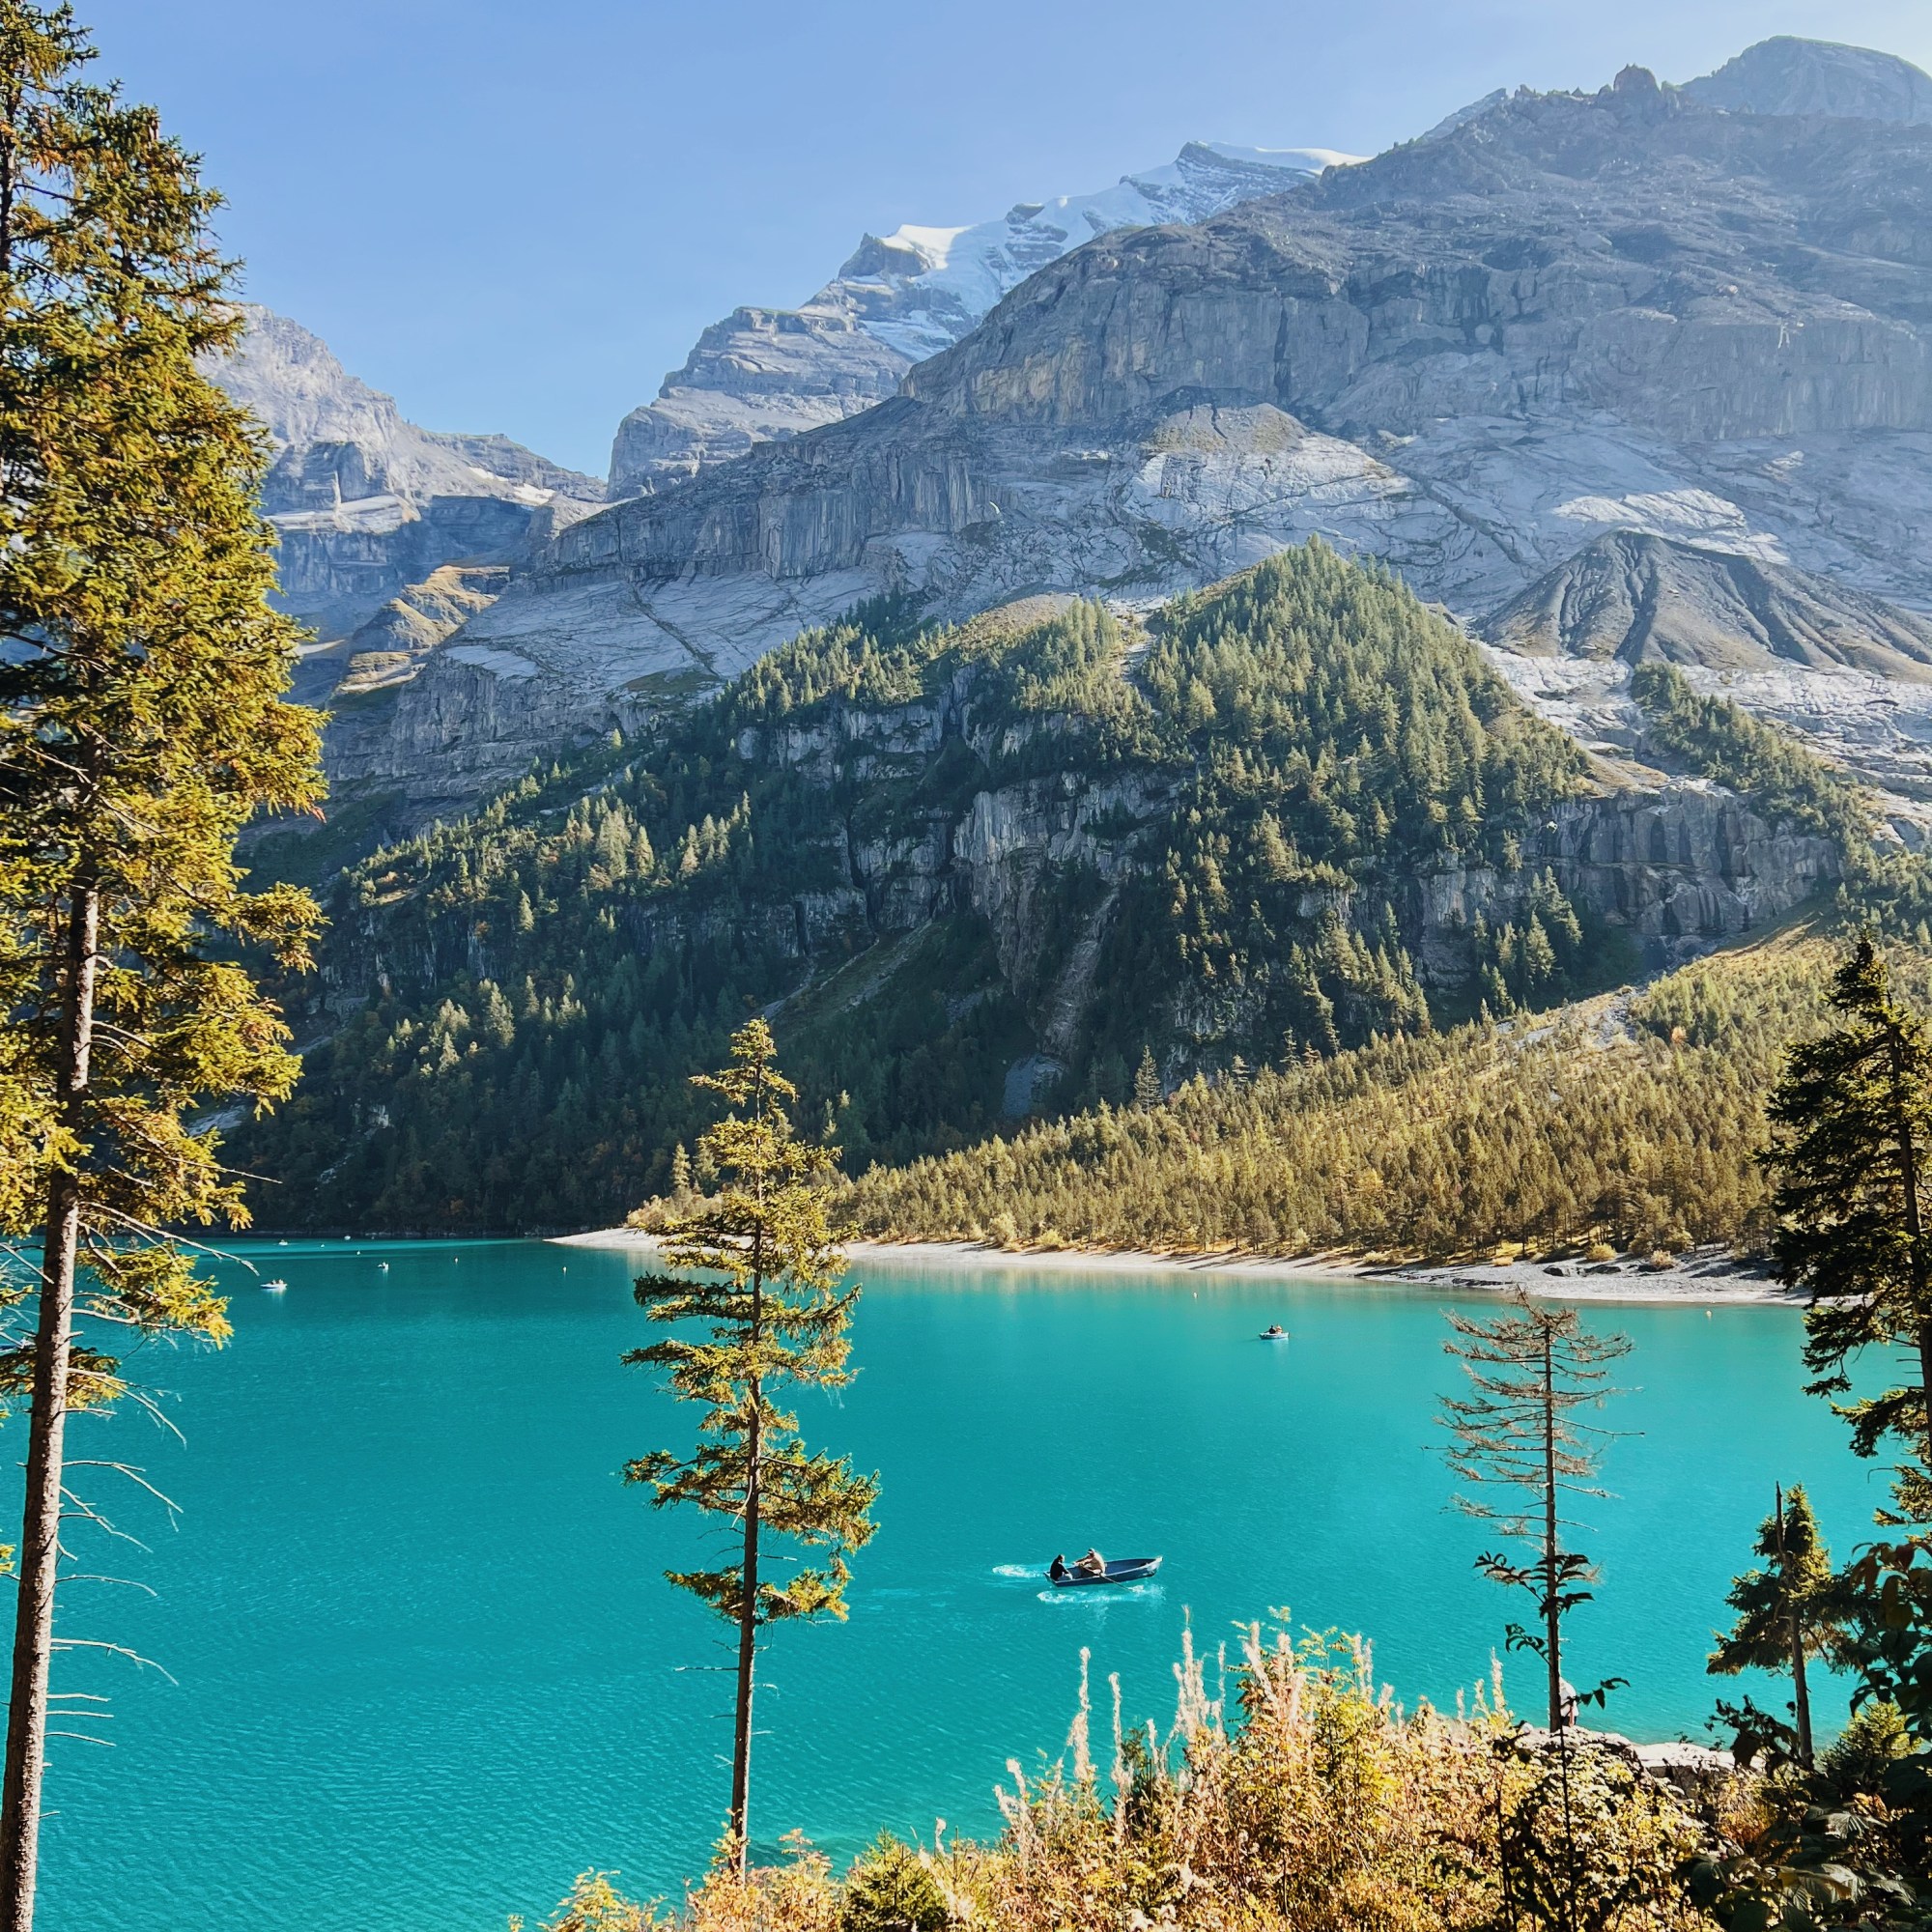
Outside of Antarctica, the countries that cost me the most per day were Liechtenstein, Switzerland & Belize.
The cheapest were Tunisia, Kosovo & Latvia.
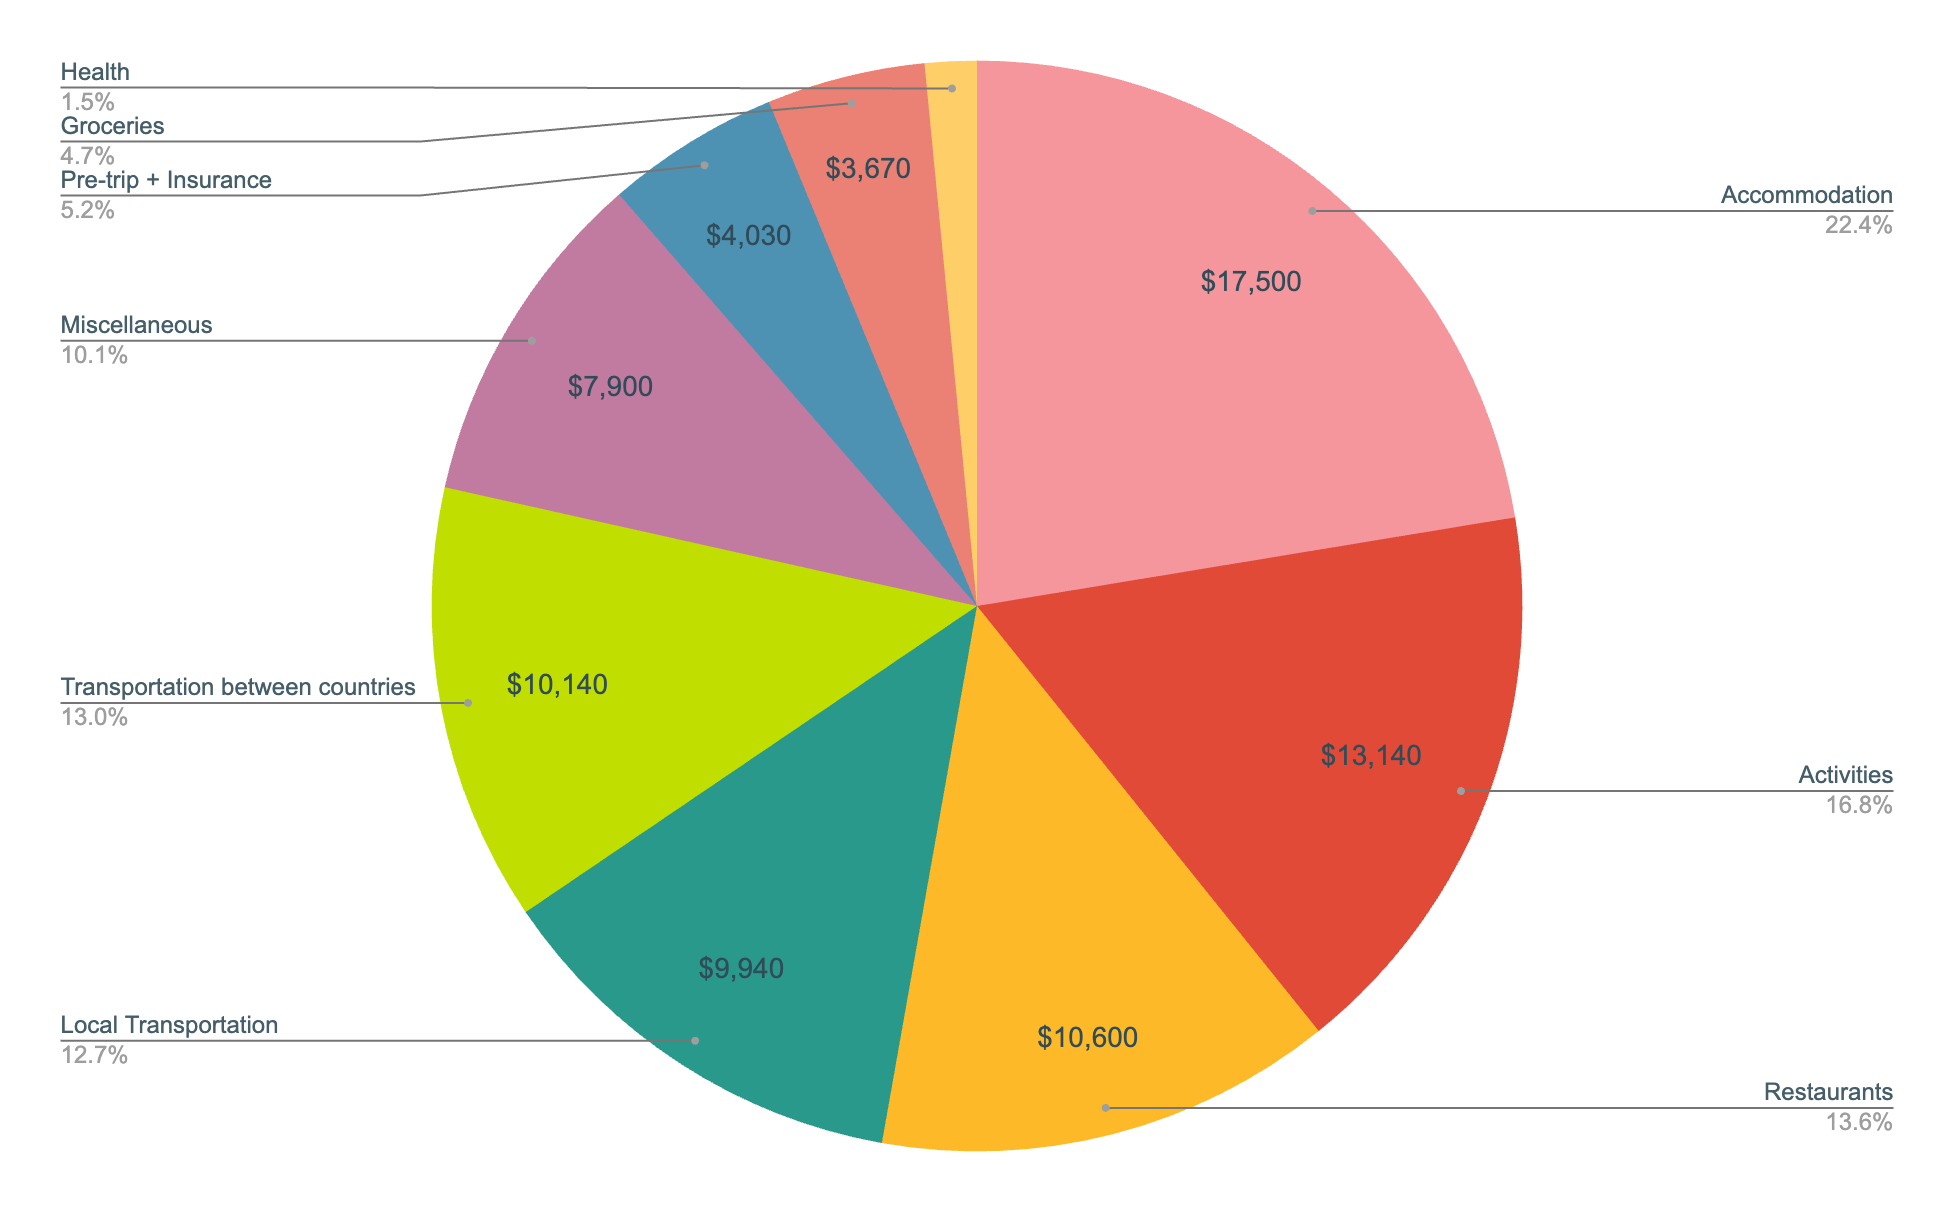
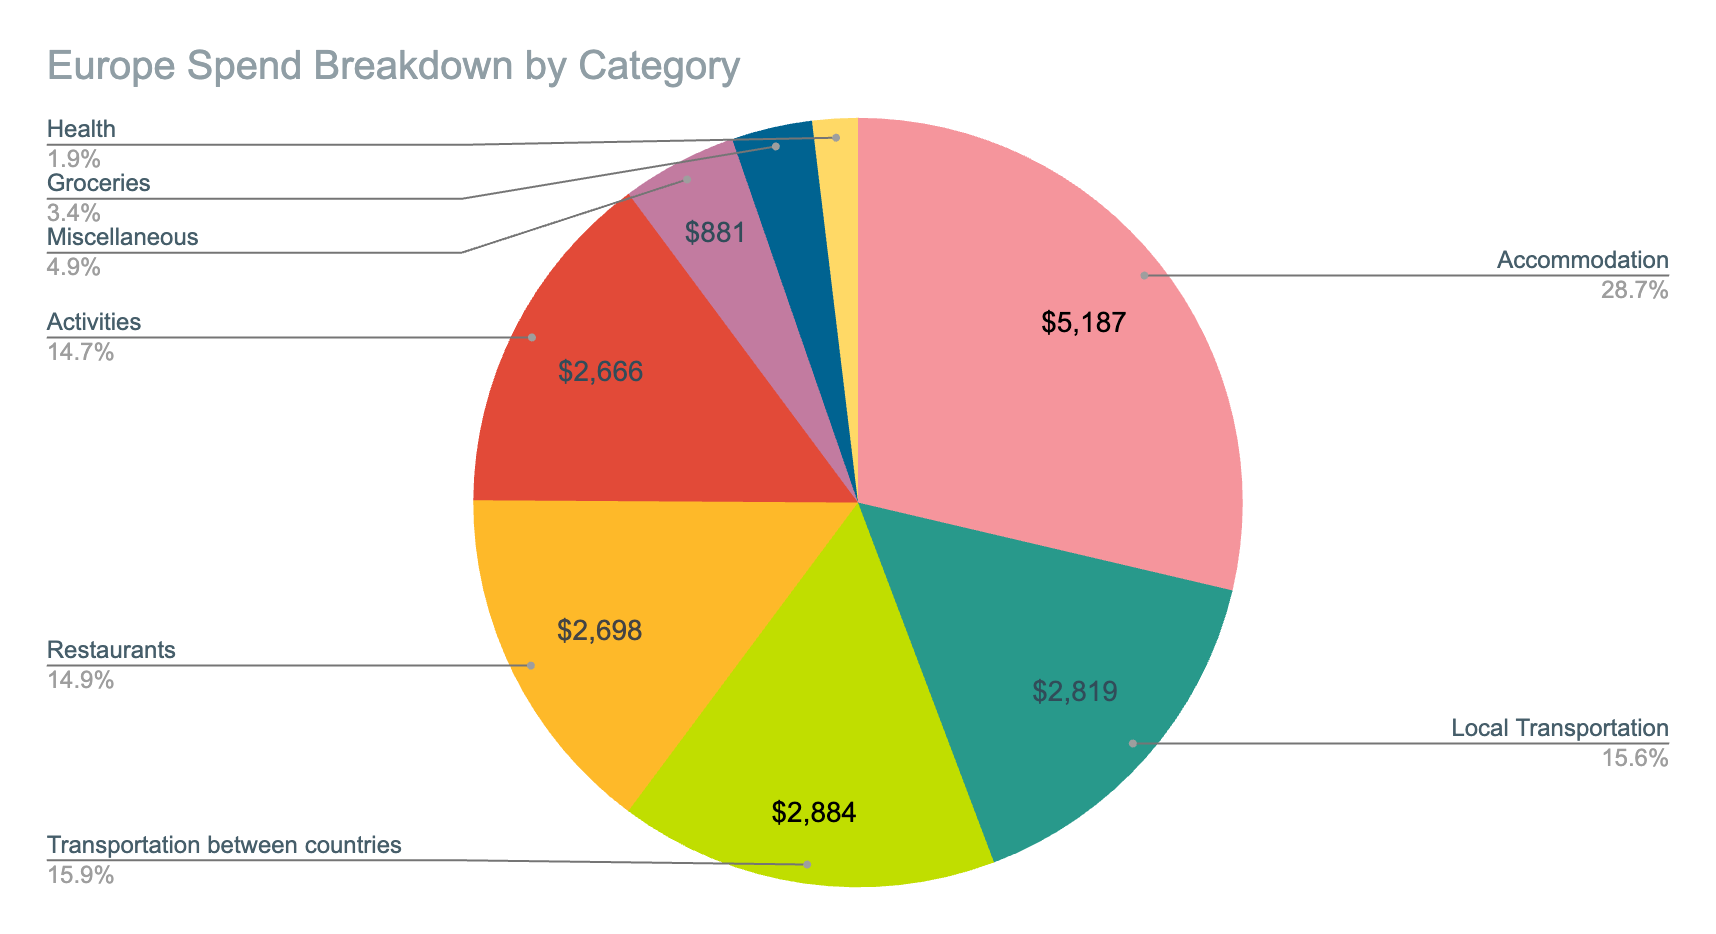
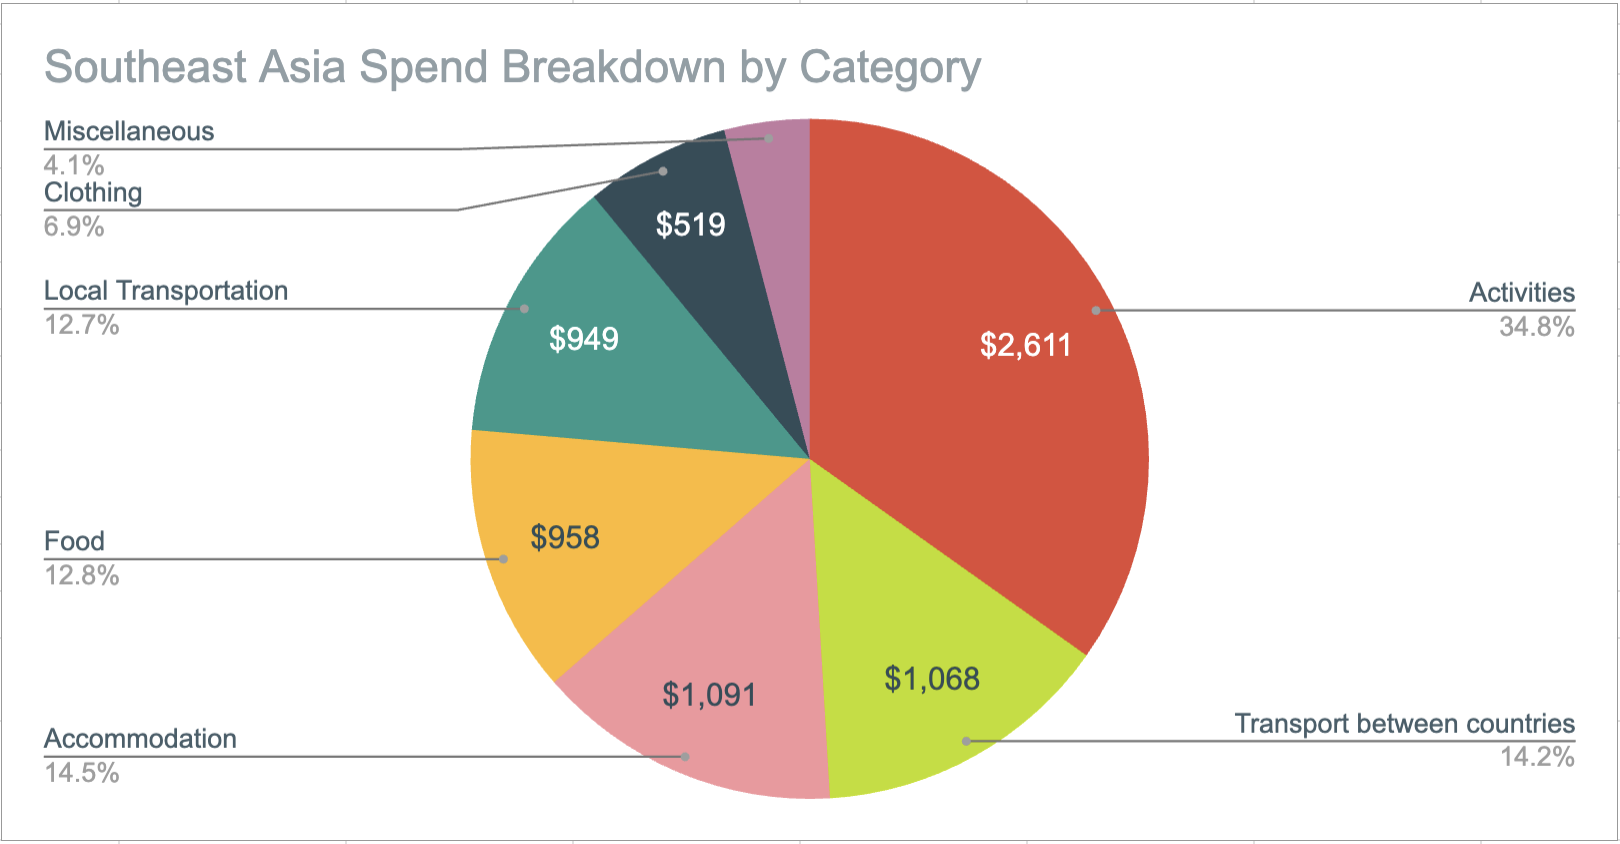
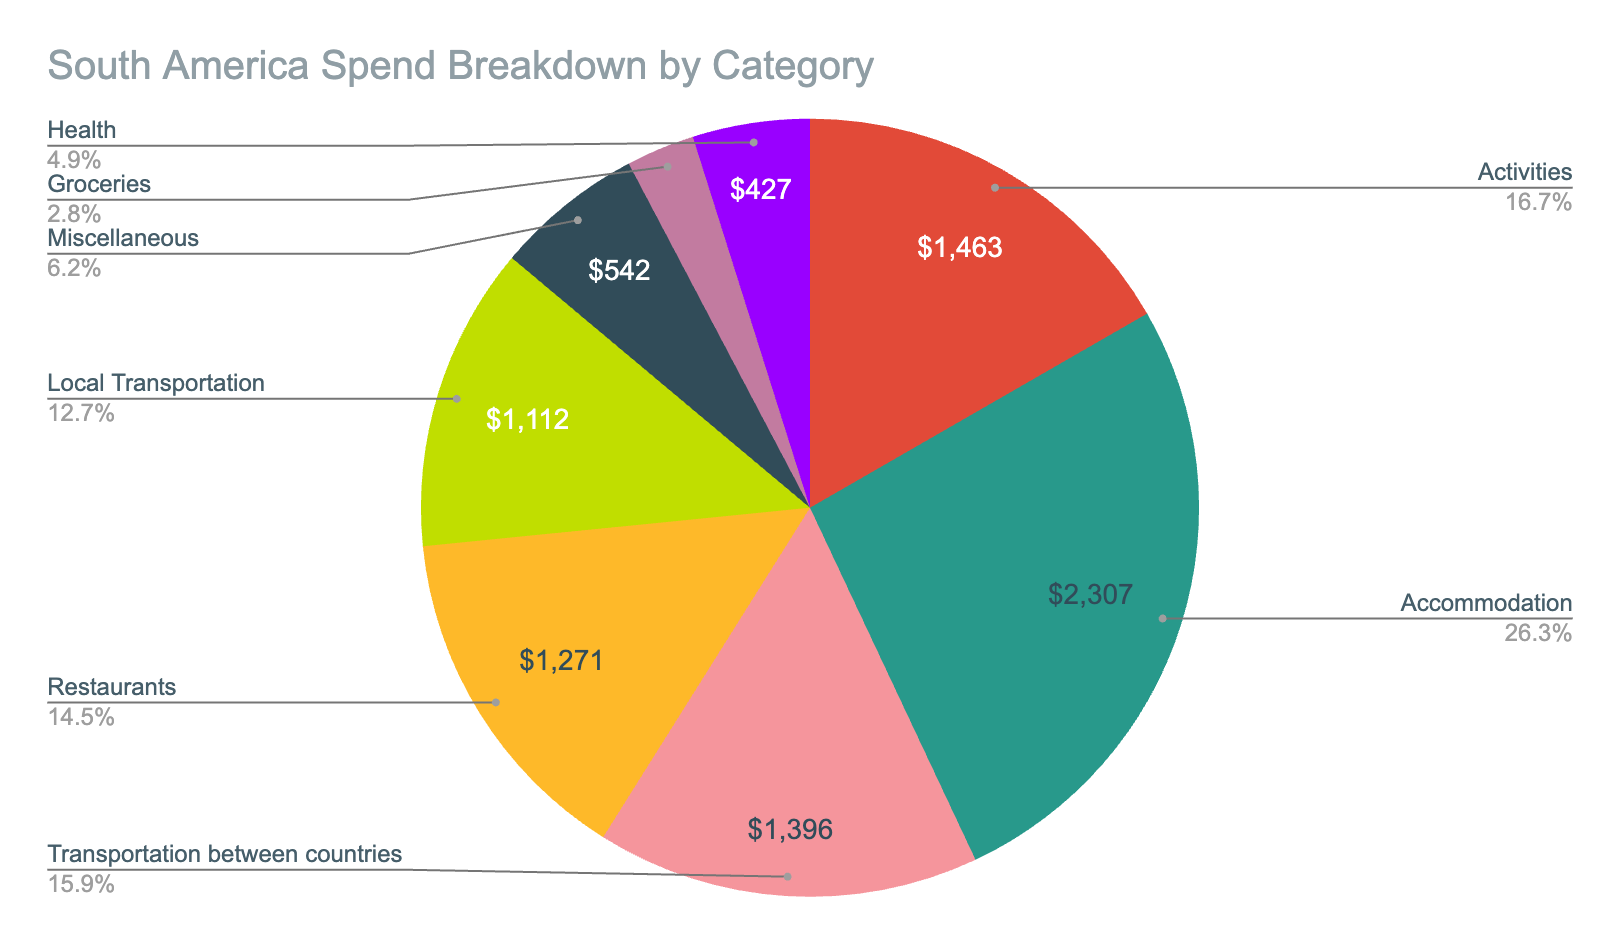
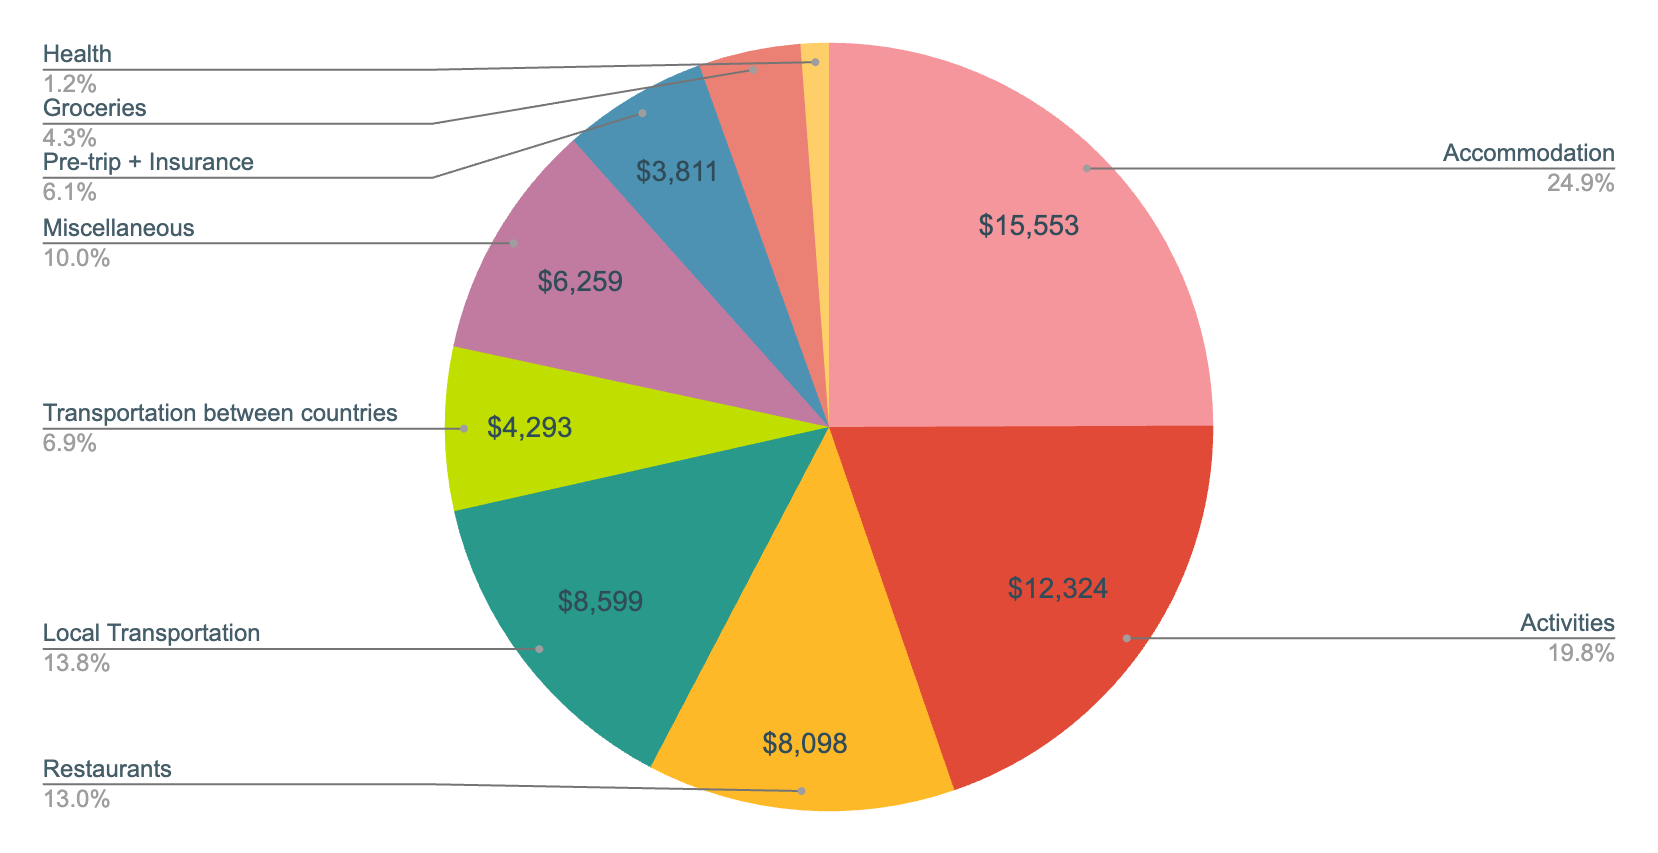
Spend by Category
This is a breakdown of how much I spent by category. As expected, accommodation is my largest spend, but I am actually proud of myself for spending so much on activities! I can be pretty stingy with spend so I love that I have said yes to so many experiences on this trip. A lot of them ended up in my top 5 memories of the trip 🙂 You’ll find the breakdown for the trip overall, as well as by region.
Europe (6 months): $18.1k
Southeast Asia (2 months): $7.5k
South America & Mexico (4.5 months): $14.5k
Central America (3.5 months): $13.2k
Europe + Western Asia (3.5 months): $9.9k
Top 5 experiences of the trip:
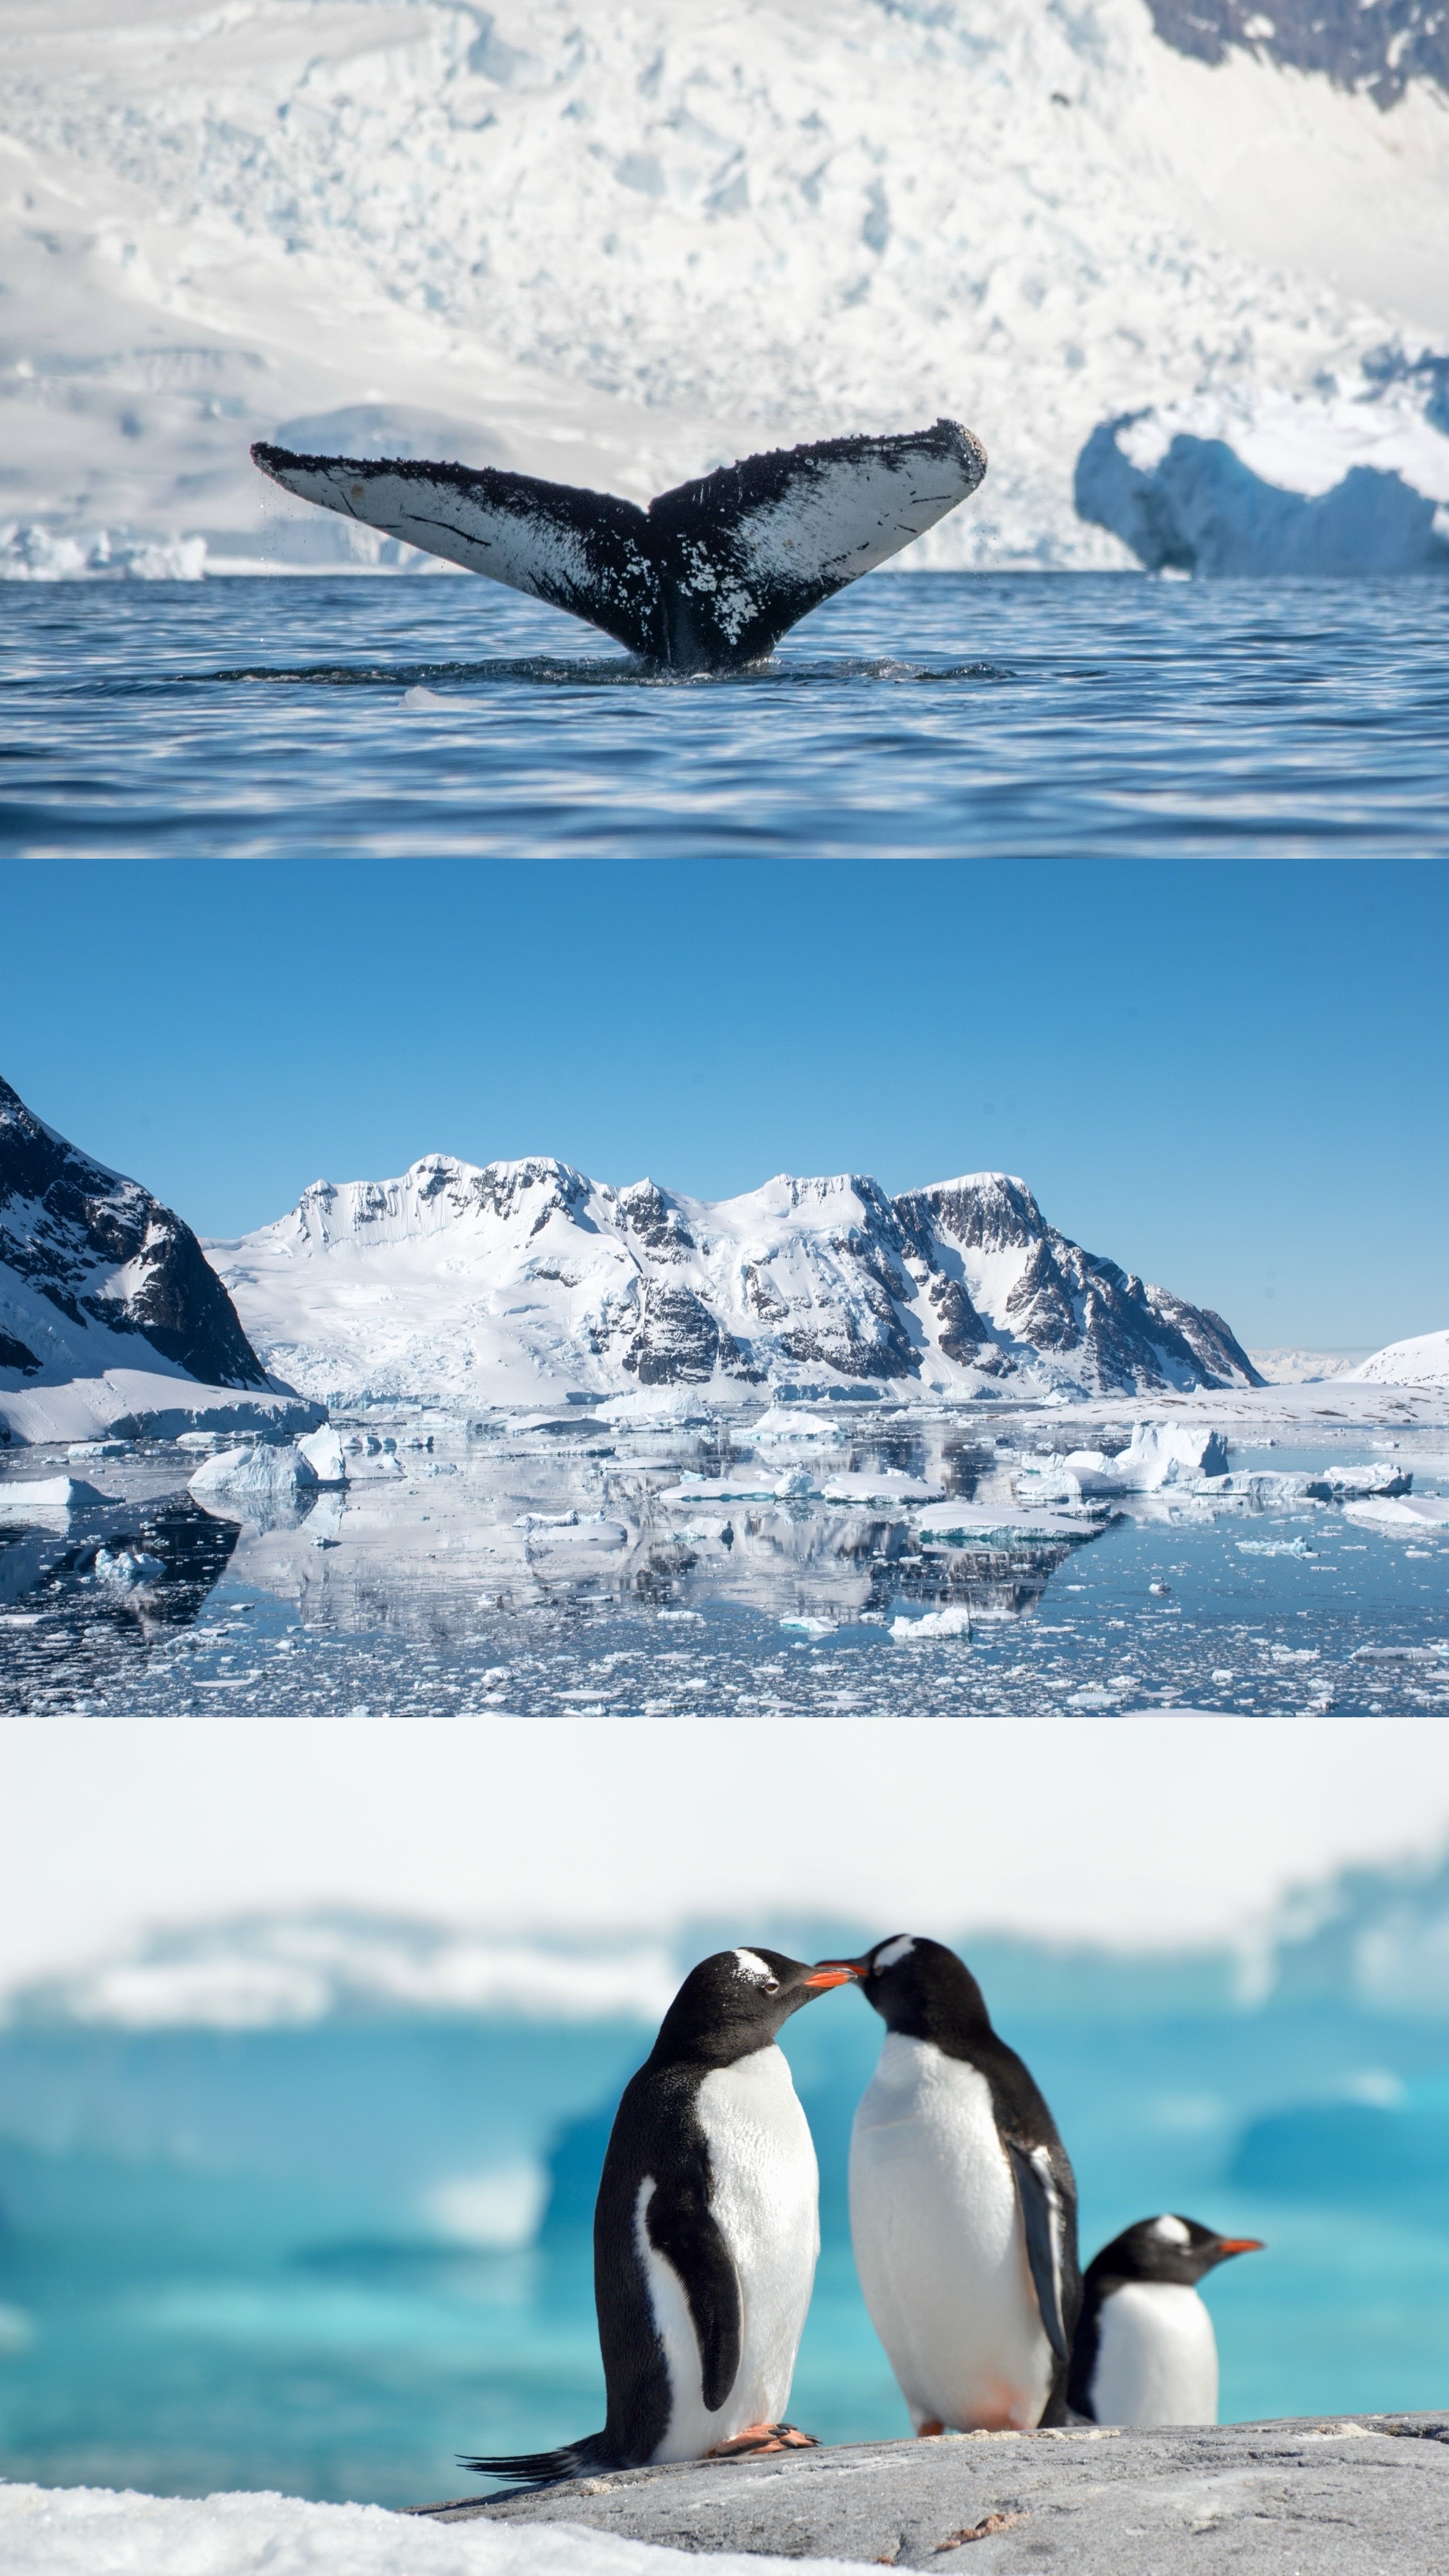
Antarctica ($$$$$)
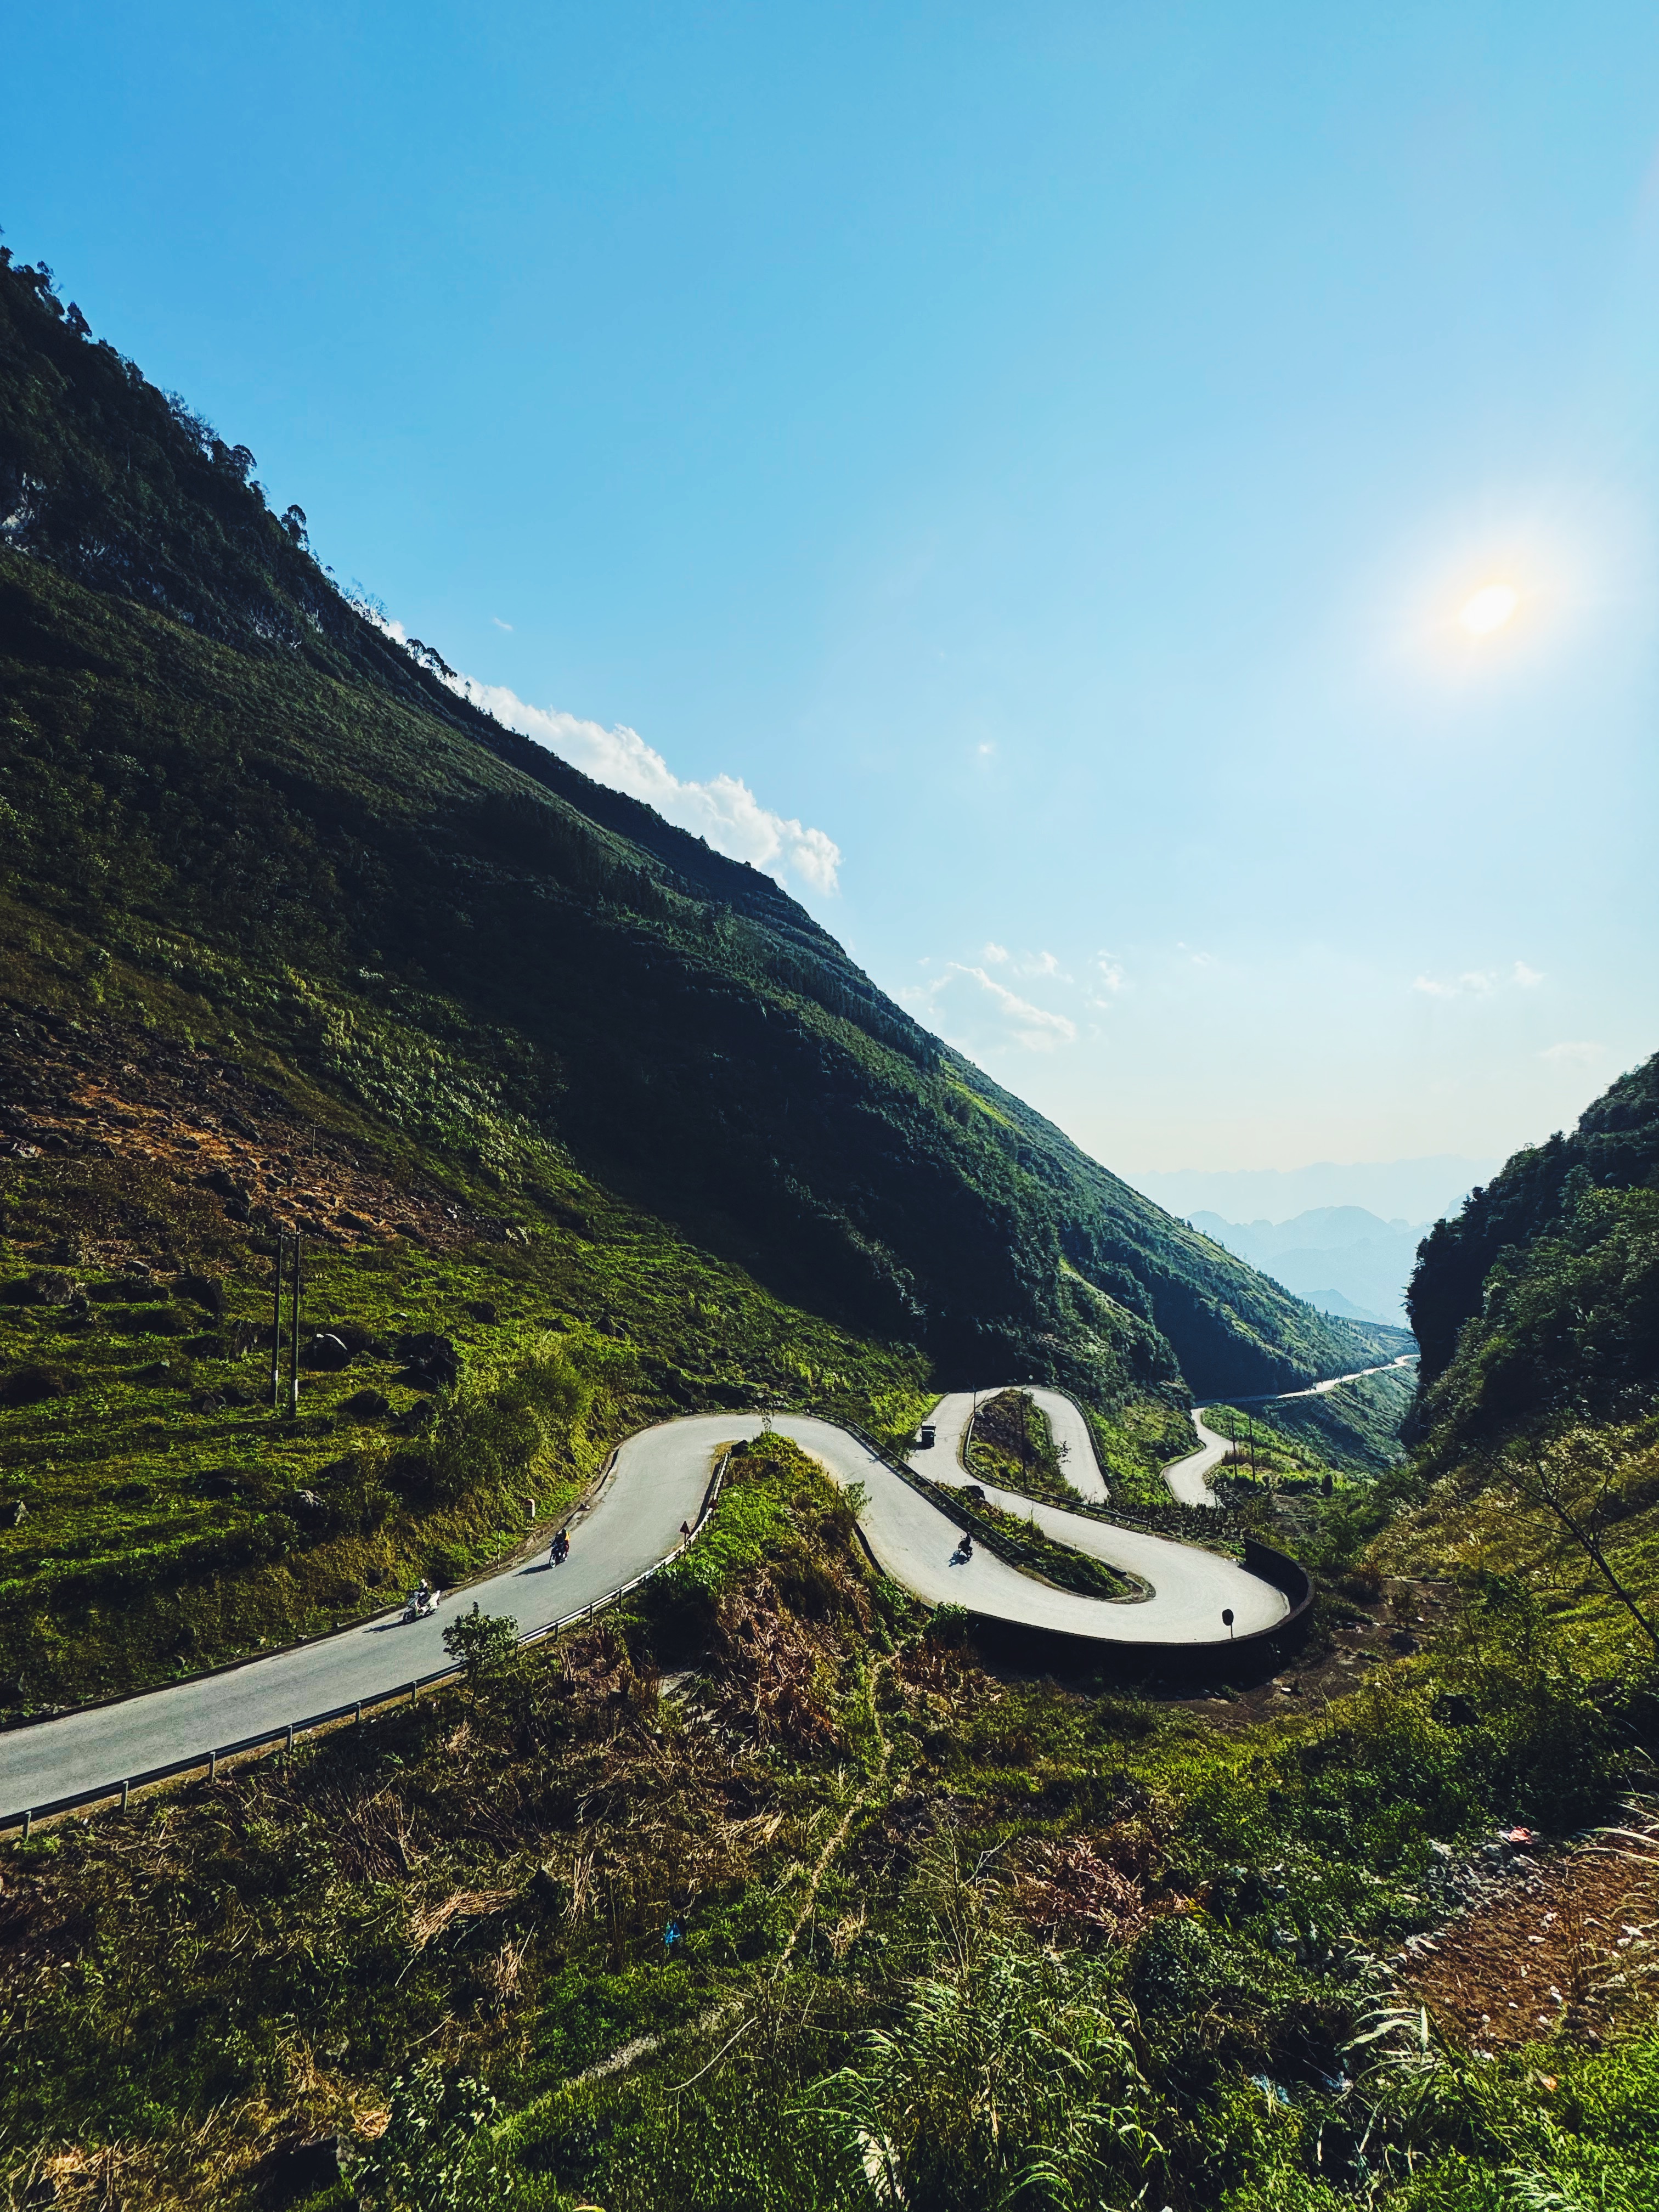
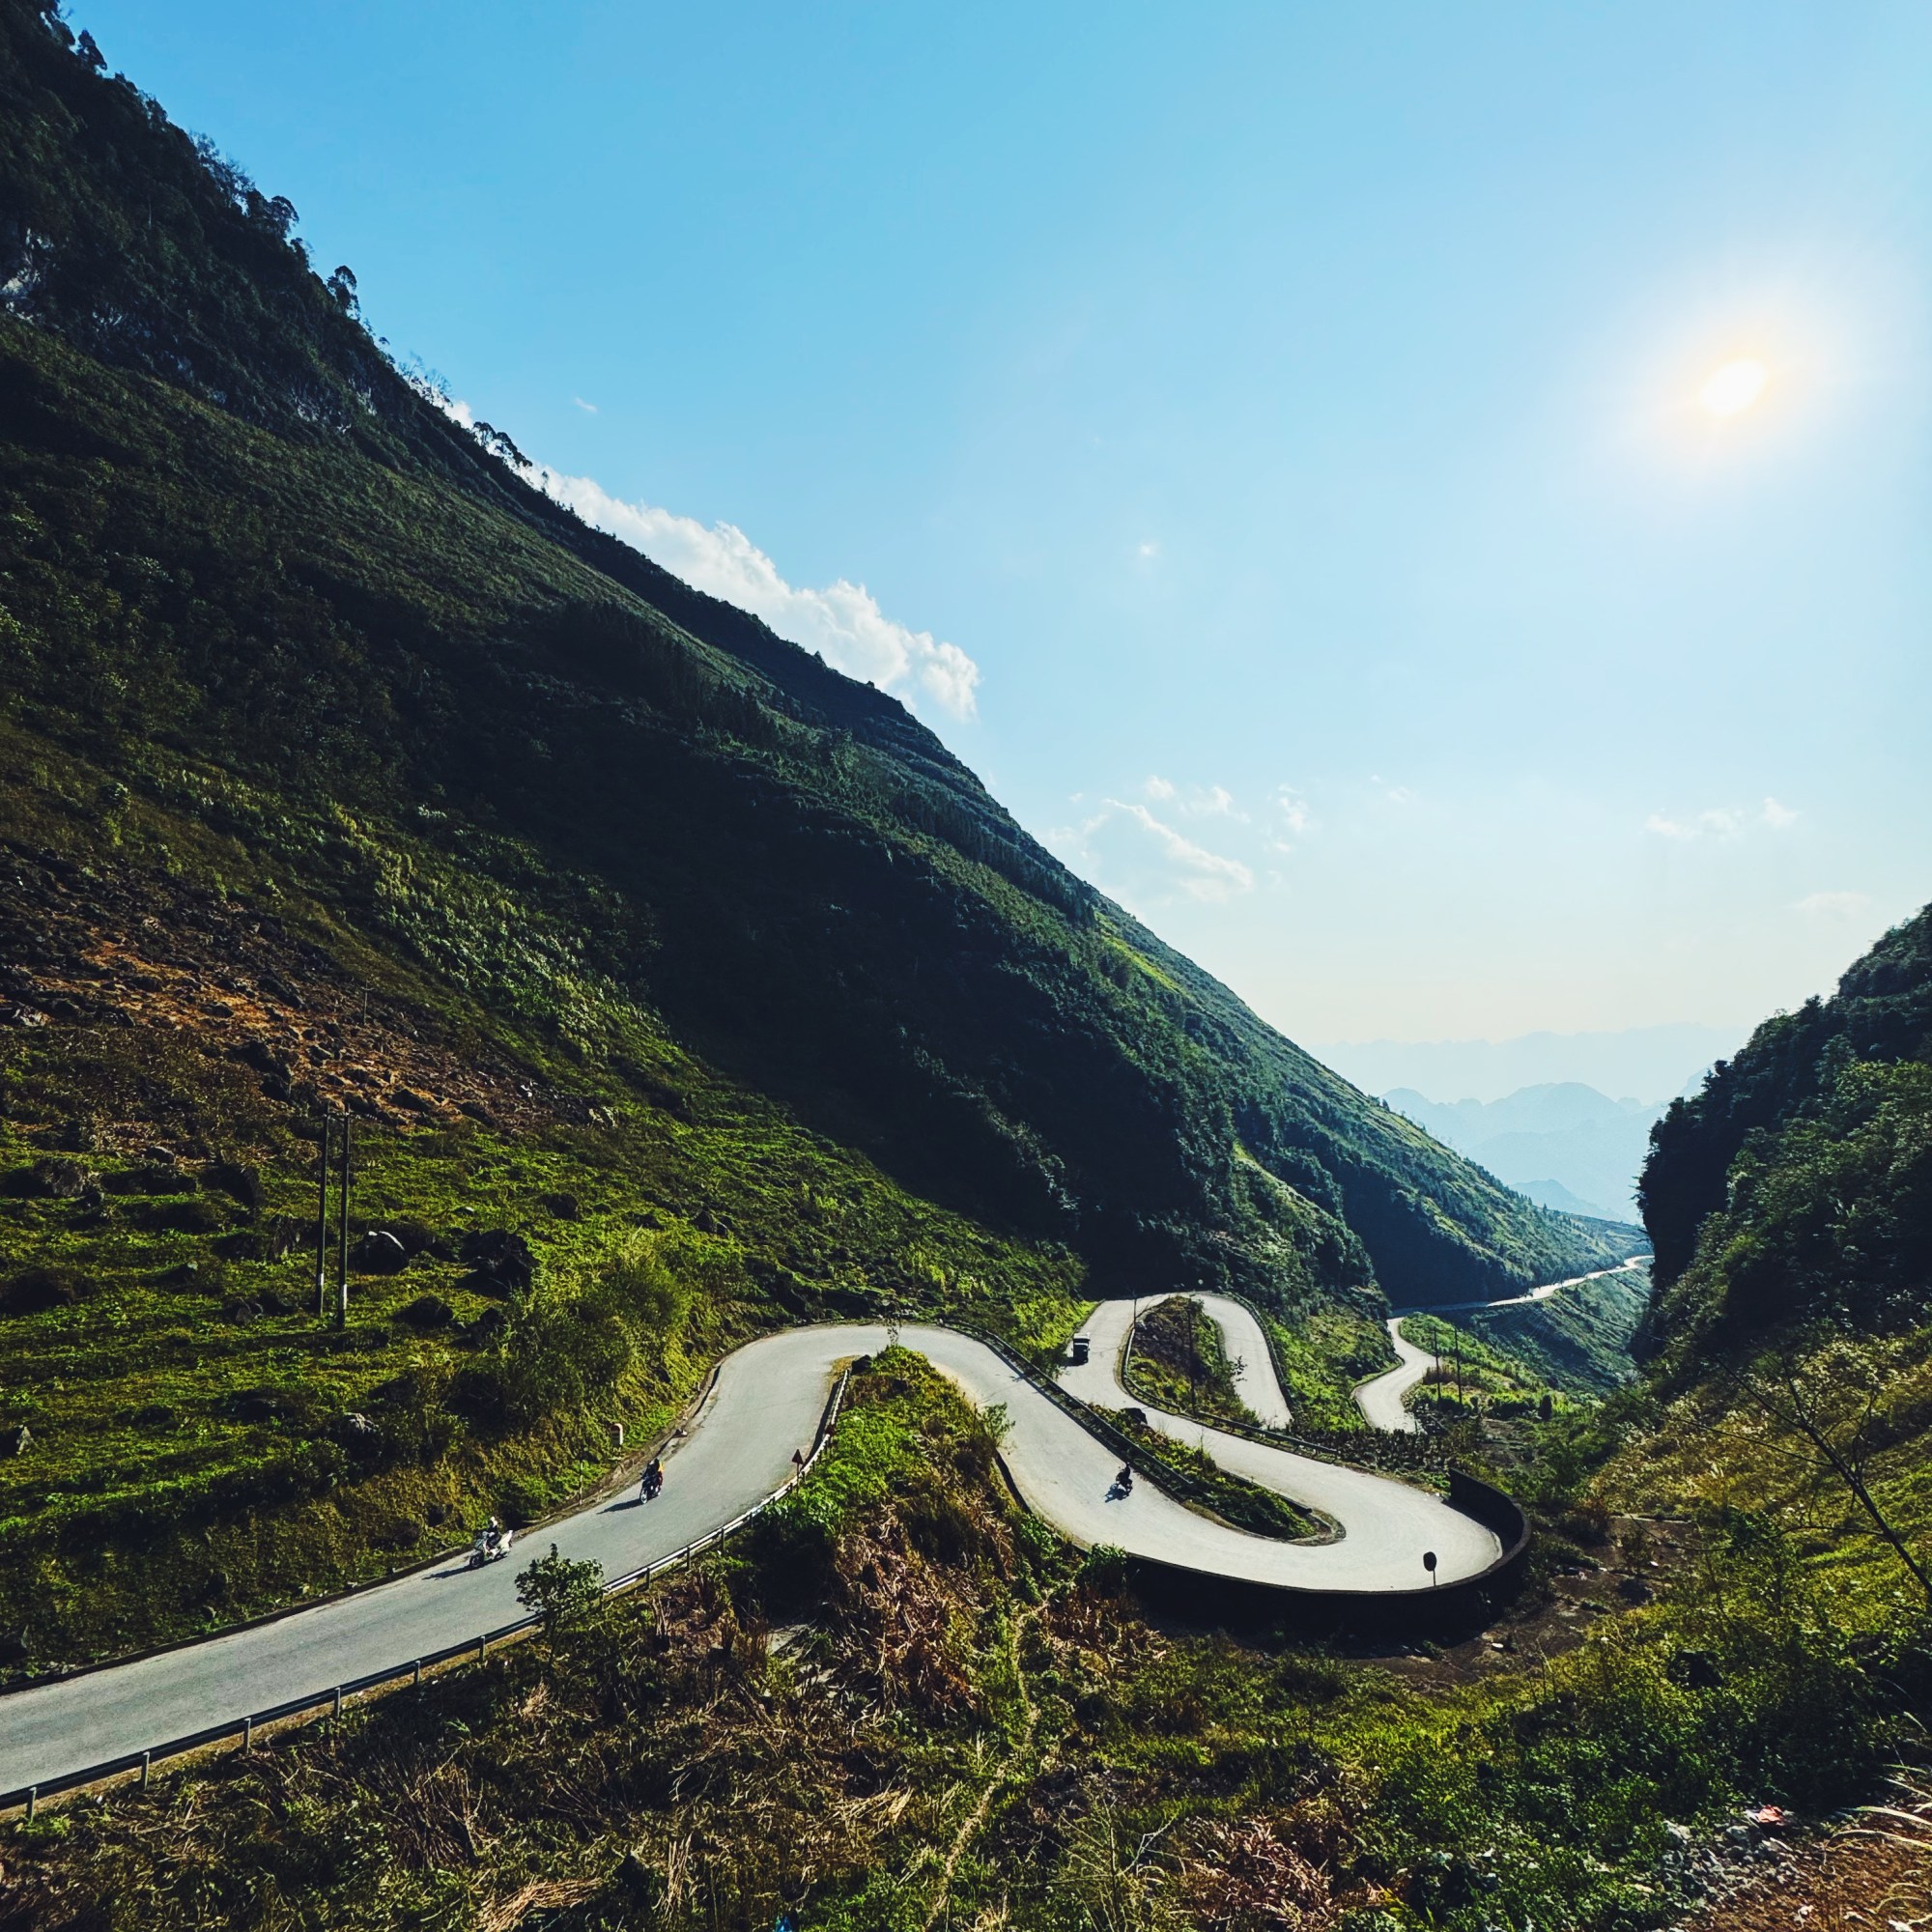
Riding Motorbikes through the Ha Giang Loop in Vietnam ($300)
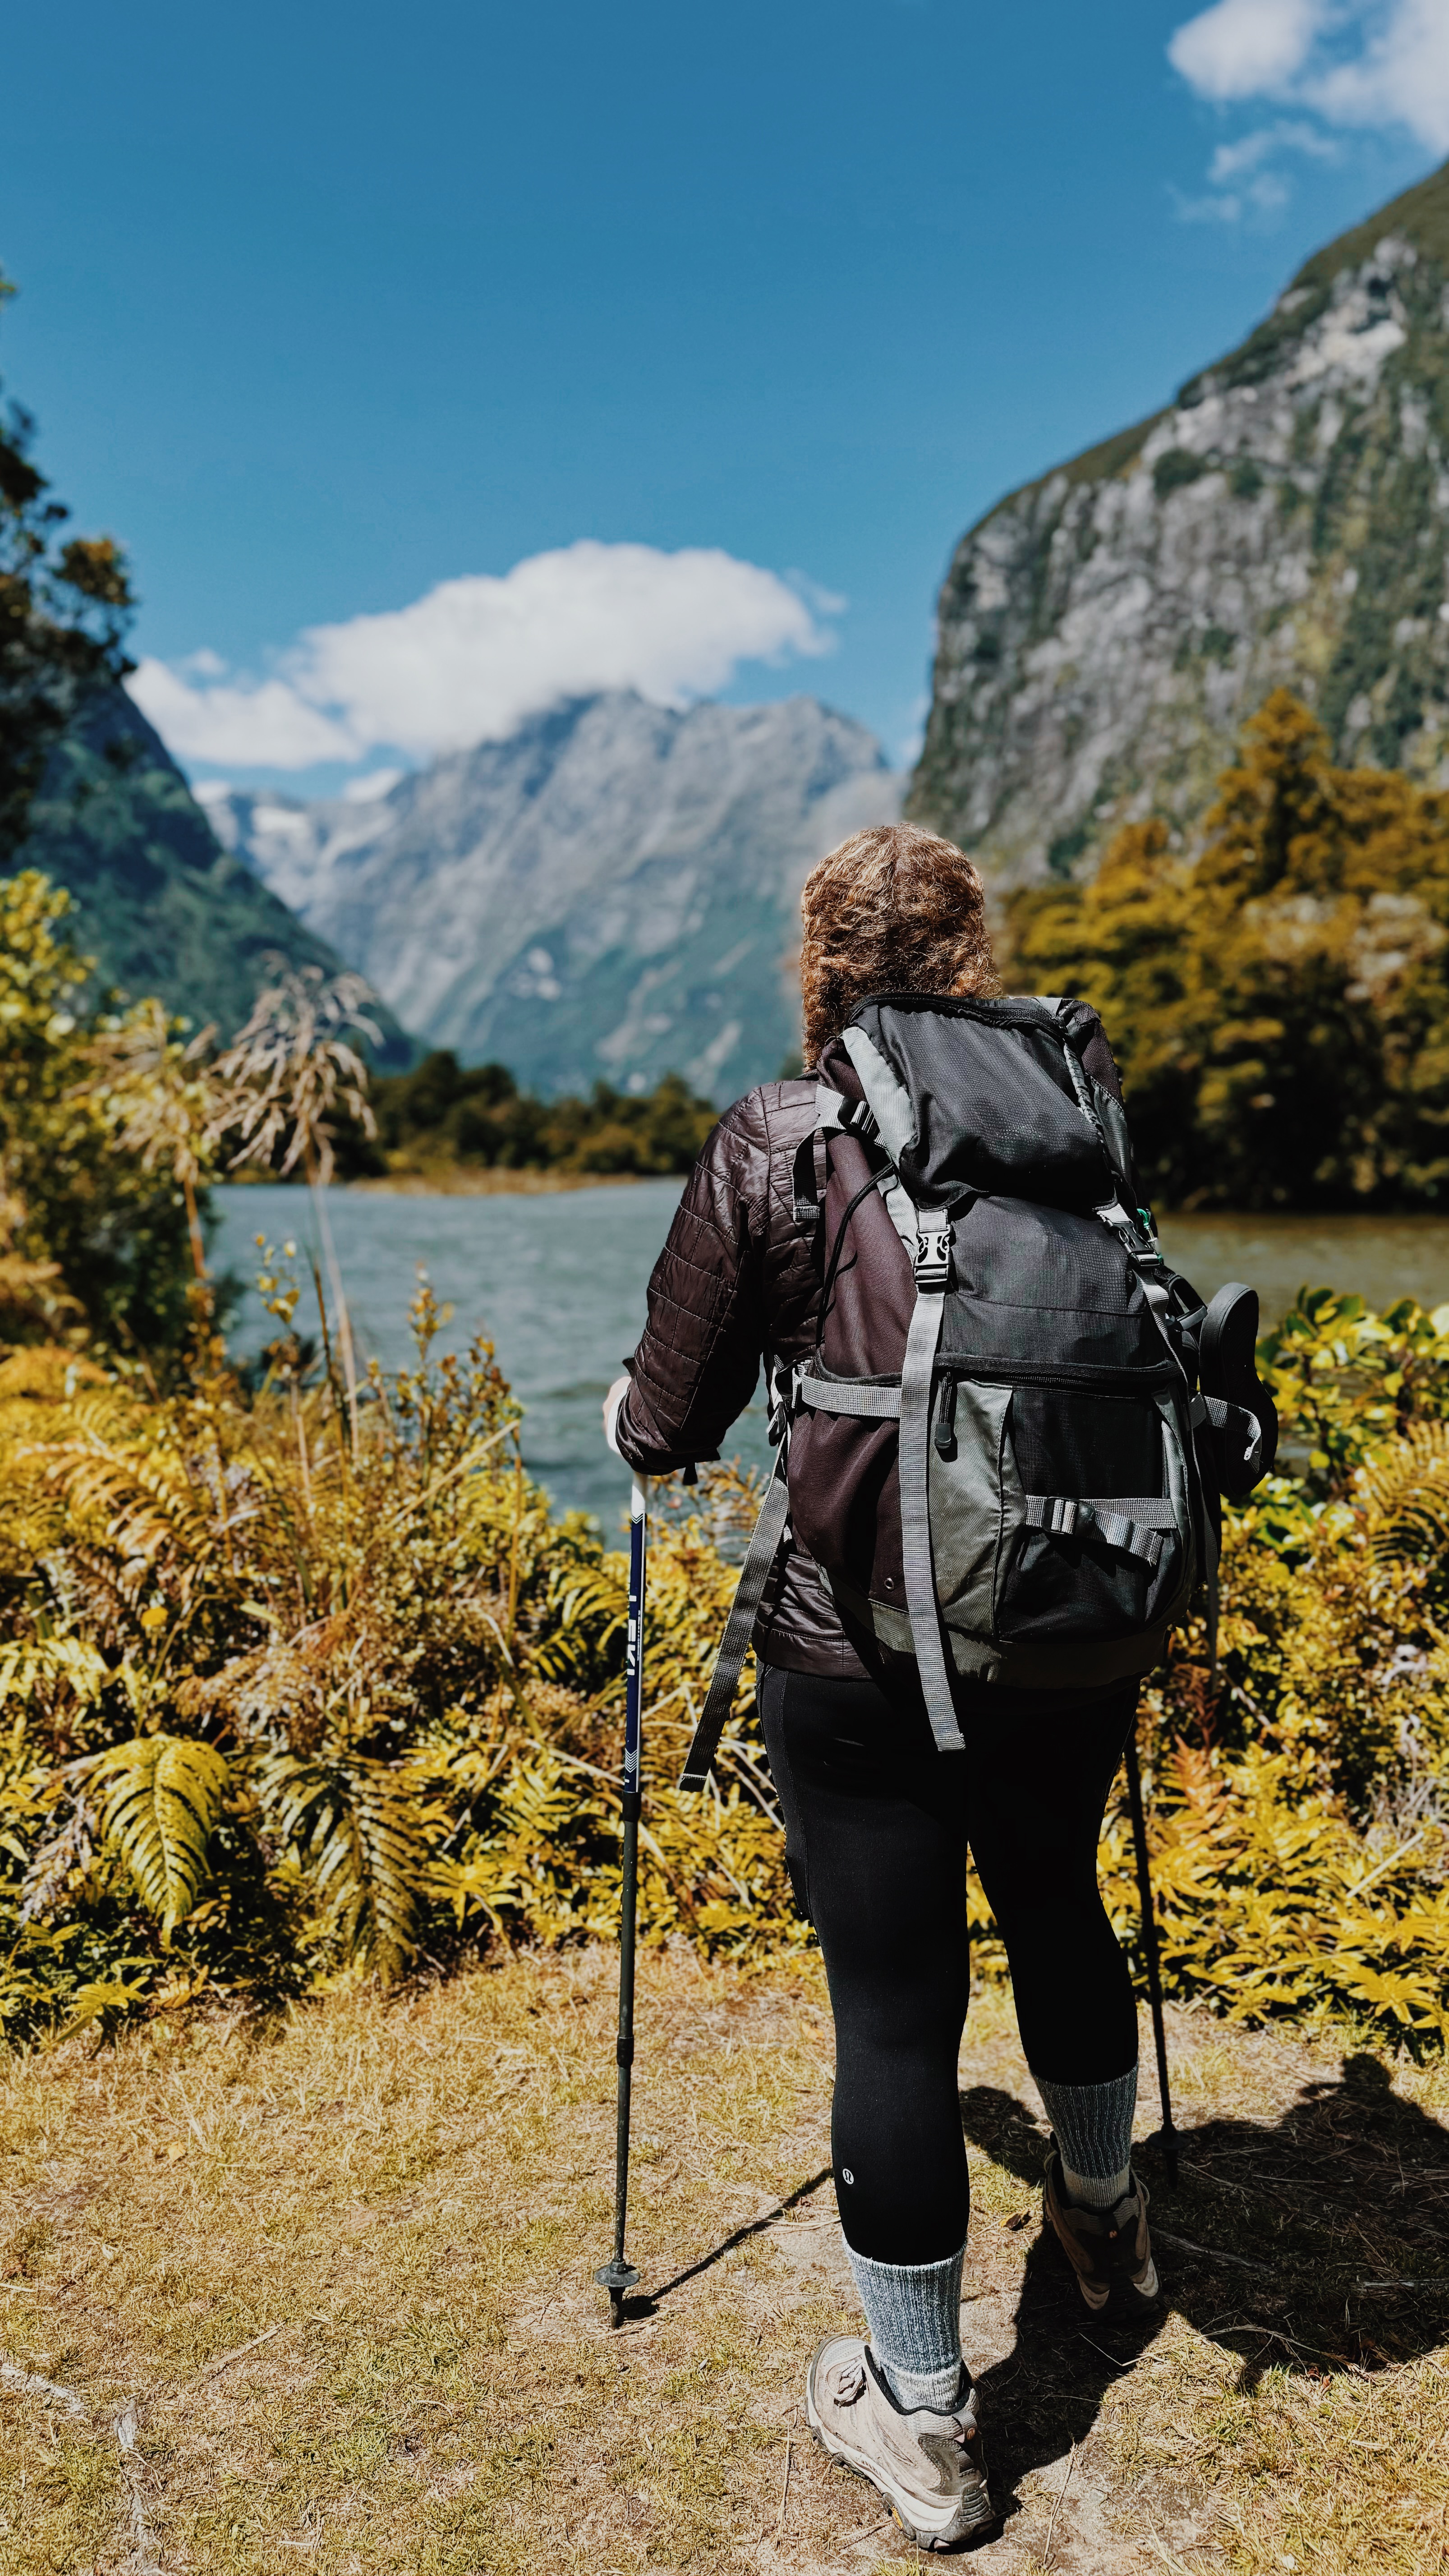
Hiking Milford Track in New Zealand ($2,045)
Climbing Acatenango in Guatemala ($105)
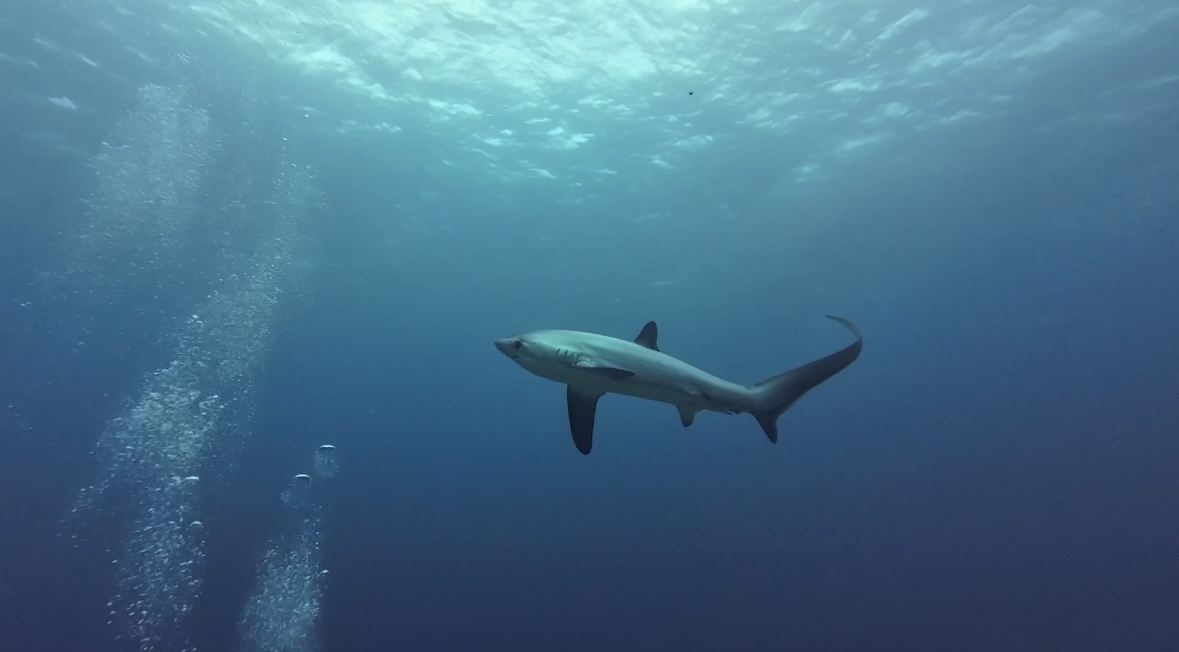
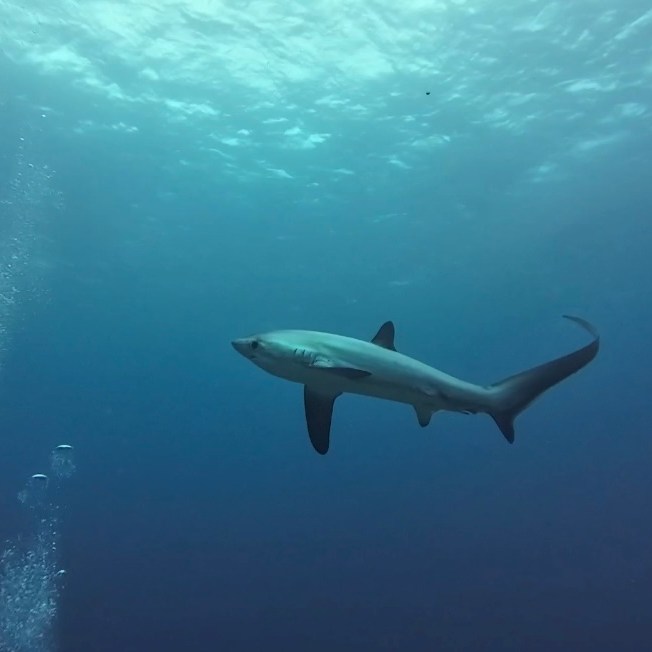
Scuba Diving with Thresher Sharks in the Philippines ($88)
Top tips for traveling cheaper:
Stay in dorms in hostels – you might sacrifice a bit on quality of sleep but in general the cost savings + meeting so many cool people makes this a great resource for traveling on the cheap.
You’ll notice I spent almost $11k on eating out. If you are staying in airbnbs or hostels with kitchens (more common in Europe, NZ & Australia), buy groceries!
Travel slower. As I mentioned, you’ll save a lot on accommodation costs if you can book a month long airbnb rather than hotels/hostels for a few nights at a time. This also will bring down your transportation costs.
Fly less! Unfortunately I did a lot of flying. I would have saved a ton of money if I did more bus/train travel.
Only take a carryon backpack. You’ll save on baggage fees every time you do have to fly.
Use credit card points to book flights.
Consider doing WOOFING or Workaway to save money in exchange for working a few hours a week (usually ~20).
Make friends on the road and then go visit them in their hometowns. It’s the best way to experience a place in a (usually) non-touristy place & you save money on accommodation: it’s a win-win!
Bonus section:
Since I track so many things beyond just expenses, here are some other fun facts from the trip!
Took 117 flights
Visited 201 cities in 54 countries
Spent $1950 on massages (avg per hour cost: $31) in 27 countries
Went scuba diving 37 times in 8 countries across 4 continents (North America, South America, Oceania & Asia)
Sent 274 postcards in 38 batches (Grandpa was #1 recipient)
Country visited the most times: England (9 unique visits). I spent 67 nights in England and spent $0 on accommodation thanks to all my friends there 🙂
18 land border crossings (mostly in Central America & Asia)
Well that’s the final cost breakdown of this epic trip around the world!! I hope this was helpful and as always, feel free to ask me any questions!
Time. Is. Flying. I have now completed 2 years on the road! Since I track every dollar I spend while traveling, I thought it would be helpful to publish an updated report of how much this trip has cost me! See here for the original post of my 1 Year trip Cost Summary. Also if you are considering doing a big trip, check out my best tips for planning an epic adventure here.
Some considerations:
This is only for one person (me)
I travel fairly cheaply (mostly staying in hostels) & in general don’t have expensive taste in food or transportation, but I also am saying yes to any experiences that I want to say yes to & not staying in the cheapest hostel.
I am traveling fairly quickly so taking lots of flights + moving locations every 3-5 days usually. It’s much cheaper to travel slower.
I am not traveling in a super logical route. For example, while in Europe I went to England, then Northern Ireland, then France, then England, then Switzerland, then England, then Ireland… I was meeting up with different friends at different points so while it wasn’t logical, it made sense for what I was doing. Or how about when I flew to Australia in the middle of my 3 months in Central America for a wedding? This is definitely an area that one can make cheaper if they don’t travel in circles like I did haha
I am flying home to California quite often for Christmas, my 30th birthday, and for some weddings. Again this is driving up some inefficiencies.
I have spent both summers at home in CA (a total of about 5 months between the two summers). This has actually saved me some money as I don’t pay for accommodation while I am home (thanks Mom + Dad!)
Here’s the trip summary leaving in June 2023, covering 42 countries across all 7 continents:
6 months in Europe + Egypt – 19 countries
1 month Fiji & New Zealand with my family – 2 countries
3 months Southeast Asia + Japan – 6 countries
6 months Mexico + South America + Antarctica- 6 countries
1 month Australia + Vanuatu with my family – 2 countries
3.5 months in Central America – 7 countries
Here’s how many days I spent on each continent in my two years of travel:
In full transparency, my parents kindly paid for Fiji, NZ, Australia, & Japan since I was with them for those four countries (very, very lucky!!) so this analysis will cover roughly 21 months (as the aforementioned countries were essentially free). This does include any spend I had while in CA, which is usually cheaper than traveling as I have no accommodation costs while at home.
Also on this trip, I have tried to add what I spent in each country to its dedicated blog post so hopefully that’s helpful. For example: scroll to the bottom of this blog post to see how much I spent for 3 weeks in the Philippines!
One last caveat – I did not include my costs for going to Antarctica because I got a deal through Freestyle Adventure Travel & signed an agreement that I wouldn’t share what I spent. Check them out if you are ever interested in exploring the one of the coolest (pun intended) places I’ve been.
Here we go…
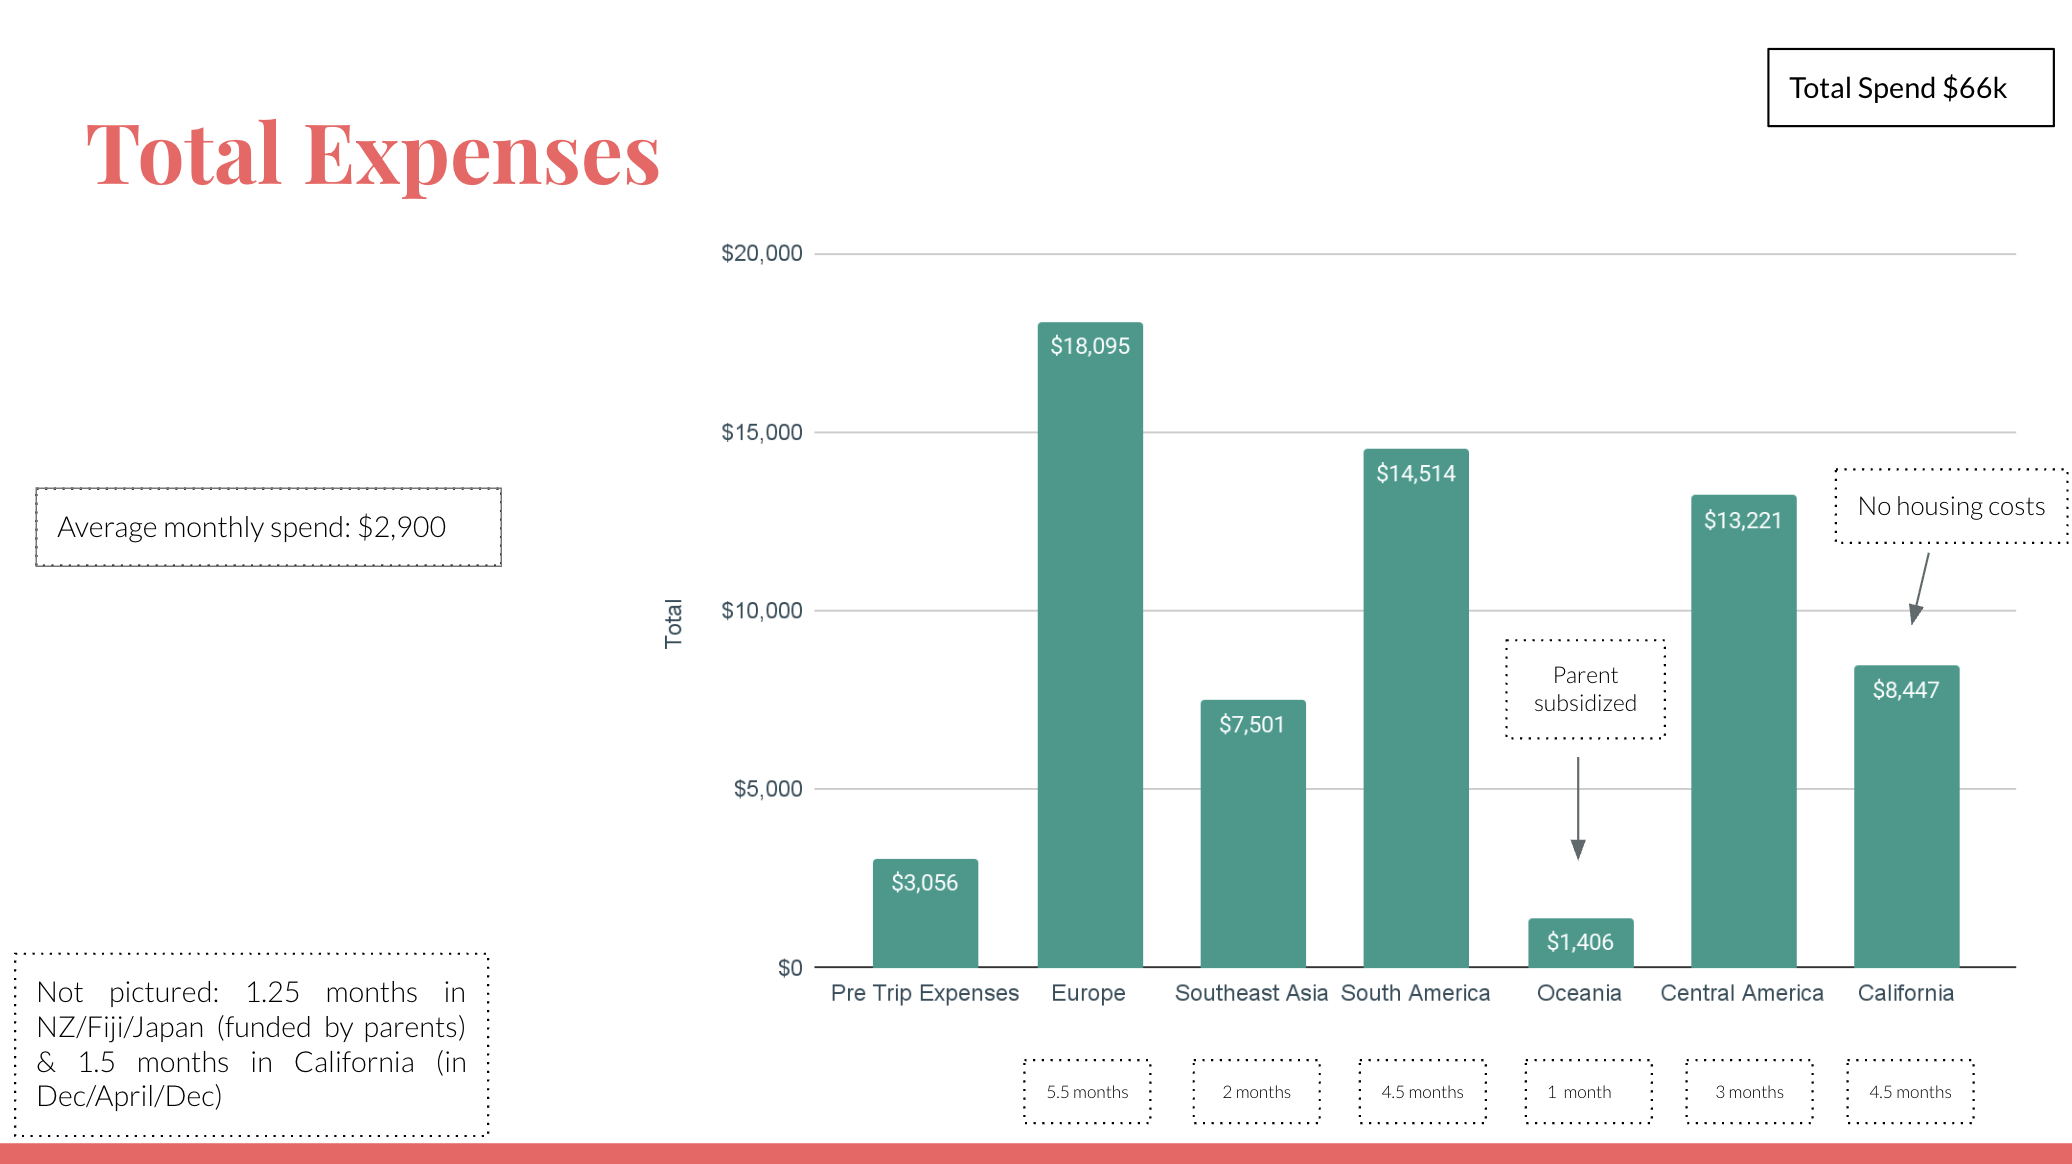
Total Spend: $66k USD
I feel pretty great about this number! I’m averaging about $3k per month while really enjoying life! I spent an average of $40k per year in my “regular” life while living in San Francisco, CA, so I’ve spent about 20% less by traveling to 42 countries – not bad!!
Spend by Segment
This shows a breakdown of the total spend by trip segment. Obviously Europe would be the highest since that was the longest segment of the trip so far. Pre-trip expenses include: clothes, Workaway membership, initial flights, & electronics. Health insurance for the duration of the trip was $170 per month ($2,040 for the year). Scuba diving really drove up costs in Central America.
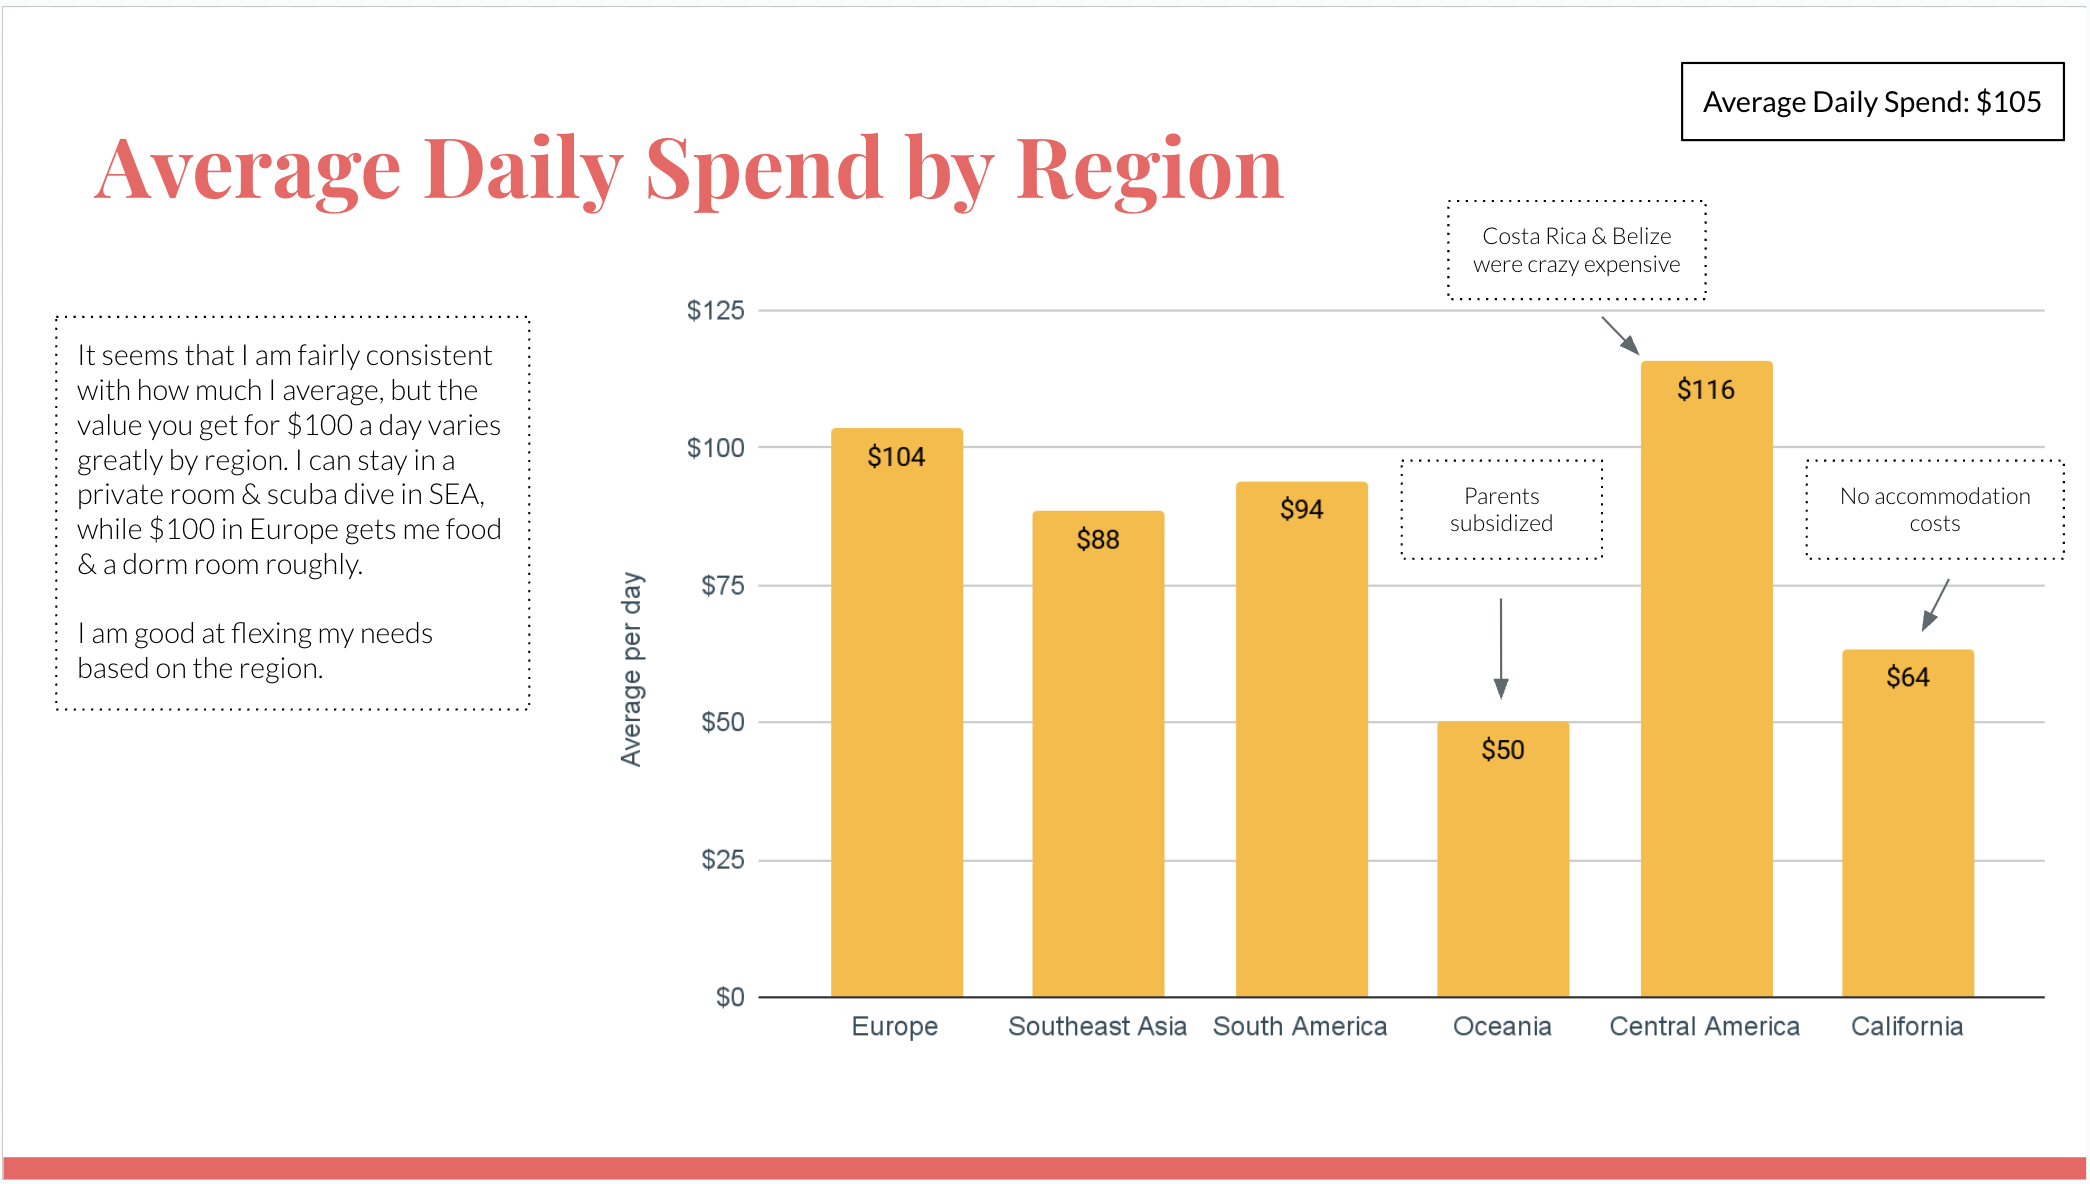
Average Daily Spend by Region
This shows the daily cost by region, which makes it far easier to compare the costs agnostic of time spent in each spot. An interesting trend I’ve noticed is that I seem to scale what I’m comfortable spending on based on roughly a $100 per day budget. To be clear, I don’t do this consciously or intentionally as in I haven’t limited myself to $100 per day, but I do seem to naturally know that in more expensive countries, I have to be more simple in my spending, whereas in Southeast Asia, I go crazy with activities and still can’t spend as much as existing in Europe. Put another way, here’s the percent Activities made up of total spend by region:
Europe – 15%
Southeast Asia – 35%
South America – 18%
Oceania – 1%
Central America – 25%
California – 14%
Spend by Category
This is a breakdown of how much I spent by category. As expected, accommodation is my largest spend, but I am actually proud of myself for spending so much on activities! I can be pretty stingy with spend so I love that I have said yes to so many experiences on this trip. A lot of them ended up in my top 5 memories of the trip 🙂 You’ll find the breakdown for the trip overall, as well as by region.
Europe (6 months): $18.1k
Southeast Asia (2 months): $7.5k
South America & Mexico (4.5 months): $14.5k
Central America (3.5 months): $13.2k
Top 5 experiences of the trip so far:
Antarctica ($$$$$)
Riding Motorbikes through the Ha Giang Loop in Vietnam ($300)
Hiking Milford Track in New Zealand ($2,045)
Climbing Acatenango in Guatemala ($105)
Scuba Diving with Thresher Sharks in the Philippines ($88)
Top tips for traveling cheaper:
Stay in dorms in hostels – you might sacrifice a bit on quality of sleep but in general the cost savings + meeting so many cool people makes this a great resource for traveling on the cheap.
You’ll notice I spent about $8k on eating out. If you are staying in airbnbs or hostels with kitchens (more common in Europe, NZ & Australia), buy groceries!
Travel slower. As I mentioned, you’ll save a lot on accommodation costs if you can book a month long airbnb rather than hotels/hostels for a few nights at a time. This also will bring down your transportation costs.
Fly less! Unfortunately I am doing a lot of flying. I’d be saving a ton of money if I was doing bus/train travel.
Only take a carryon backpack. You’ll save on baggage fees every time you do have to fly.
Use credit card points to book flights.
Consider doing WOOFING or Workaway to save money in exchange for working a few hours a week (usually ~20).
Make friends on the road and then go visit them in their hometowns. It’s the best way to experience a place in a (usually) non-touristy place & you save money on accommodation: it’s a win-win!
Hope this was helpful!!! Wish me luck on my last chapter for the trip: Western Asia & Europe for 3 months 🙂
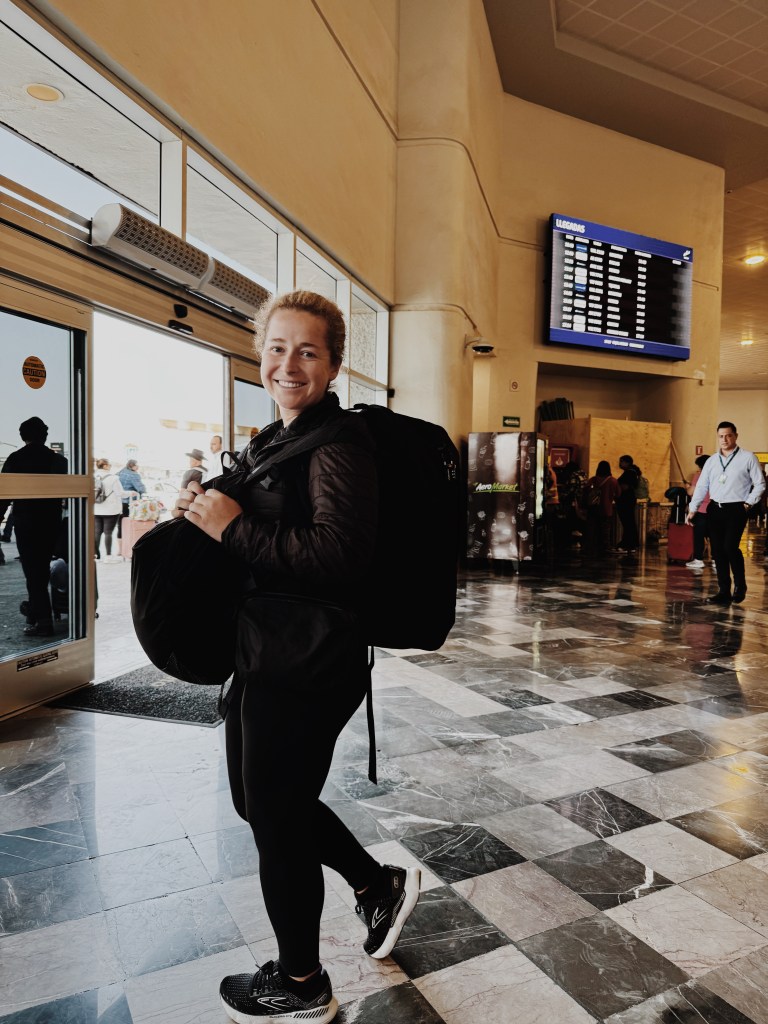
I can’t believe it’s already 2025!! I am off to Central America for 3 months. I plan to explore all 7 countries in the region (Panama, Costa Rica, El Salvador, Nicaragua, Honduras, Belie & Guatemala).
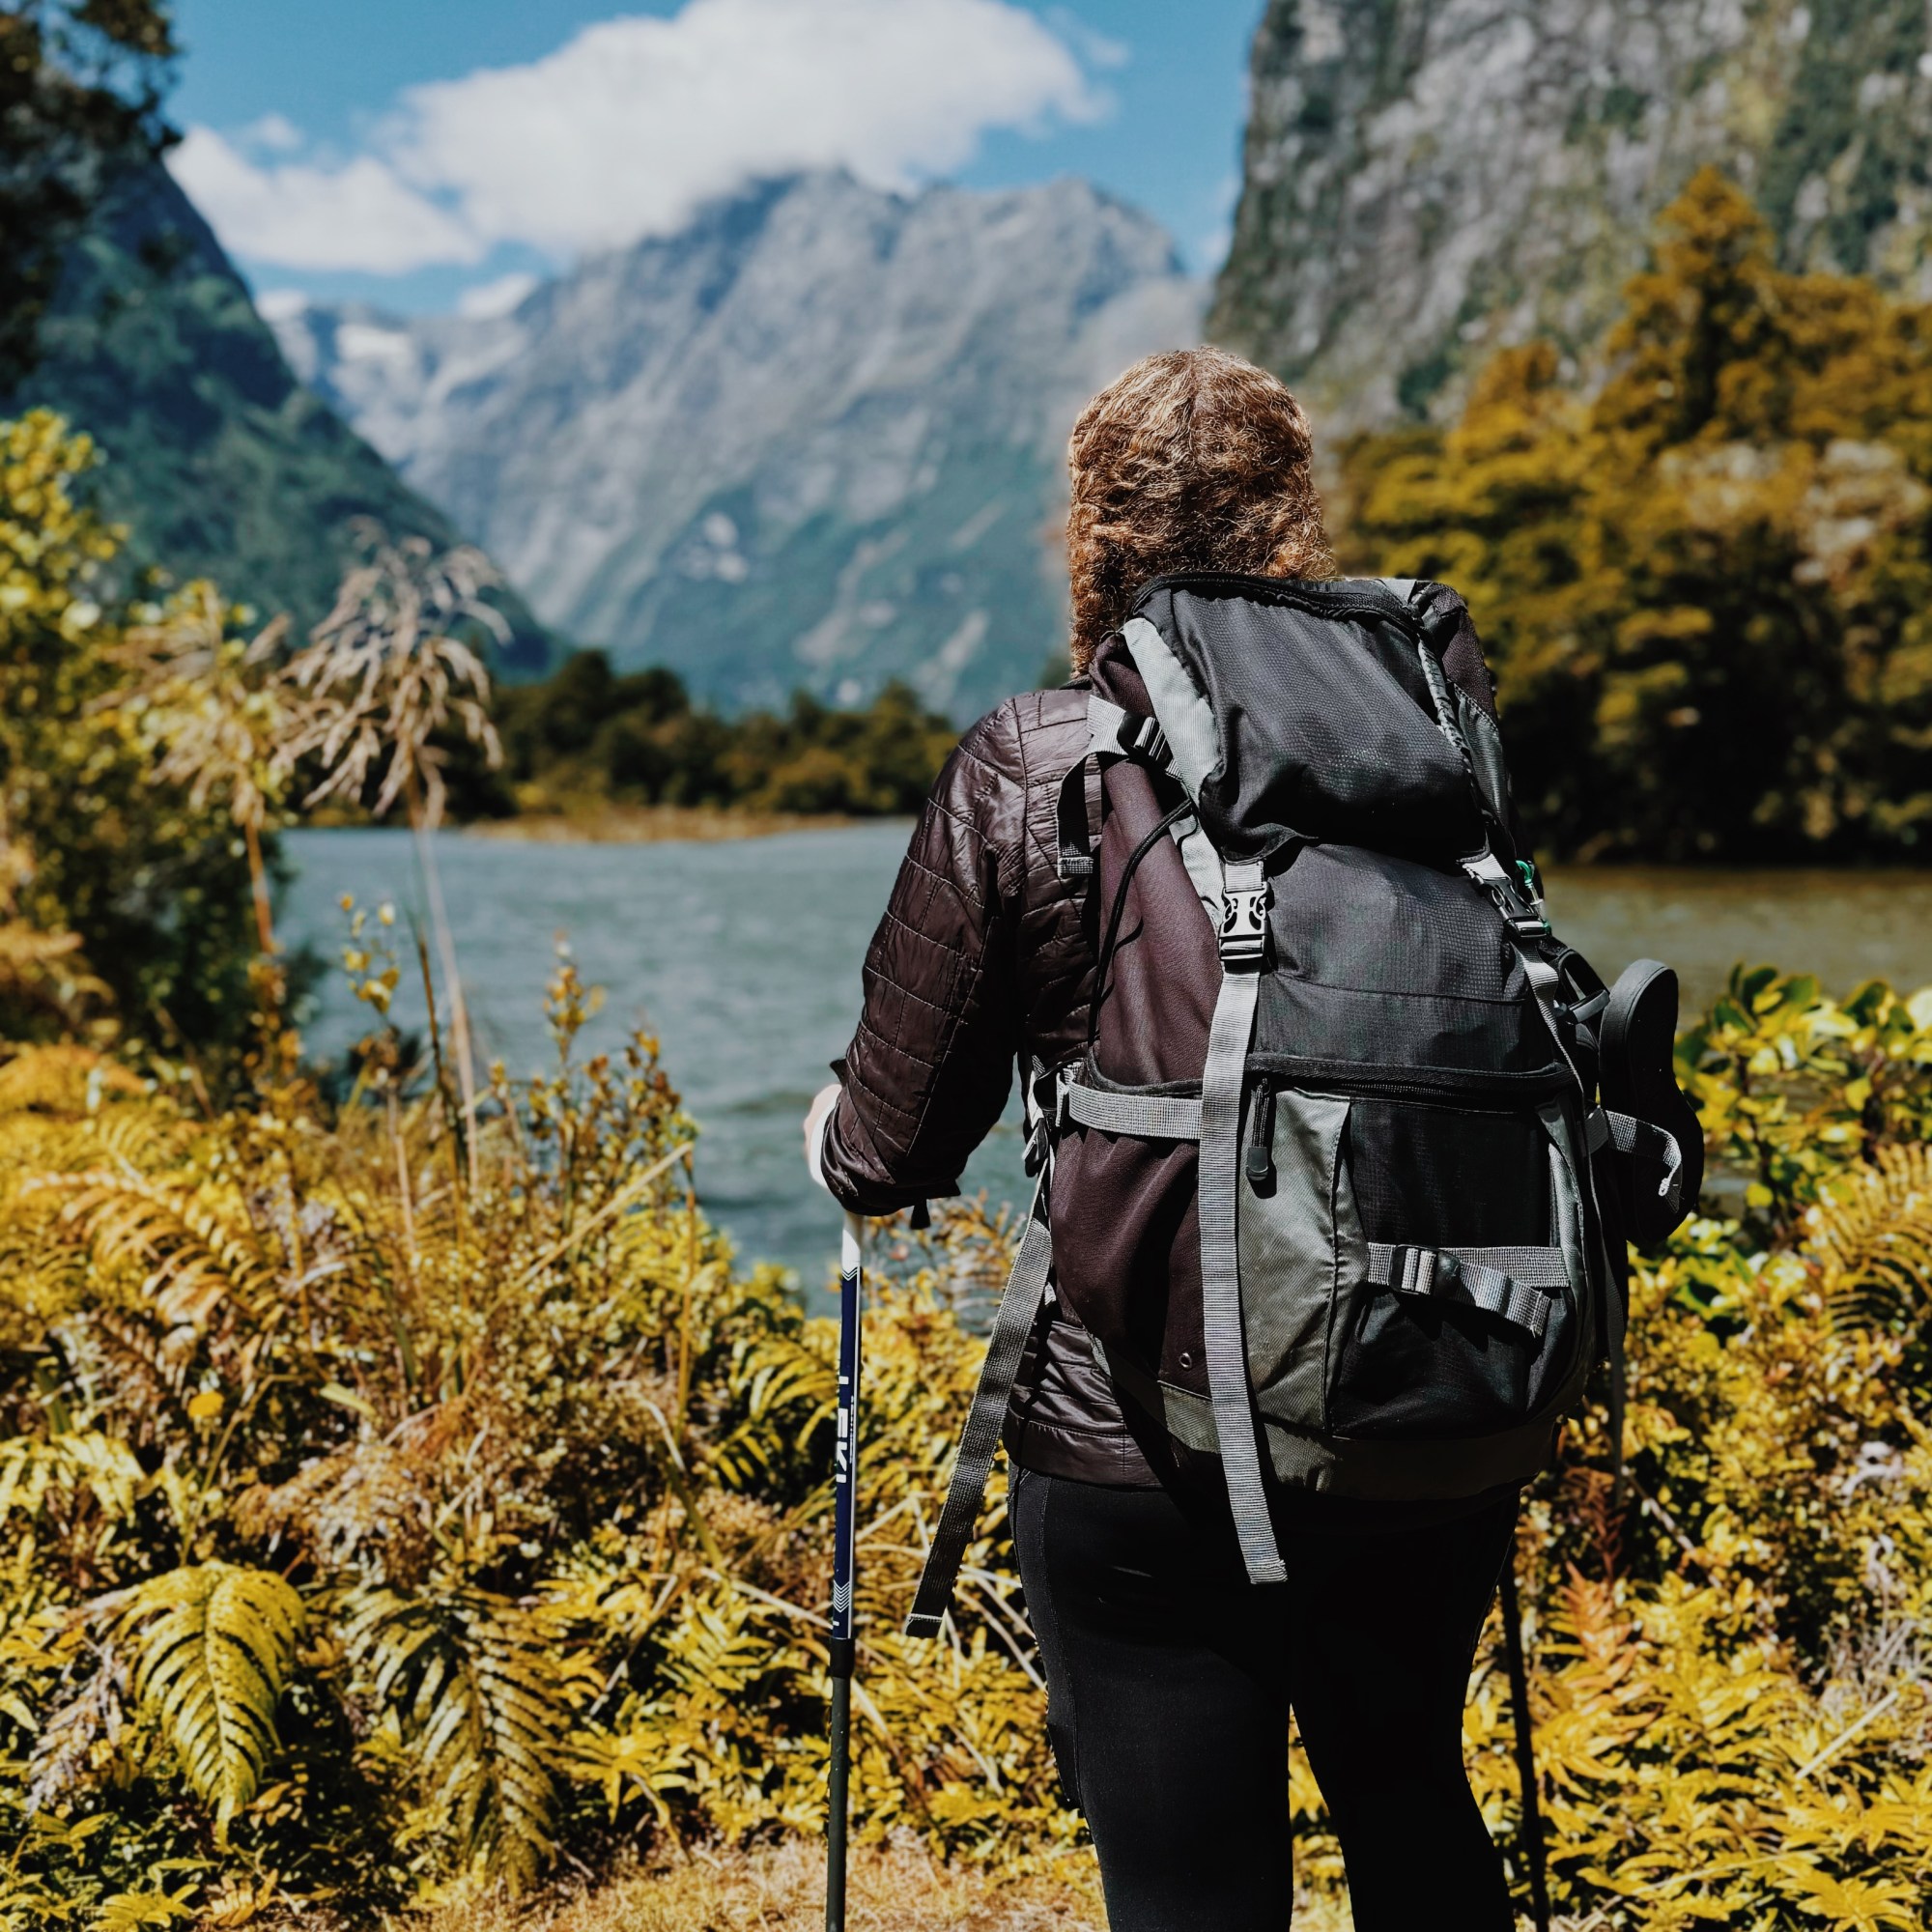
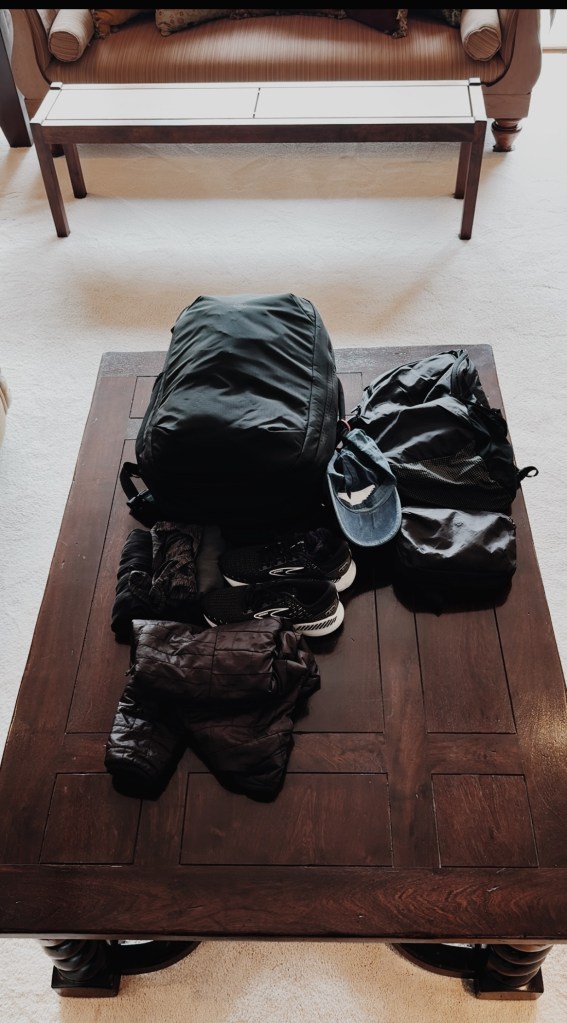
Of course I am using my 35L Tortuga Setout backpack 🙂 They don’t sell the exact backpack I have anymore, but here is their latest & greatest! Can’t recommend their bags more. I have used a Tortuga backpack on each of my longterm trips!
Overall tips:
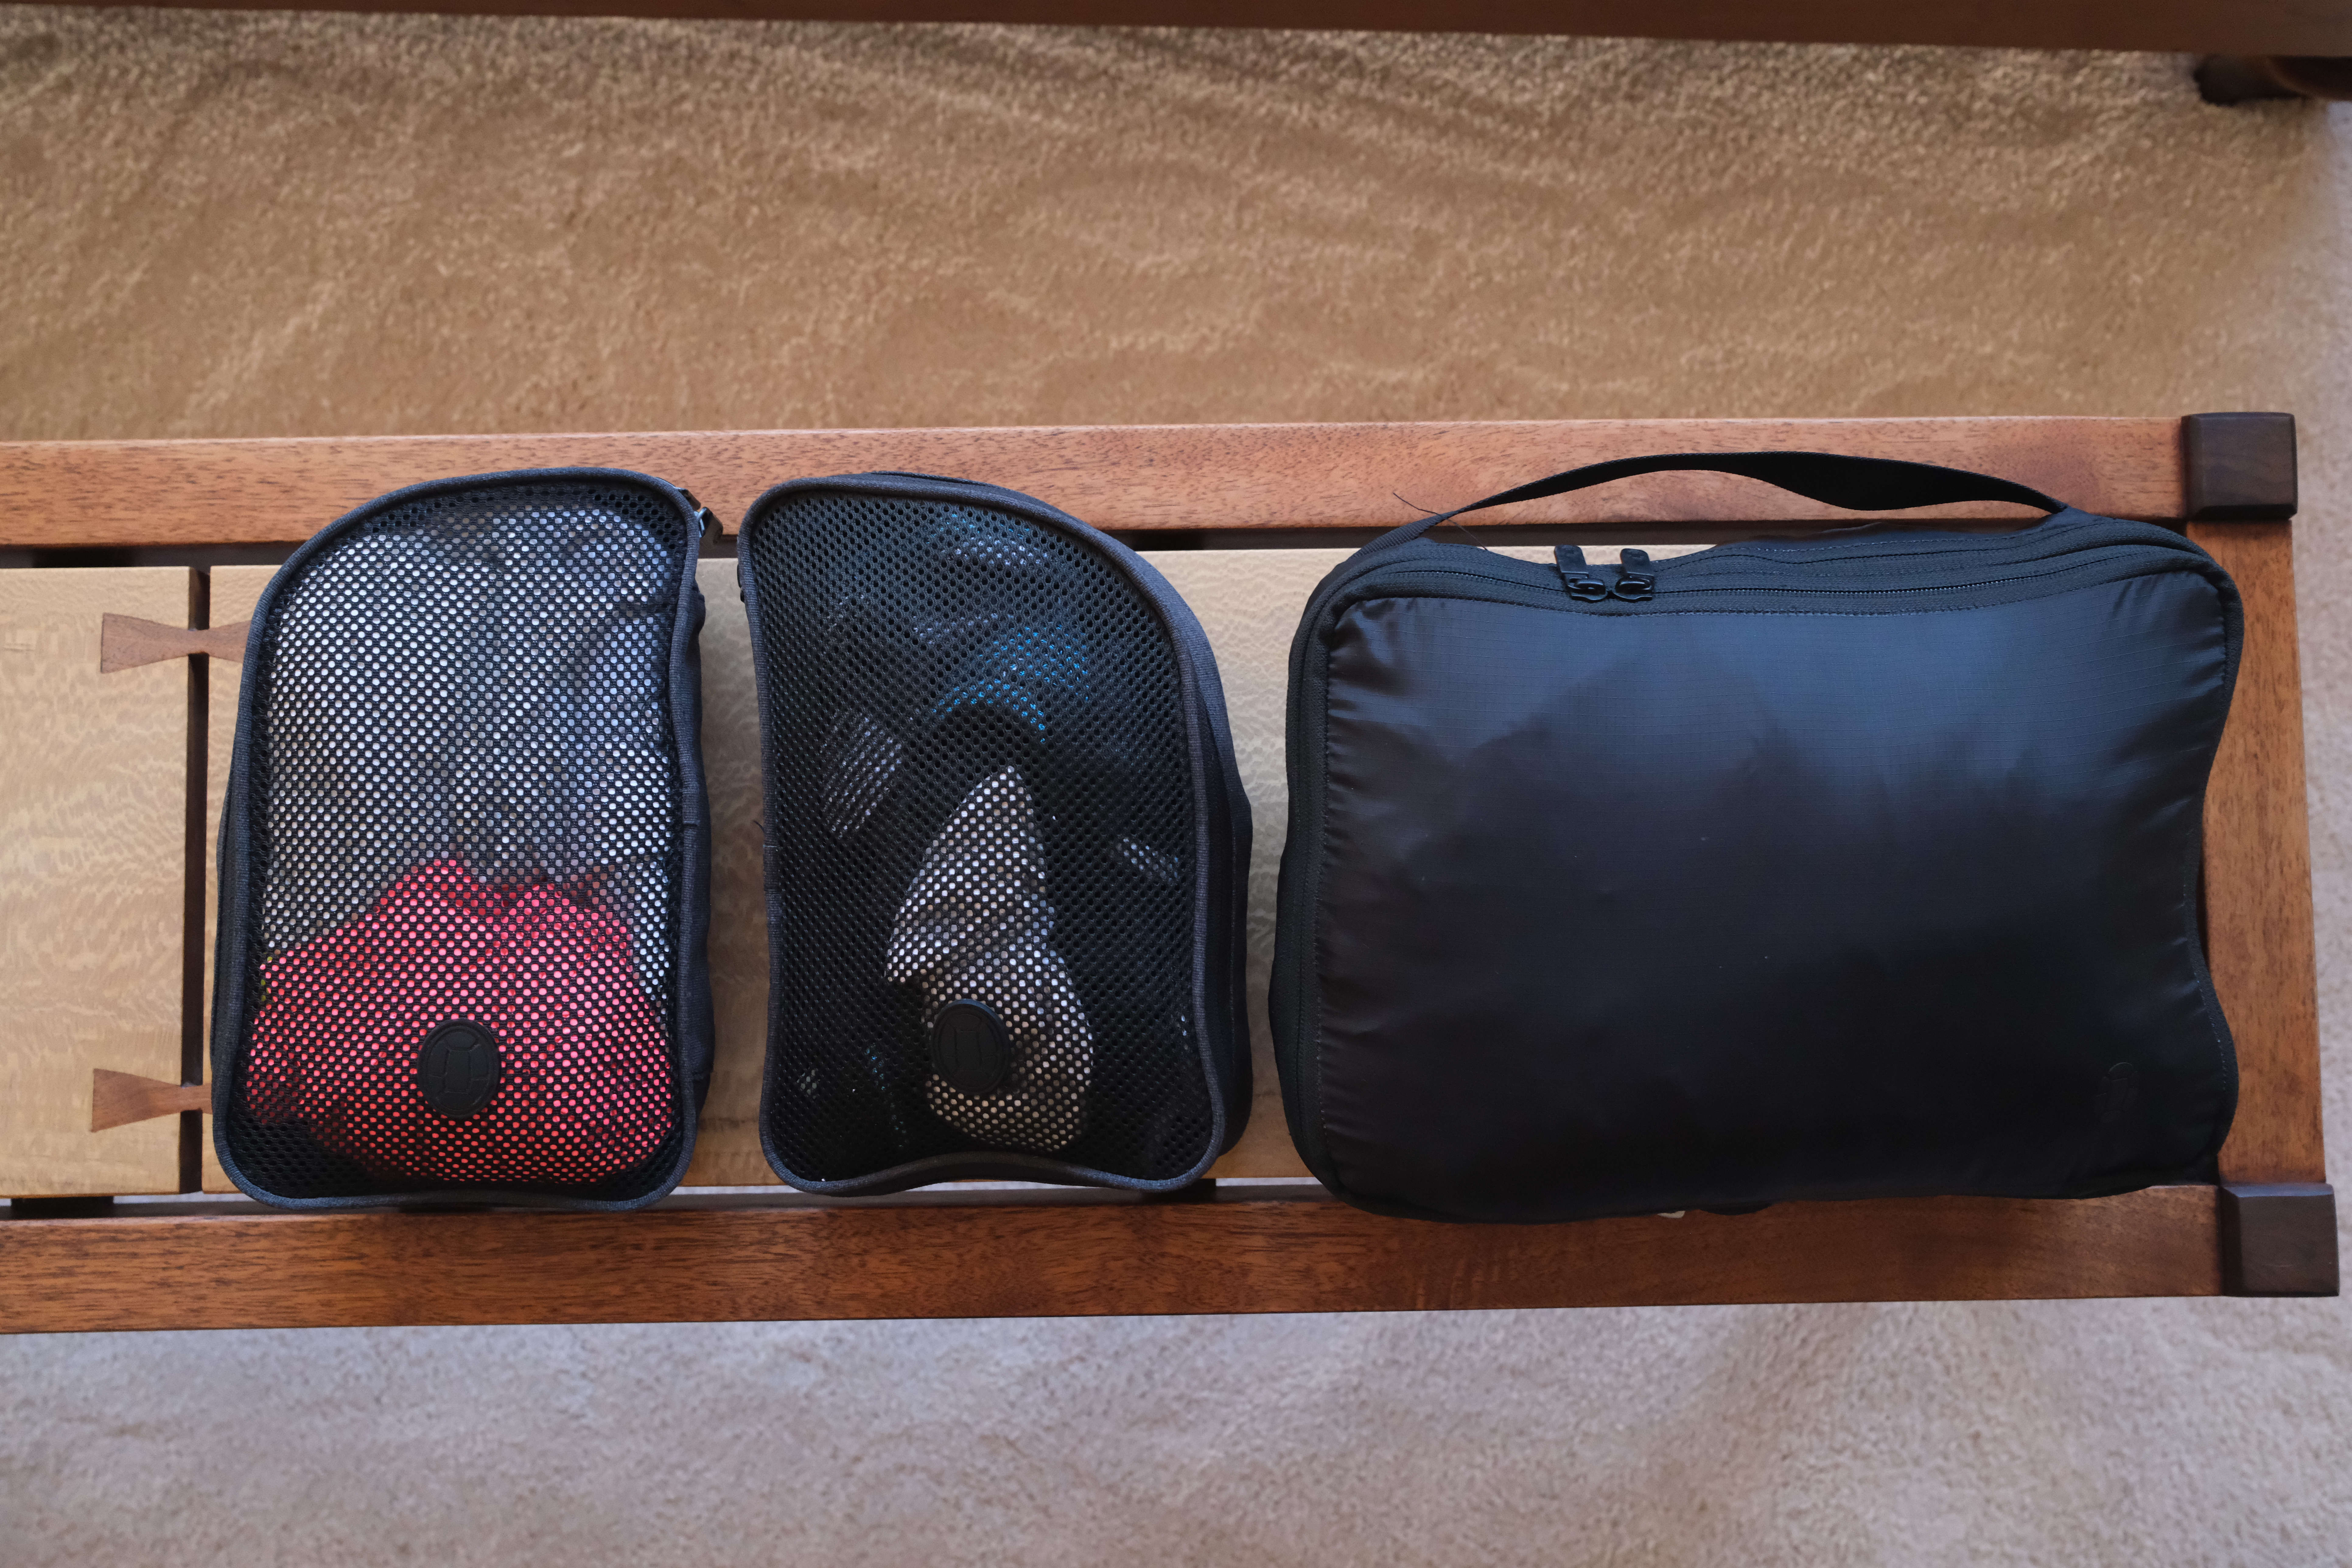
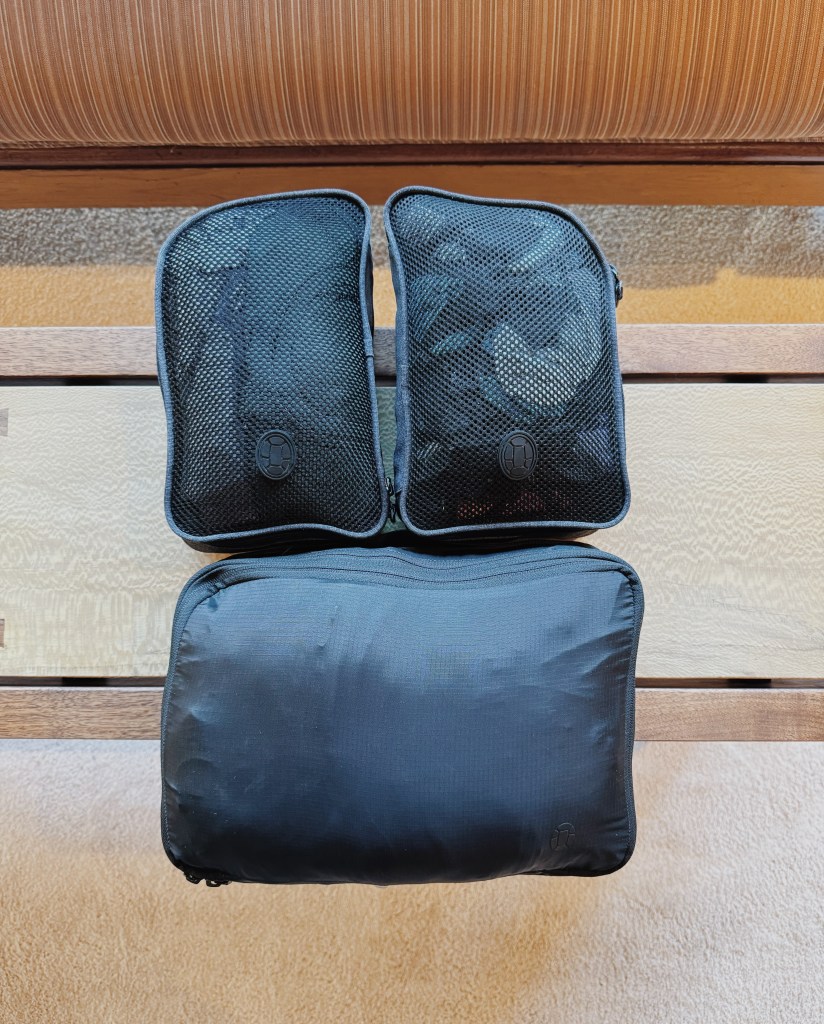
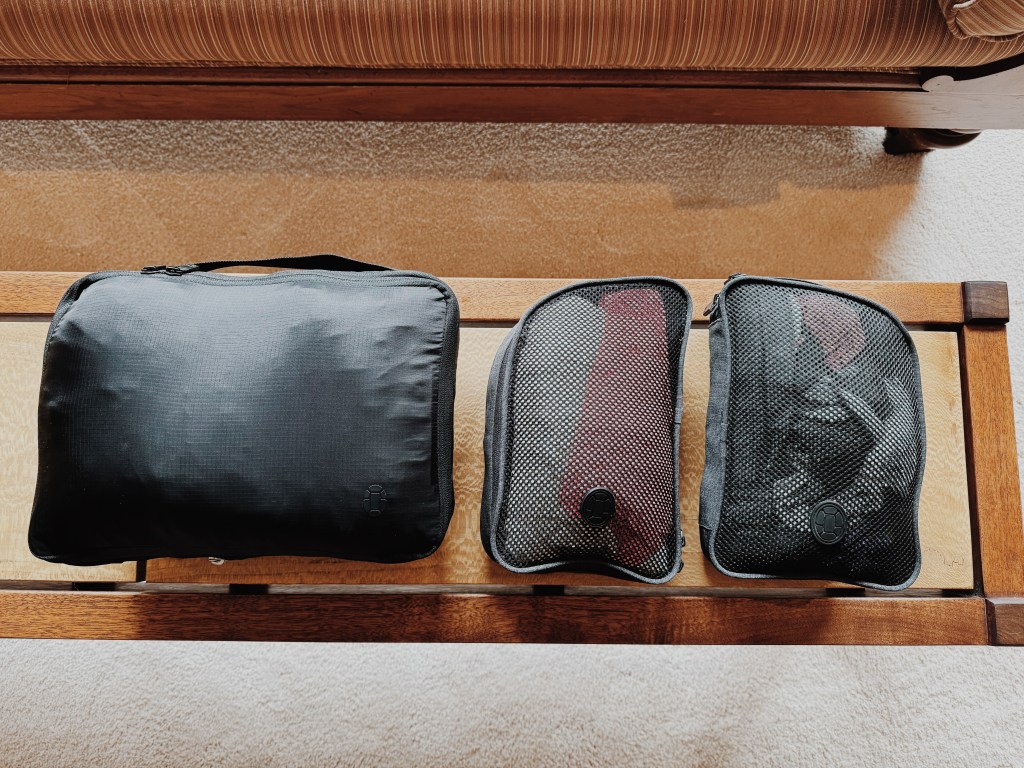
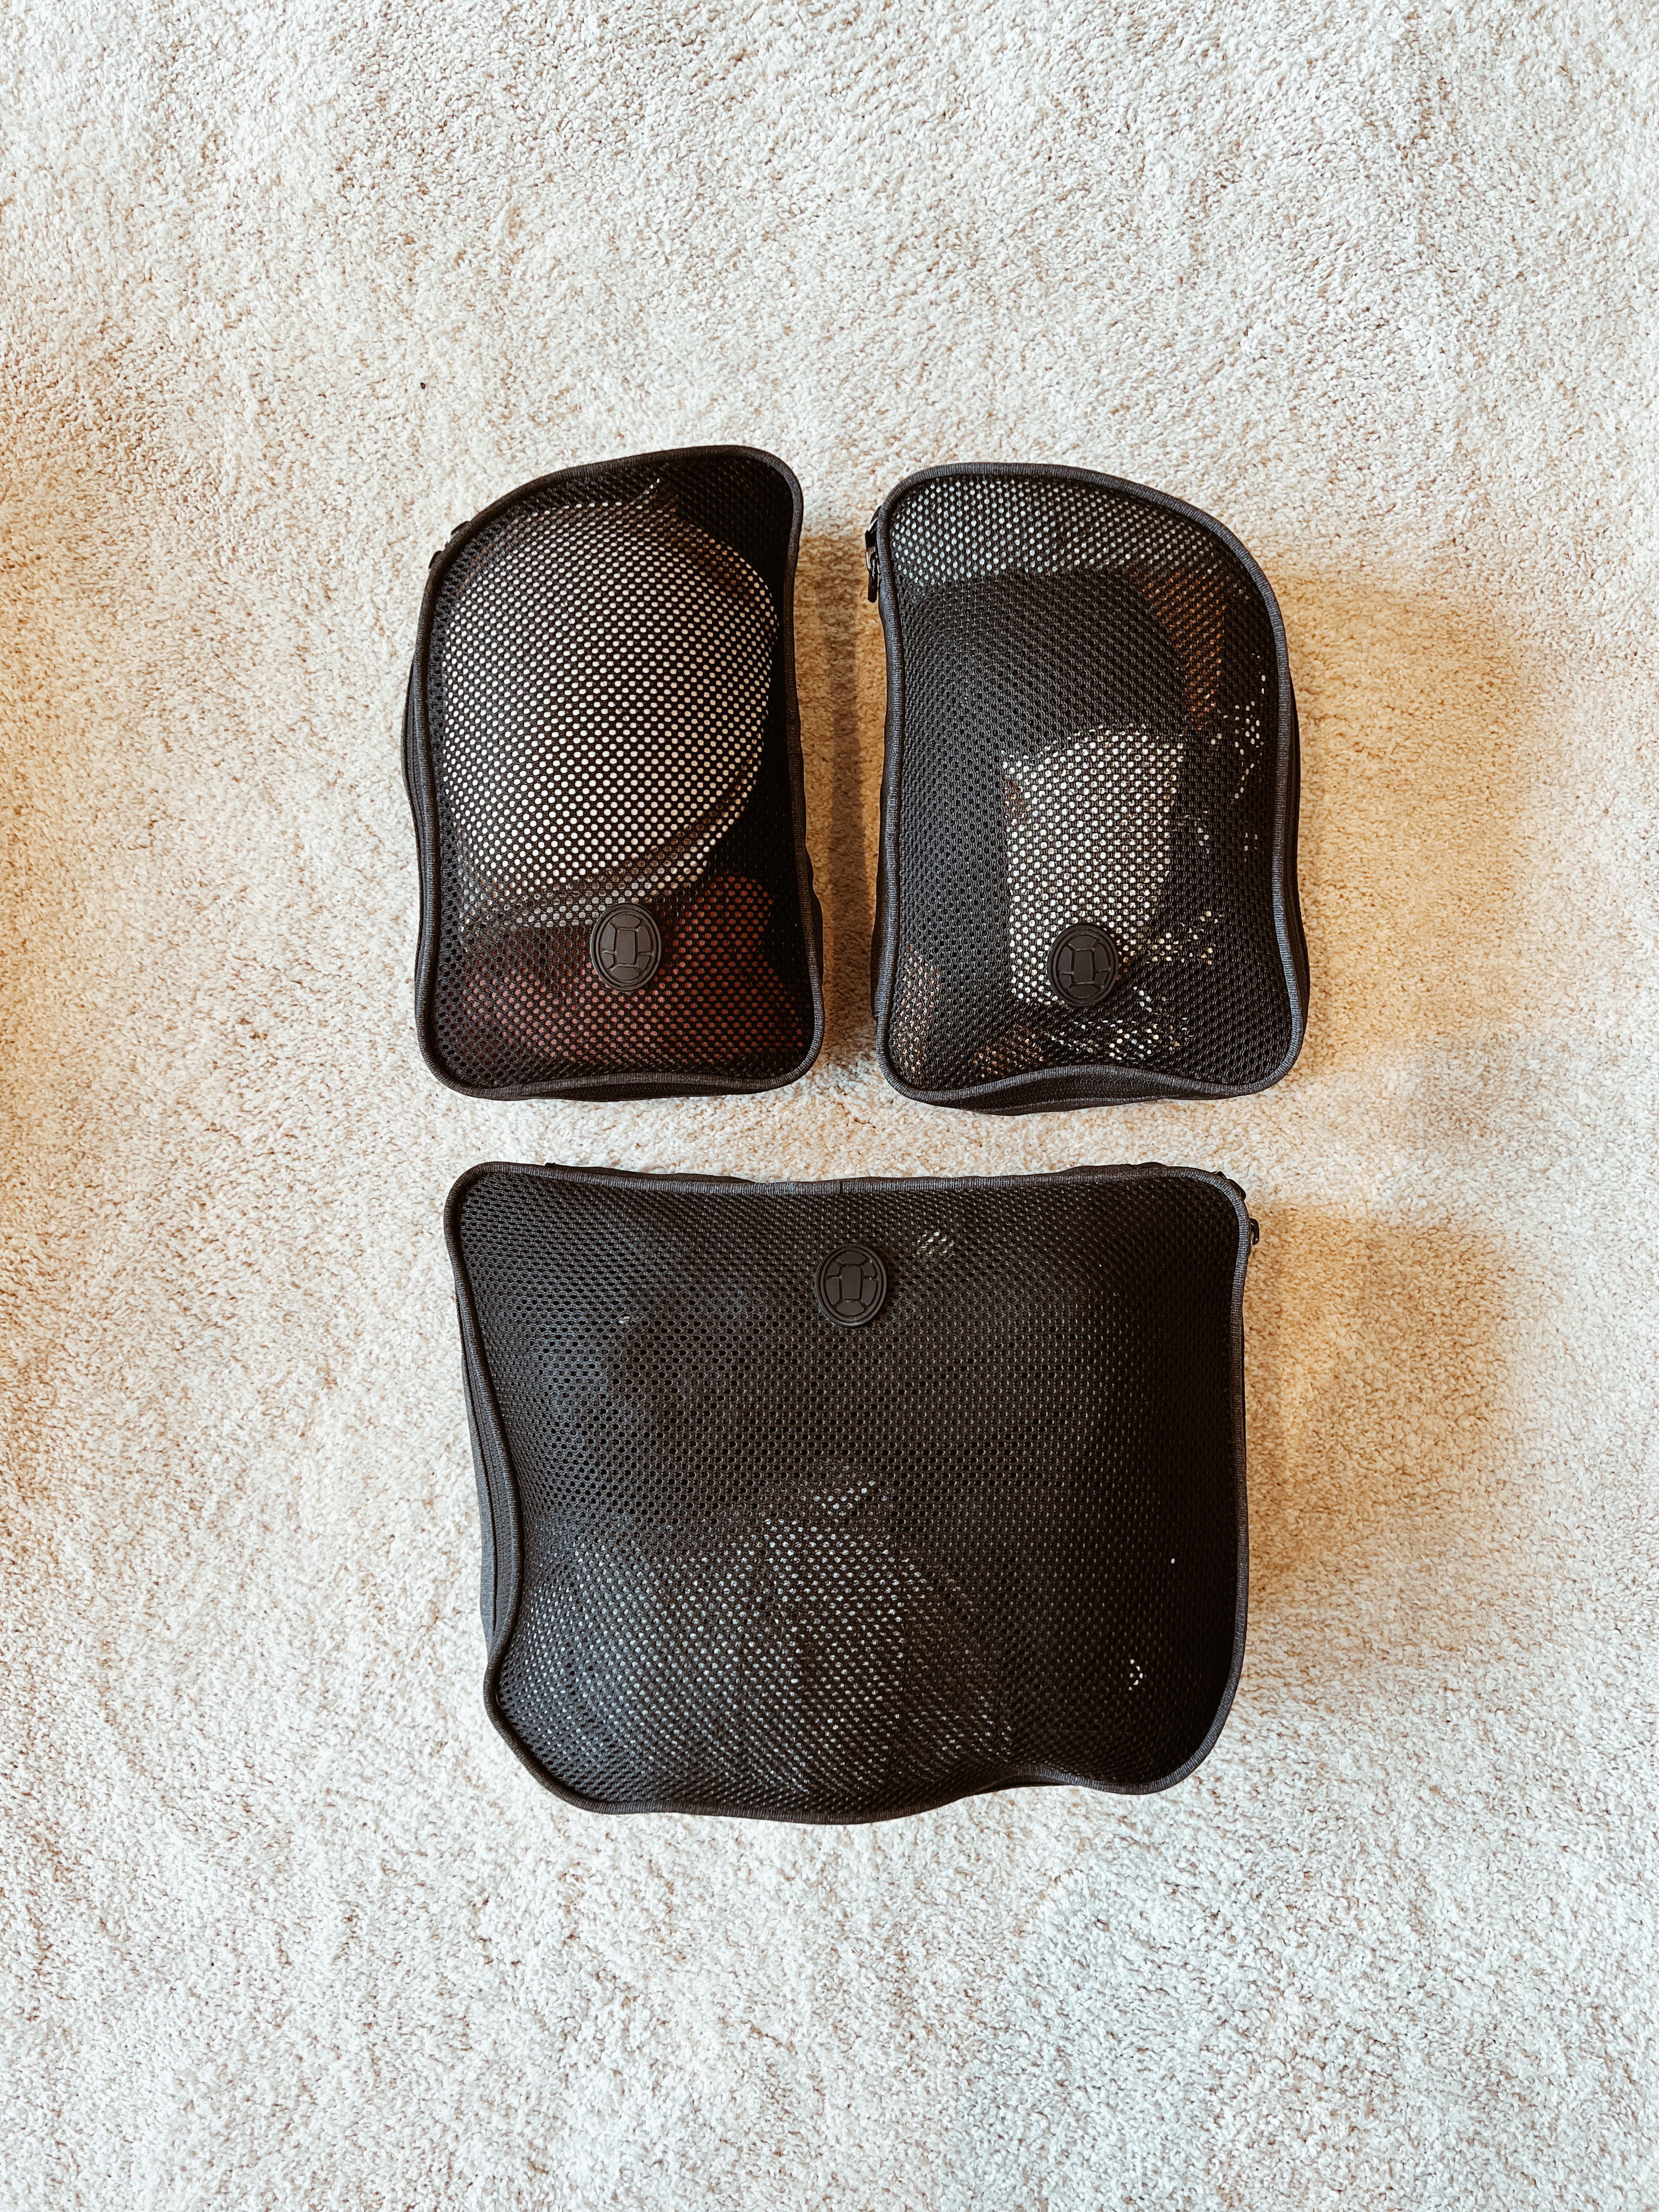
Use packing cubes! I love that my Tortuga packing cubes perfectly fit the dimensions of my bag, but Amazon should have plenty of options!
Think through how the clothes will feel in heat. Linen & lightweight materials will be best.
Make sure that every top works with every bottom and works with every shoes. Use a capsule wardrobe as inspiration.
Less is more! Even though I have done this full time for over 36 consecutive months (holy moly), I still inevitably pack 1-2 items that I never end up reaching for. Think through if you actually will where it or if it’s just an aspirational item.
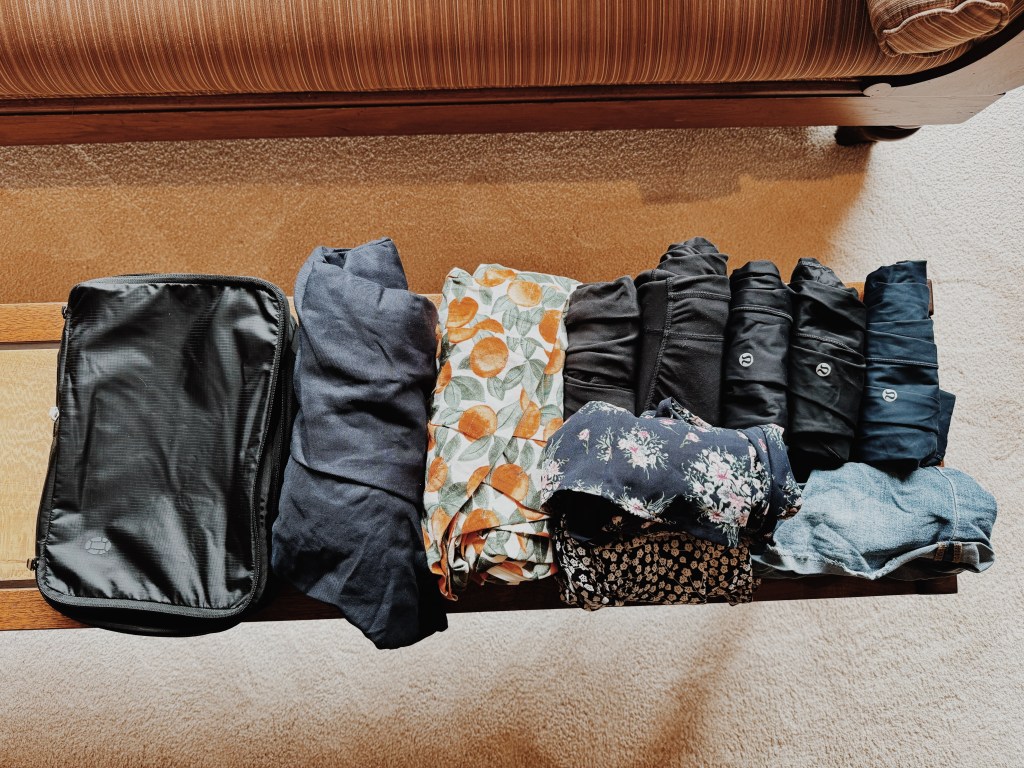
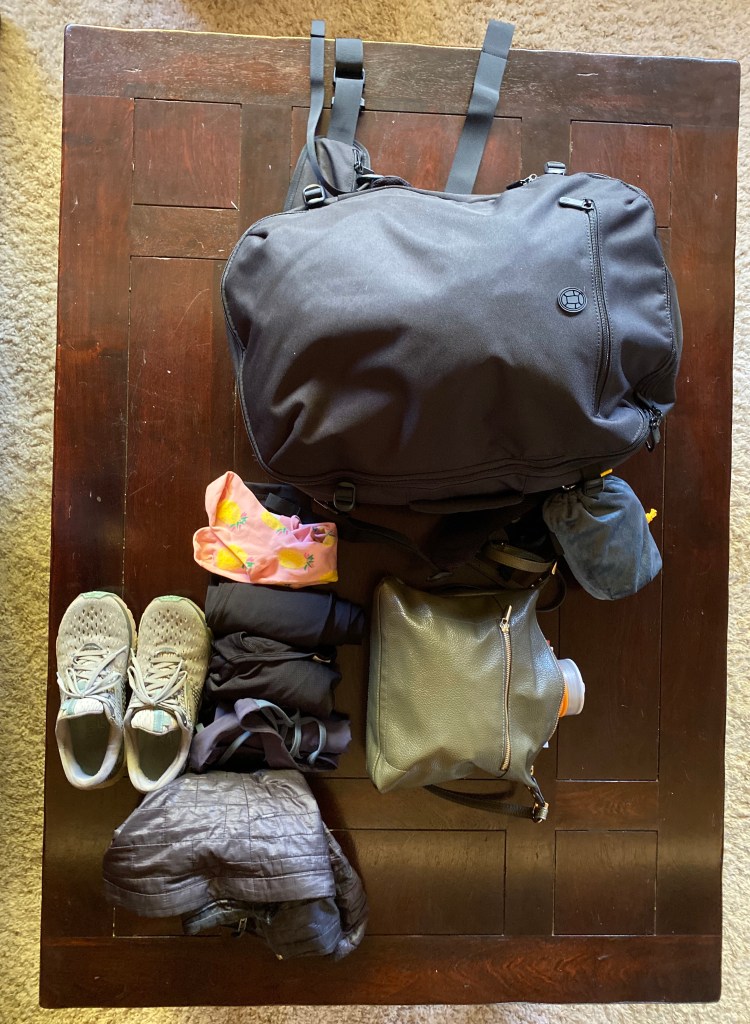
PACKING LIST FOR CENTRAL AMERICA:
CLOTHES
2 pairs of Lululemon Fast & Free Crop’s – I’m trying to make it easy to workout while on the road this time around.
1 pair of Lululemon Align pants – can be used for working out/walking around town or I can dress it up.
1 Romper
2 Jumpsuits (Madewell) – I’m obsessed with this jumpsuit – it’s great for hot weather but still provides mosquito coverage. I love it so much that I had a copy made while I was in Hoi An, Vietnam. I picked a fun orange print & added cap sleeves.
1 Cute shirt (I’m only taking one as I think I’ll be in my rompers and jumpsuits most days)
3 sports bras
4 athletic shirts (for running + sleeping in). Three are from Lululemon.
Waterproof sandals- I just bought Teva dupes (will act as my water shoe as well as my cute shoes- I never said the backpacker lifestyle was glamorous haha)
Light Patagonia puffer – good for chilly planes/busses & for when I visit countries that are a little cooler, even in the summer. It also smushes down fairly small so it’s a great backpacker jacket. I’ve also used it as a pillow in a pinch.
1 Swimsuit (feel free to bring 2-3 if that’s your thing)
Sunglasses (Warby Parker)
Rain coat (Patagonia; you can pack it up into it’s pocket so I can easily attach it to the outside of my bag via a carabiner)
Tortuga Daypack (they don’t sell the one I have anymore sadly). This acts as my personal item for flights and I can use it for adventures during the day.
Sling crossbody bag (I put it into my daypack on travel days). I use this out and about on a daily basis.
ELECTRONICS
Computer + Charger
iPad
iPhone + Charger (I get a 6 ft cord so I can always reach the plug from my hostel dorm bed!)
AirPod Pro’s
Fujifilm x100vi – YOU GUYS I BOUGHT A CAMERA!!! I’m so excited to try it out this trip!!
Headphones (Bose; noise-cancelling for travel days)
AirTag (This is a no brainer these days; provides peace of mind incase I am forced to check my bag or when it’s below me in a bus. Always nice to confirm it’s still with me!)
Extra sim cards for my new camera
Extra battery for my new camera
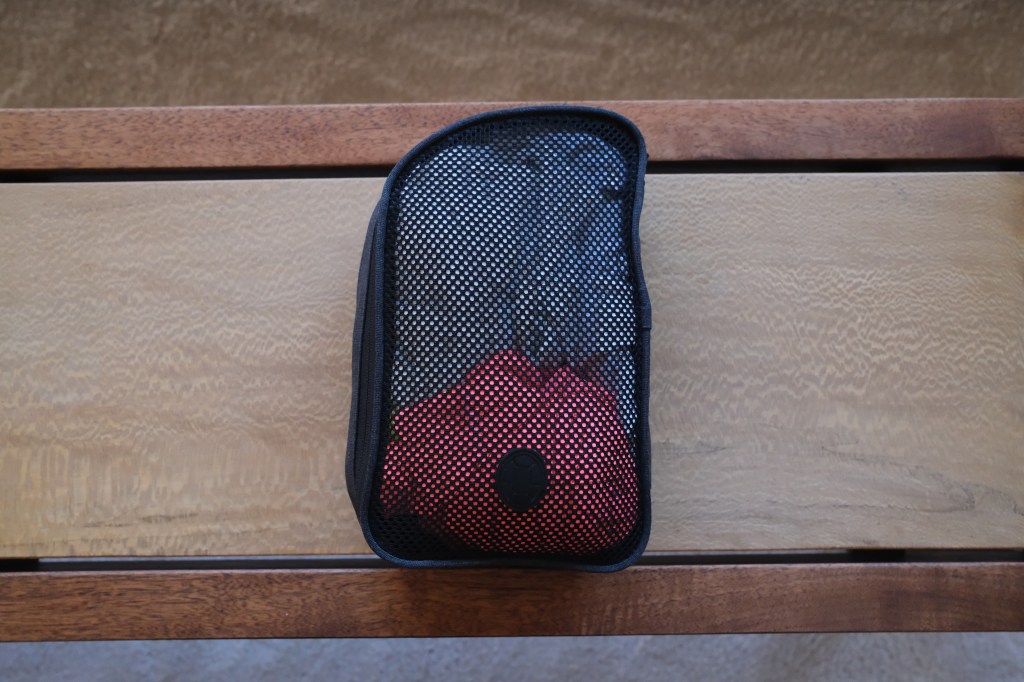
TOILETRIES (I USE A BUNCH OF LITTLE TOILETRY BAGS TO KEEP THESE ALL ORGANIZED)
Toothbrush
Toothpaste
Flosser
Any medication you take
Retainer
Deodorant
Tiny roller perfume
Makeup
Makeup Remover (I’ve become obsessed with cleansing balm for this because it isn’t a liquid, & it’s highly effective at getting makeup off at the end of the day!
Razor
Conditioner + Shampoo (Get containers to put your products into & refill on the road!!)
Face wash
Moisturizer
Brush
Pocket Hand Sanitizer– I keep one in my backpack and one in my sling/purse. Great in general, but also for when inevitably there is no soap at a random bus stop bathroom 🙂
Tiger balm (I picked this up in Southeast Asia and it’s now a staple in my bag. Great for mosquito bites and just feeling a little sick. It’s kinda like Vick’s vapor rub).
Electrolytes (these are a must for traveling, but especially in hotter climates)
A few protein bars for emergency snacks! You never know when you’ll be stuck on a bus in the middle of nowhere & get hungry.
Cough drops
Topical steroid cream for bed bug bites or regular bug bites to help with itchiness
MISCELLANEOUS
Passport – no explanation necessary 🙂
ID (I bring my driver’s license)
Travel Credit Card- I bring 2-3 cards with me in case I lose one it gets stolen or it gets hacked. Important to get ones with no foreign transaction fee; I have the Chase Sapphire Reserve (hello lounge access!) + Capital One Venture Card.
Debit Card (Charles Schwab has the best one because it reimburses ATM fees from any ATM in the world 🙂)
US Dollars – I always bring 1-2 Hundred dollar bills as an emergency source of cash (luckily most places in the world would take USD if it was truly an emergency & you needed some cash to get you out of a situation), however, in the case of Central America, I’ve taken more! USD are used in some countries here (like El Salvador), but also some businesses will give you a better rate when paying in USD. Take some smaller bills as they are helpful for border exit/entrance fees.
Record of your plans (I make folders within my email inbox to keep track of everything or you could print out a copy of your itinerary)
Eye Mask (you can either go the classic eye mask route or get one like this that almost acts like your eye mask + ear plug since you can play white noise through the built in bluetooth speaker- pretty cool!)
Lock (for staying in hostels or locking my bag.) Get the combo lock so you don’t have to worry about tiny keys. I take three to be able to lock two different compartments in my bag AND so I can keep my computer/passport/iPad compartment still locked when I use the other one to lock a locker within a hostel (+ one for backup!).
3 carabiners – I just attach them to my backpack and over the course of the trip they will hold everything from my water bottle, shoes, rain jacket and more. You will not regret having a few on hand.
Pack of playing cards (My sister got my a custom deck with some of my favorite photos from my travels – such a thoughtful gift)
Monopoly Deal – a fabulous compact game for the backpacking trail!
Face mask (I’ve used this while feeling sick as well as on a dusty motorcycle ride)
2 pens for writing postcards
Ziplock bags of various sizes. I inevitably need to put dirty shoes, wet bathing suit, leftover pizza, or dirty socks somewhere and I am always incredibly relieved to have some ziplocks at the ready. Plus they take up no space/weight so there’s no downside to bringing them.
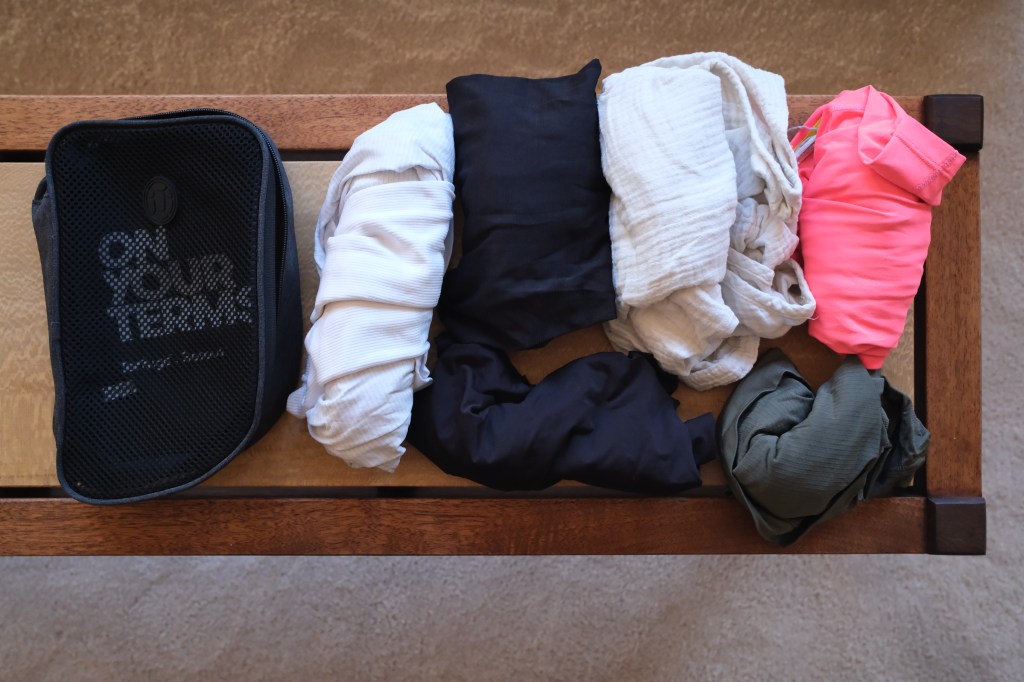
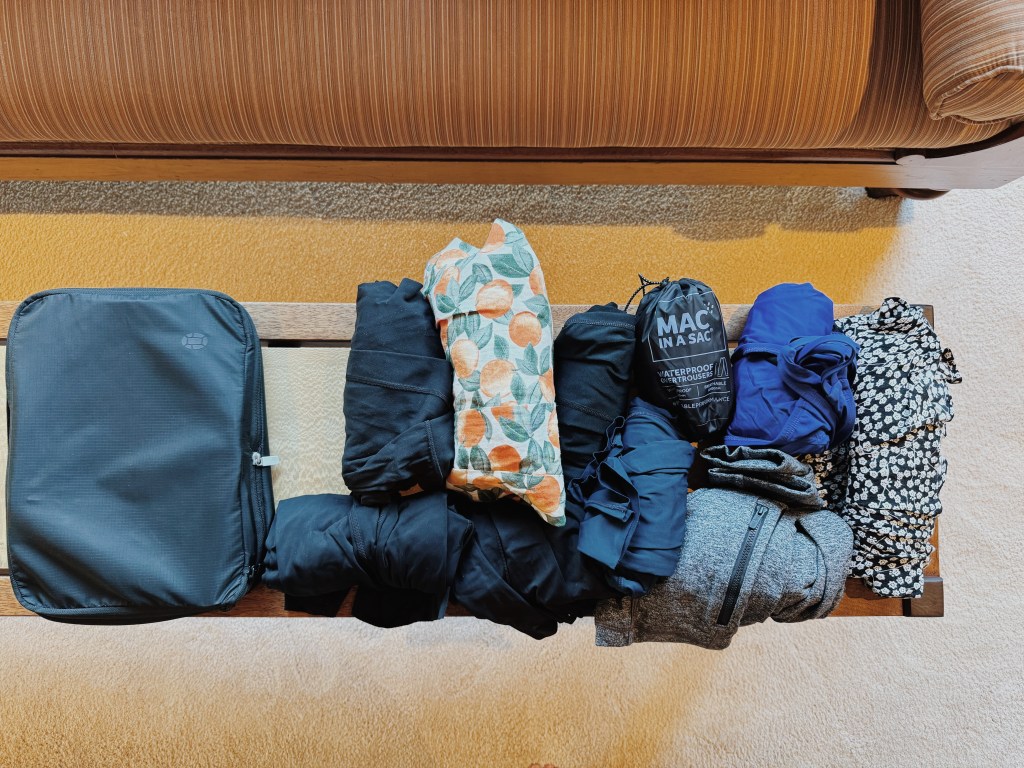
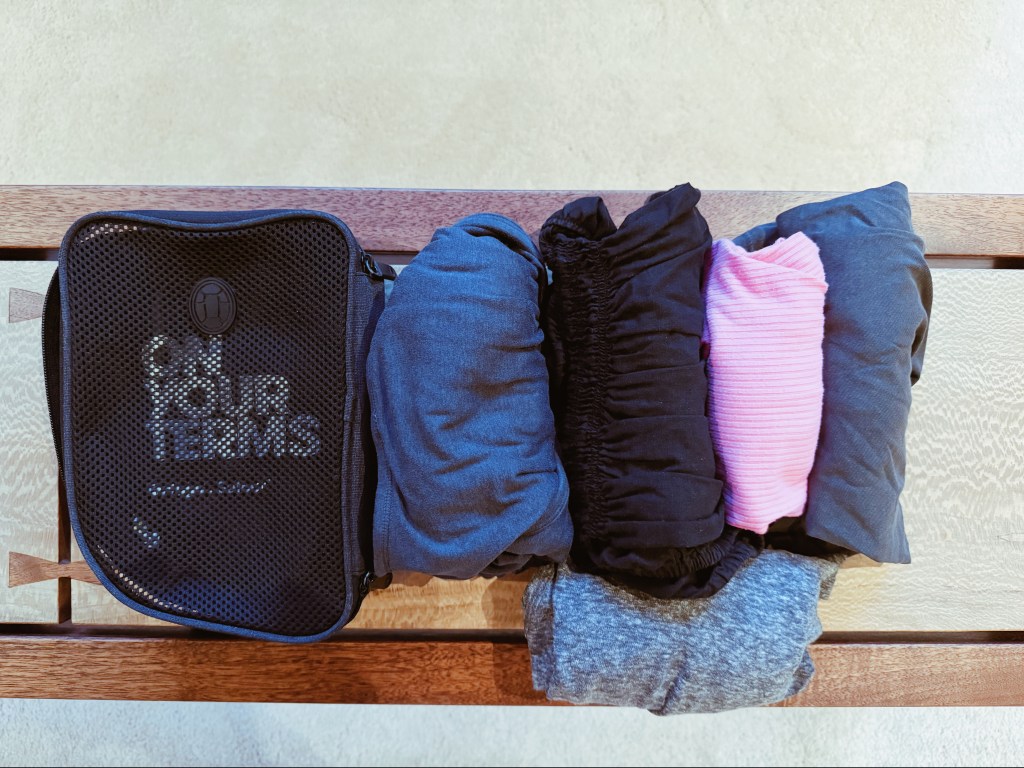
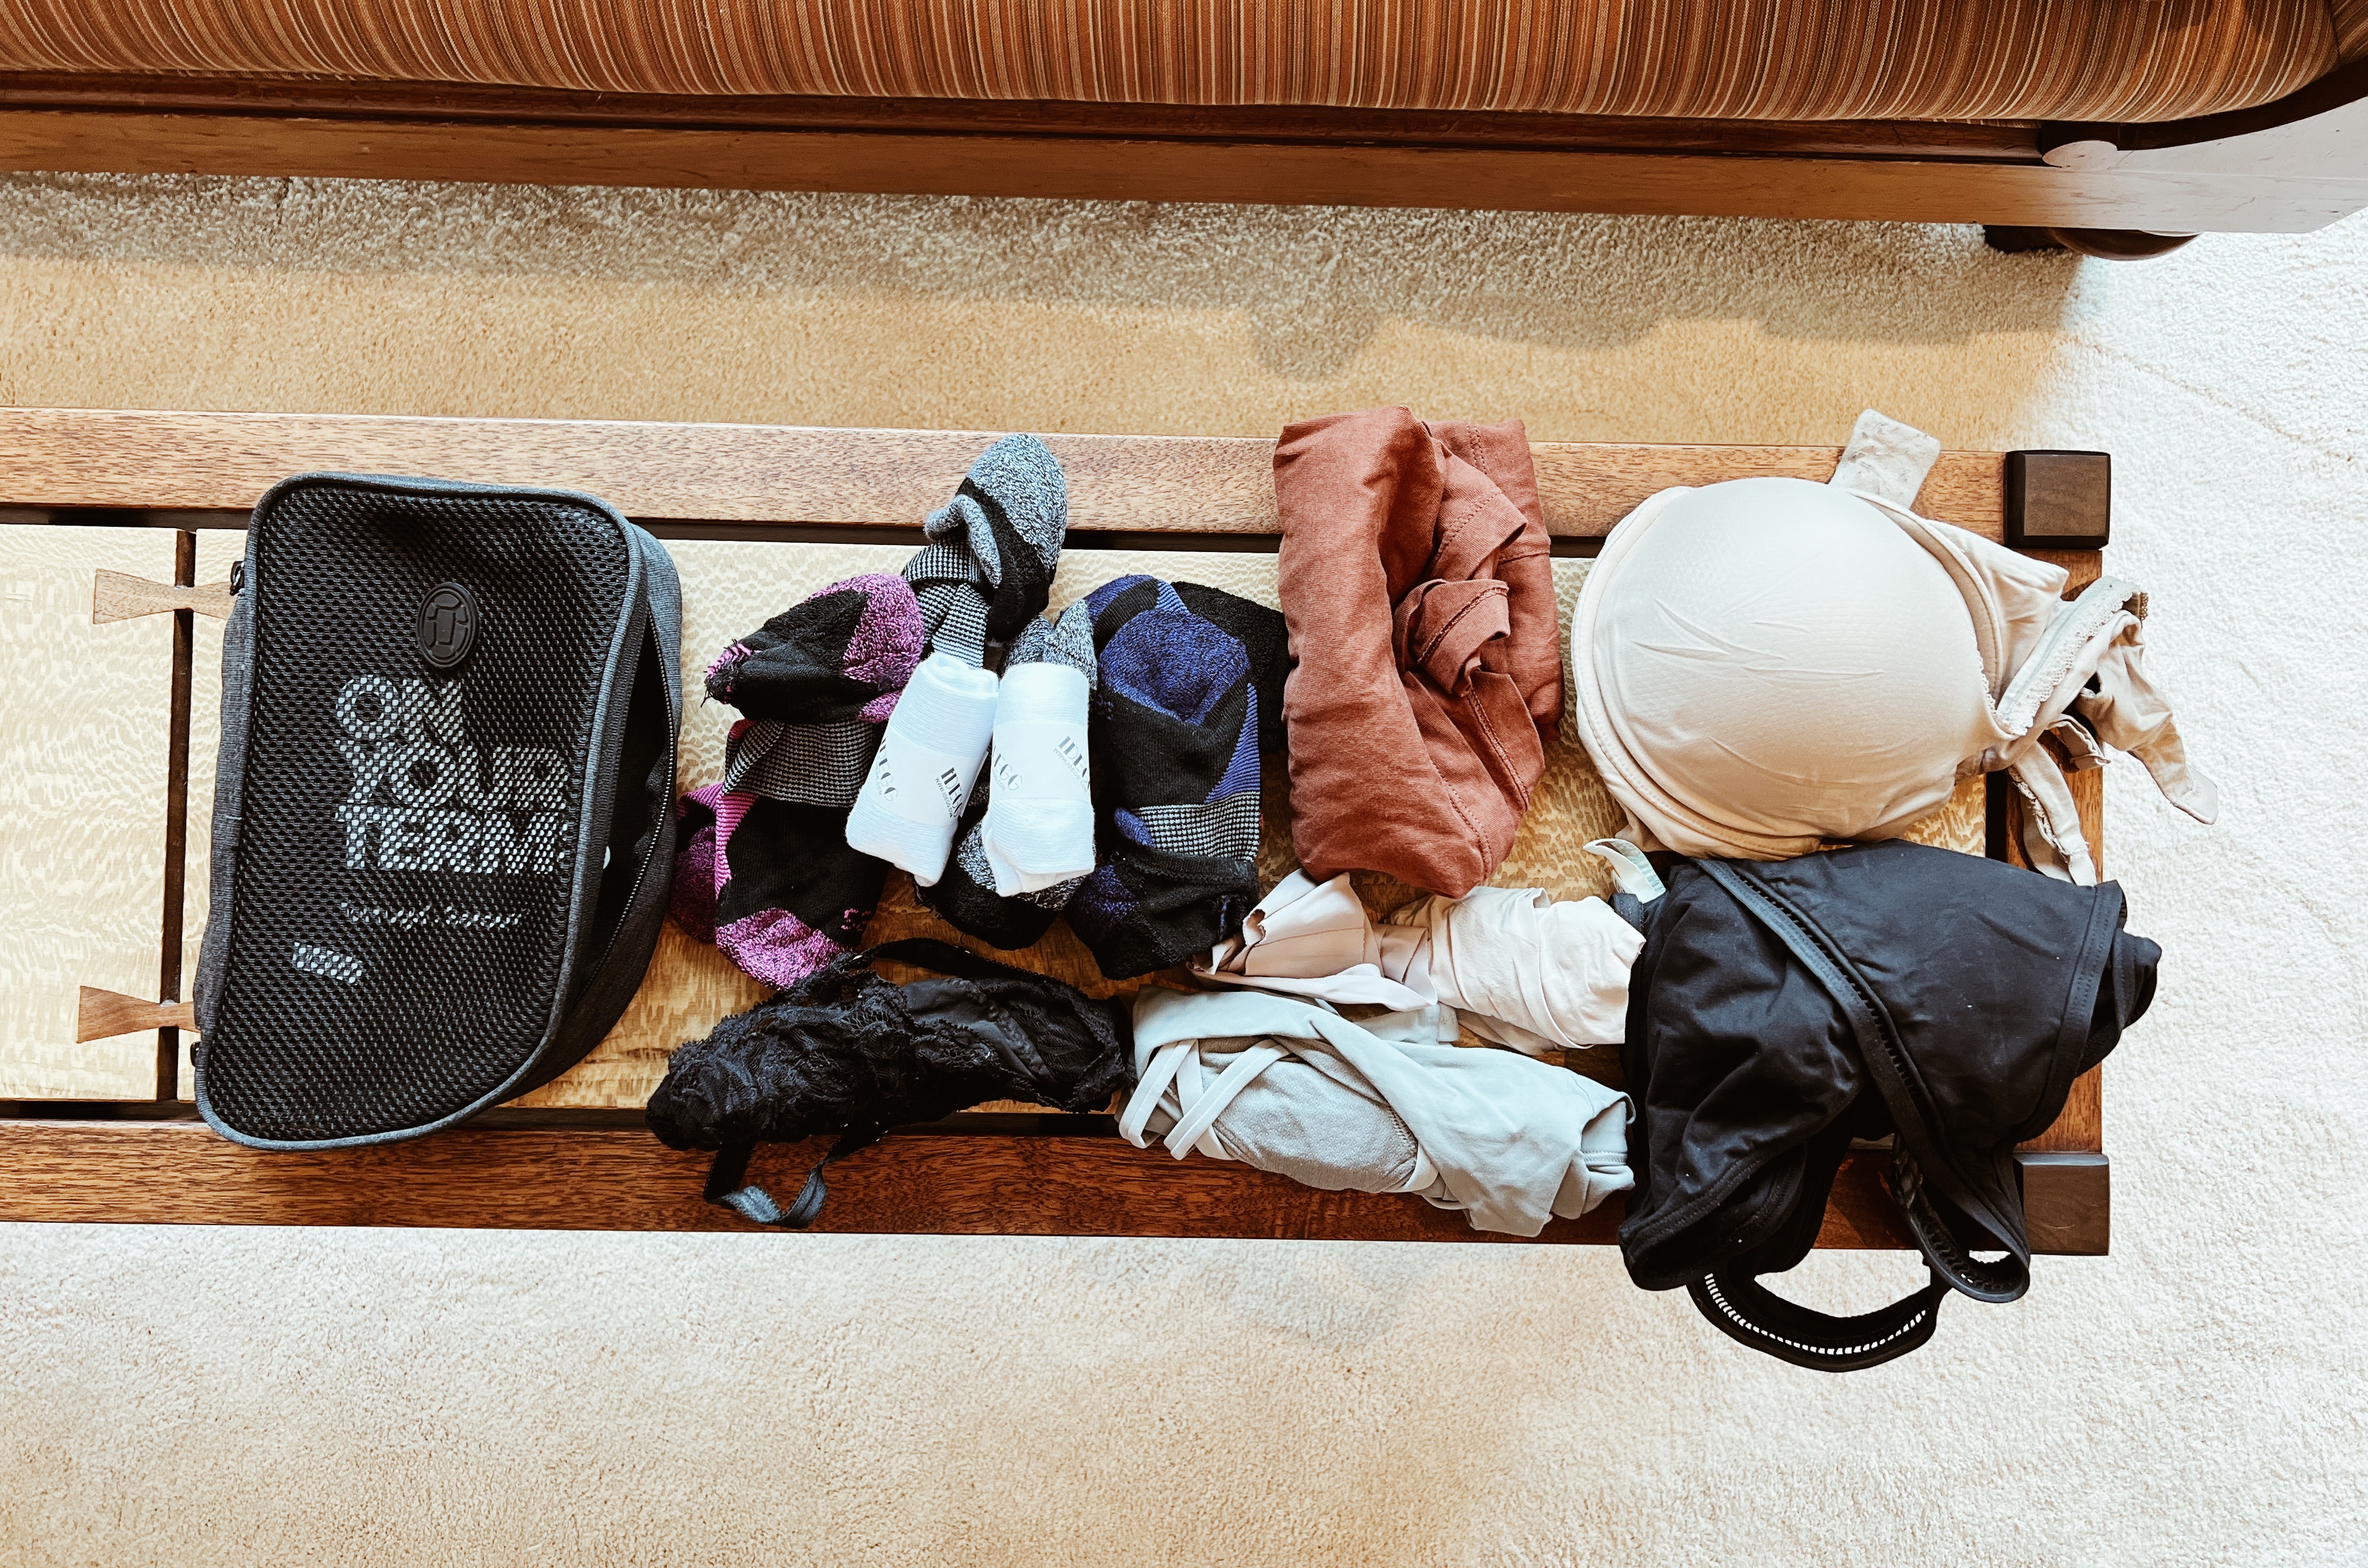
Here is what I packed in each packing cube:
Bathing suit, two sports bra, one bralette, Nike booty shorts and socks + underwearOne long-sleeve shirt, four workout shirts, one cute shirtThree jumpsuits, two ropers, two Lululemon pants
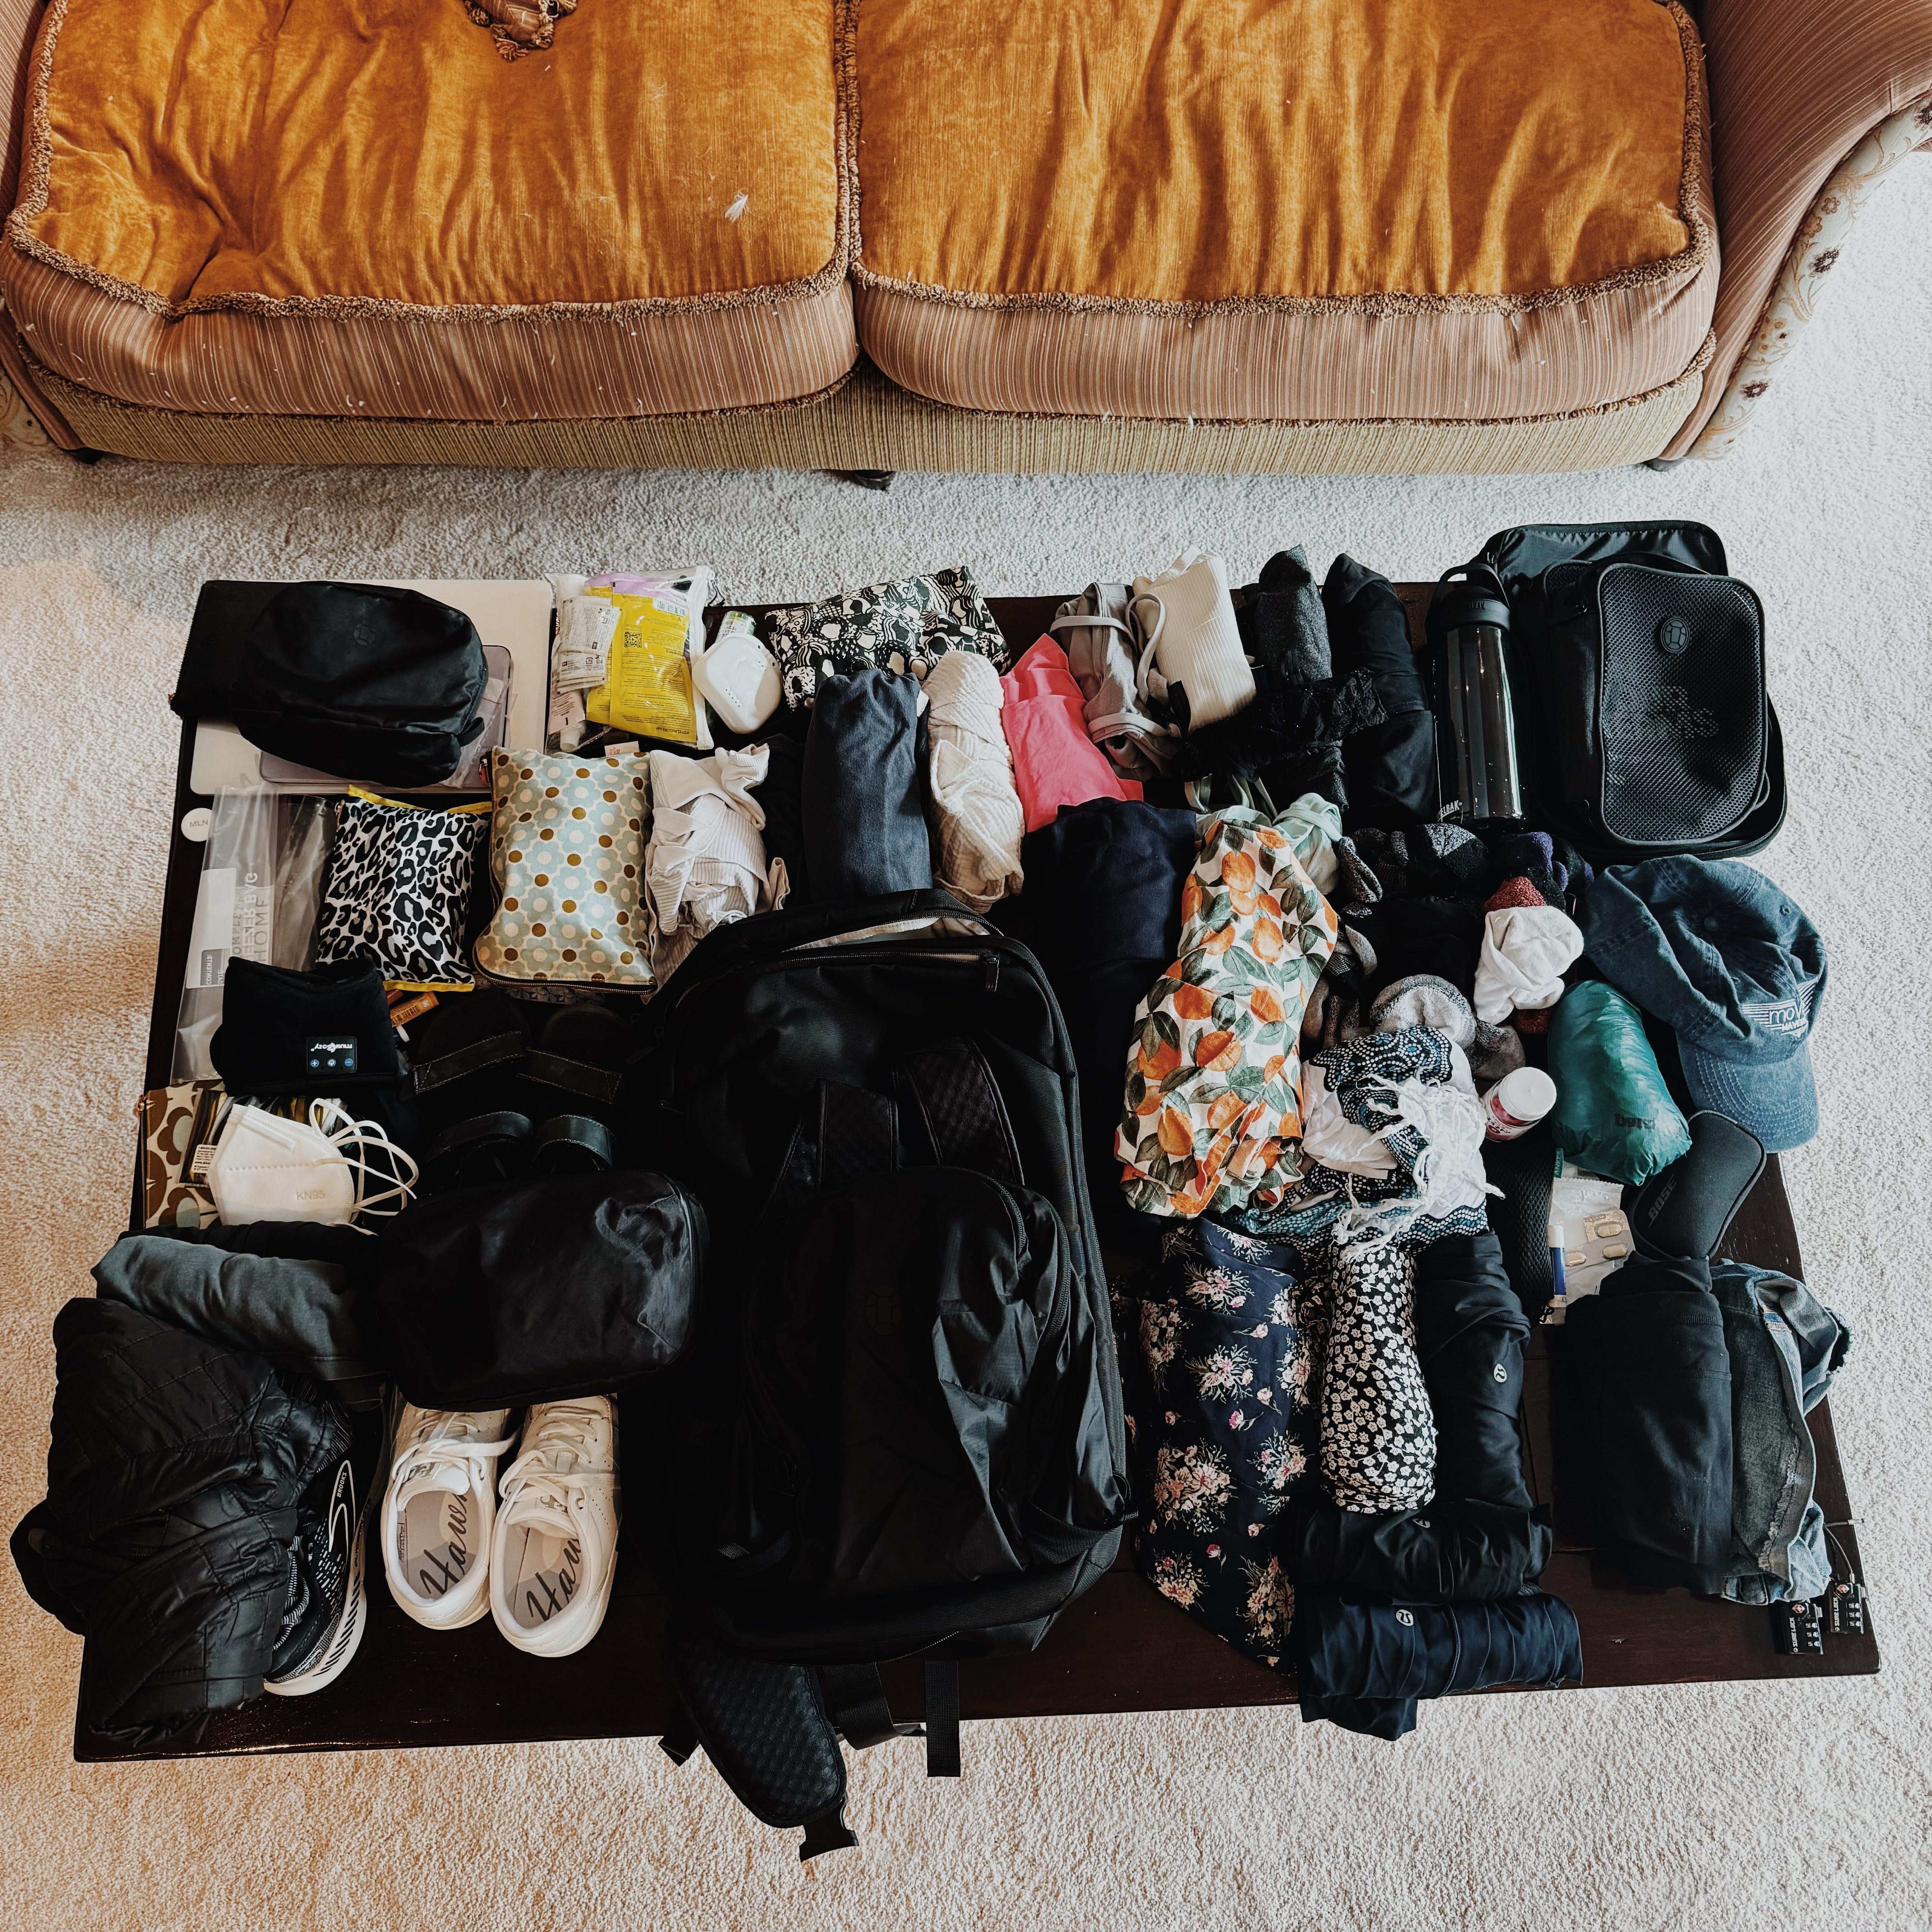
After a wonderful 2.5 months soaking up the summer sun in California, I am back on the road again. This time I am headed to South America to backpack all around this large continent! I am planning to go to Argentina, Uruguay, Colombia, Bolivia, Chile, Brazil, & Paraguay… but also ANTARCTICA!! Pretty exciting stuff. I’ll finally check off all 7 continents 🙂
That being said, this was one of the more challenging trips to pack for because I’ll be doing lots of hiking & in some colder climates, which means more layers and bulkier items like my hiking shoes. I made the decision to really focus my clothes on practicality, which means I sacrificed bringing lots of “cute” clothes that I inevitably wouldn’t be wearing much since the focal point of this trip is hiking, often at higher (read: colder) altitudes. If you know me then you know I’d wayyyy rather be warm than dressed cutely haha.
Overall tips:
Start with the right bag! I love every bag I have ever had from Tortuga. They are designed for this type of travel and include features like opening like a suitcase (avoid top loading backpacks), fit carry on size restrictions, & organize your stuff beautifully. I currently use an old bag of theirs that is 35L. Try to take MAX 45L (but the smaller the better).
Consider the weather, destination, & time of year you are heading to South America as this will greatly vary what types of clothes you will need. Bolivia in the winter – COLD, Colombia in the summer- HOT, Buenos Aires – generally fairly mild year round
Think through how the clothes will layer together.
Make sure that every top works with every bottom and works with every shoes. Use a capsule wardrobe as inspiration. This is less important since my clothes are mostly athletic items, but still good to think through.
Less is more! I can’t emphasize this enough. You CAN do laundry. You CAN buy anything you feel like you ended up needing on the road. I promise!
If you are planning a longterm trip, don’t forget to check out all the things I wish I had known before setting off on my first big trip!
Also, here’s a great Antarctica specific packing list.
1 pair of Lululemon Align pants – can be used for working out/walking around town (even hiking in a pinch) or I can dress it up.
1 pair of Lululemon joggers- after a long day of hiking, I want a more casual, comfy pair of pants to throw on in the evenings.
One pair of warmer leggings from Patagonia – For Antarctica
Waterproof pants – for Antarctica
1 jumpsuit I had made in Hoi An (inspired by my Madewell Jumpsuit) – this will be my one cute outfit when needed
2 Cute shirts – these are pretty casual (in a pinch I could hike in them)
4 sports bras
4 athletic shirts (for running + sleeping in). One is from Vuori & a few from Lululemon. Need lots of these for all the hiking!
3 long sleeve shirt (I recommend Merino Wool but I can’t use it because I’m allergic to wool sadly so mine is from Lululemon – I have 3 colors!)
1 long sleeve jacket from Lululemon – good for warmth & layering, but also super cute!
Booty shorts (to sleep in)
5 pairs of underwear
9 pairs of socks (some regular, some hiking, some warm for Antarctica)
Waterproof gloves (for Antarctica)
1 black bralette
Light Patagonia puffer – good for chilly planes/busses & for layering on hikes. It also smushes down fairly small so it’s a great backpacker jacket. I’ve also used it as a pillow in a pinch.
1 Swimsuit – I don’t foresee doing much swimming on this trip, but it’s always smart to bring one
Hiking boots – I normally don’t bring these traveling since they are heavy & bulky (aka they never go in my pack, I just wear them on travel days), but for the amount of hiking I am doing, it’s a must to bring them.
Waterproof sandals (will act as my water shoe as well as my cute shoes- I never said the backpacker lifestyle was glamorous haha)
Sunglasses (Warby Parker)
Baseball hat
Bandana- for hiking
Warm hat – for hiking & for Antarctica
Scarf or gator – for Antarctica
Rain coat (Patagonia; you can pack it up into its pocket so I can easily attach it to the outside of my bag via a carabiner)
Running belt – I don’t use it often since my Lululemon Fast & Free’s have a pocket for my phone, but every once in a while it comes in handy.
Crossbody bag (I put it into my daypack on travel days). I use this out and about on a daily basis. It fits my iPad mini, passport, keys, credit cards, cash, AirPods, chapstick, sunscreen, etc.
ELECTRONICS
Computer + Charger
iPad
iPhone + Charger (I get a 6 ft cord so I can always reach the plug from my hostel dorm bed!)
AirPod Pro’s
Headphones (Bose; noise-cancelling for travel days)
AirTag (This is a no brainer these days; provides peace of mind incase I am forced to check my bag or when it’s below me in a bus. Always nice to confirm it’s still with me!)
Headlamp – for hiking + Antartica
TOILETRIES (I USE A BUNCH OF LITTLE TOILETRY BAGS TO KEEP THESE ALL ORGANIZED)
Toothbrush
Toothpaste
Floss
Any medication you take
Retainer
Deodorant
Tiny roller perfume
Makeup
Makeup Remover (I’ve become obsessed with cleansing balm for this because it isn’t a liquid, & it’s highly effective at getting makeup off at the end of the day!)
Razor
Conditioner + Shampoo (Get containers to put your products into & refill on the road!!)
Face wash
Moisturizer
Hair Brush
Pocket Hand Sanitizer– I keep one in my backpack and one in my sling/purse. Great in general, but also for when inevitably there is no soap at a random bus stop bathroom 🙂
Tiger balm (I picked this up in Southeast Asia and it’s now a staple in my bag. Great for mosquito bites and just feeling a little sick. It’s kinda like Vick’s vapor rub).
Ibuprofen
Hair ties and bobby pins
Moleskin
Bandaids
Cough drops
Topical steroid cream for bed bug bites or regular bug bites to help with itchiness
MISCELLANEOUS
Passport – no explanation necessary 🙂
ID (I bring my driver’s license)
Travel Credit Card- I bring 2-3 cards with me in case I lose one it gets stolen or it gets hacked. Important to get ones with no foreign transaction fee; I have the Chase Sapphire Reserve (hello lounge access!) + Capital One Venture Card.
Debit Card (Charles Schwab has the best one because it reimburses ATM fees from any ATM in the world 🙂)
US Dollars – I always bring 1-2 Hundred dollar bills as an emergency source of cash (luckily most places in the world would take USD if it was truly an emergency & you needed some cash to get you out of a situation), however, in the case of South America, I’ve taken more! Between Bolivia’s visa requiring payment in USD & the best exchange rate being USD to local currencies in a lot of countries, I’ve taken closer to 10 Hundred dollar bills
Record of your plans (I make folders within my email inbox to keep track of everything or you could print out a copy of your itinerary)
Eye Mask (you can either go the classic eye mask route or get one like this that almost acts like your eye mask + ear plug since you can play white noise through the built in bluetooth speaker- pretty cool!)
Lock (for staying in hostels or locking my bag.) Get the combo lock so you don’t have to worry about tiny keys. I take two to be able to lock two different compartments in my bag AND so I can keep my computer/passport/iPad compartment still locked when I use the other one to lock a locker within a hostel.
3 carabiners – I just attach them to my backpack and over the course of the trip they will hold everything from my water bottle, shoes, rain jacket and more. You will not regret having a few on hand.
Hand warmers for Antarctica
Pack of playing cards (My sister got my a custom deck with some of my favorite photos from my travels – such a thoughtful gift)
Monopoly Deal – a fabulous compact game for the backpacking trail!
Face mask (I’ve used this while feeling sick as well as on a dusty motorcycle ride)
2 pens for writing postcards
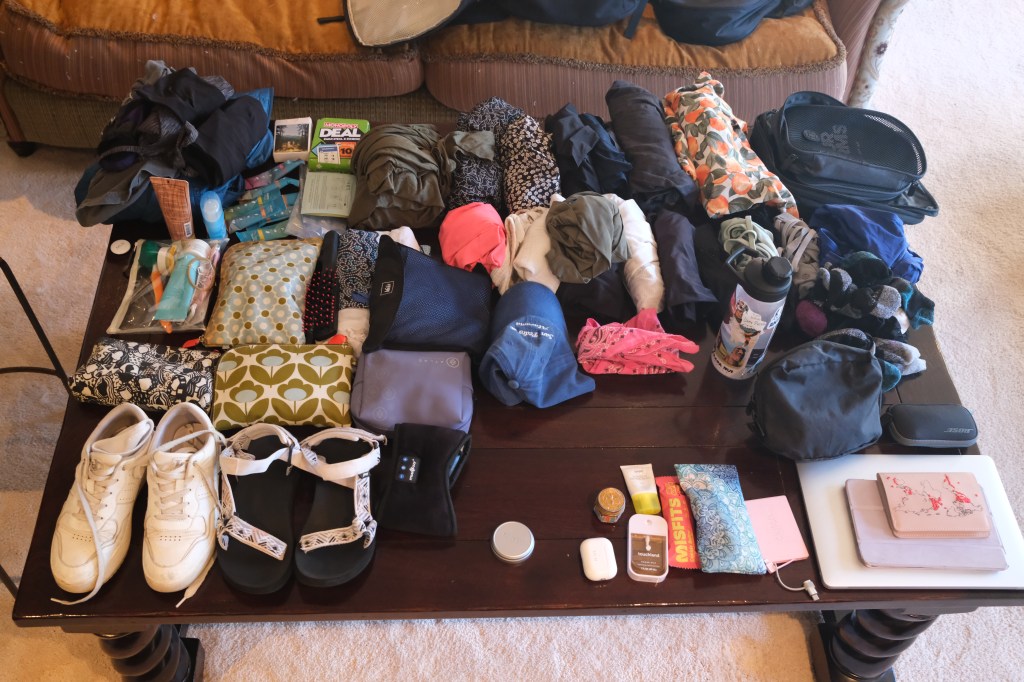
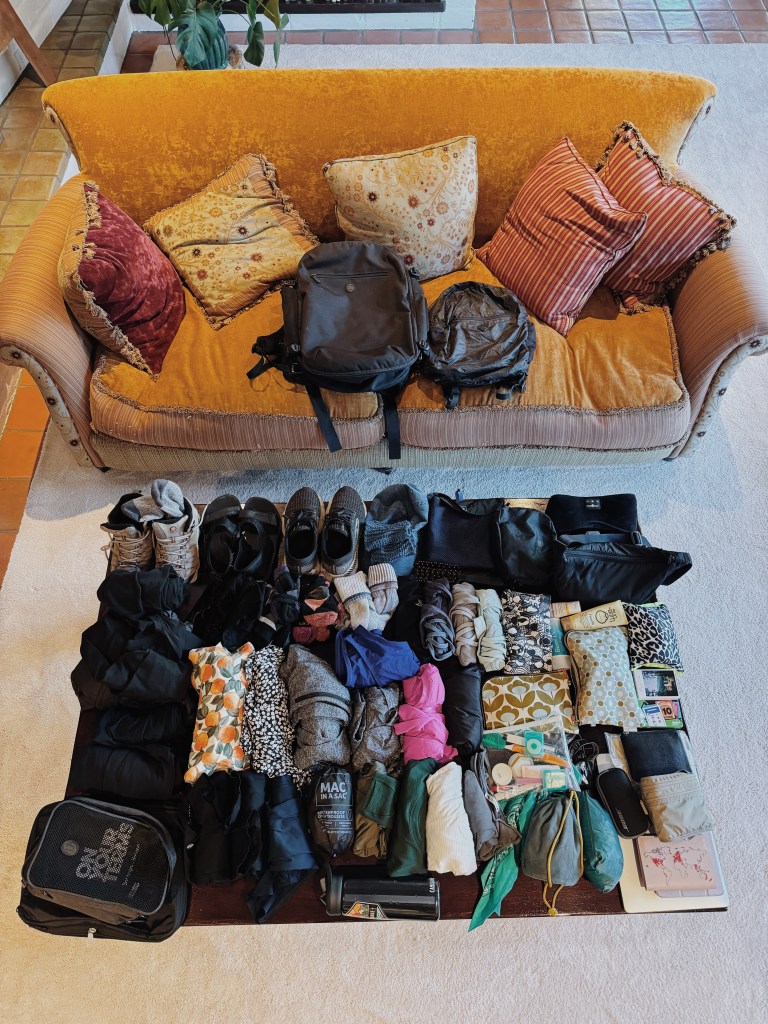
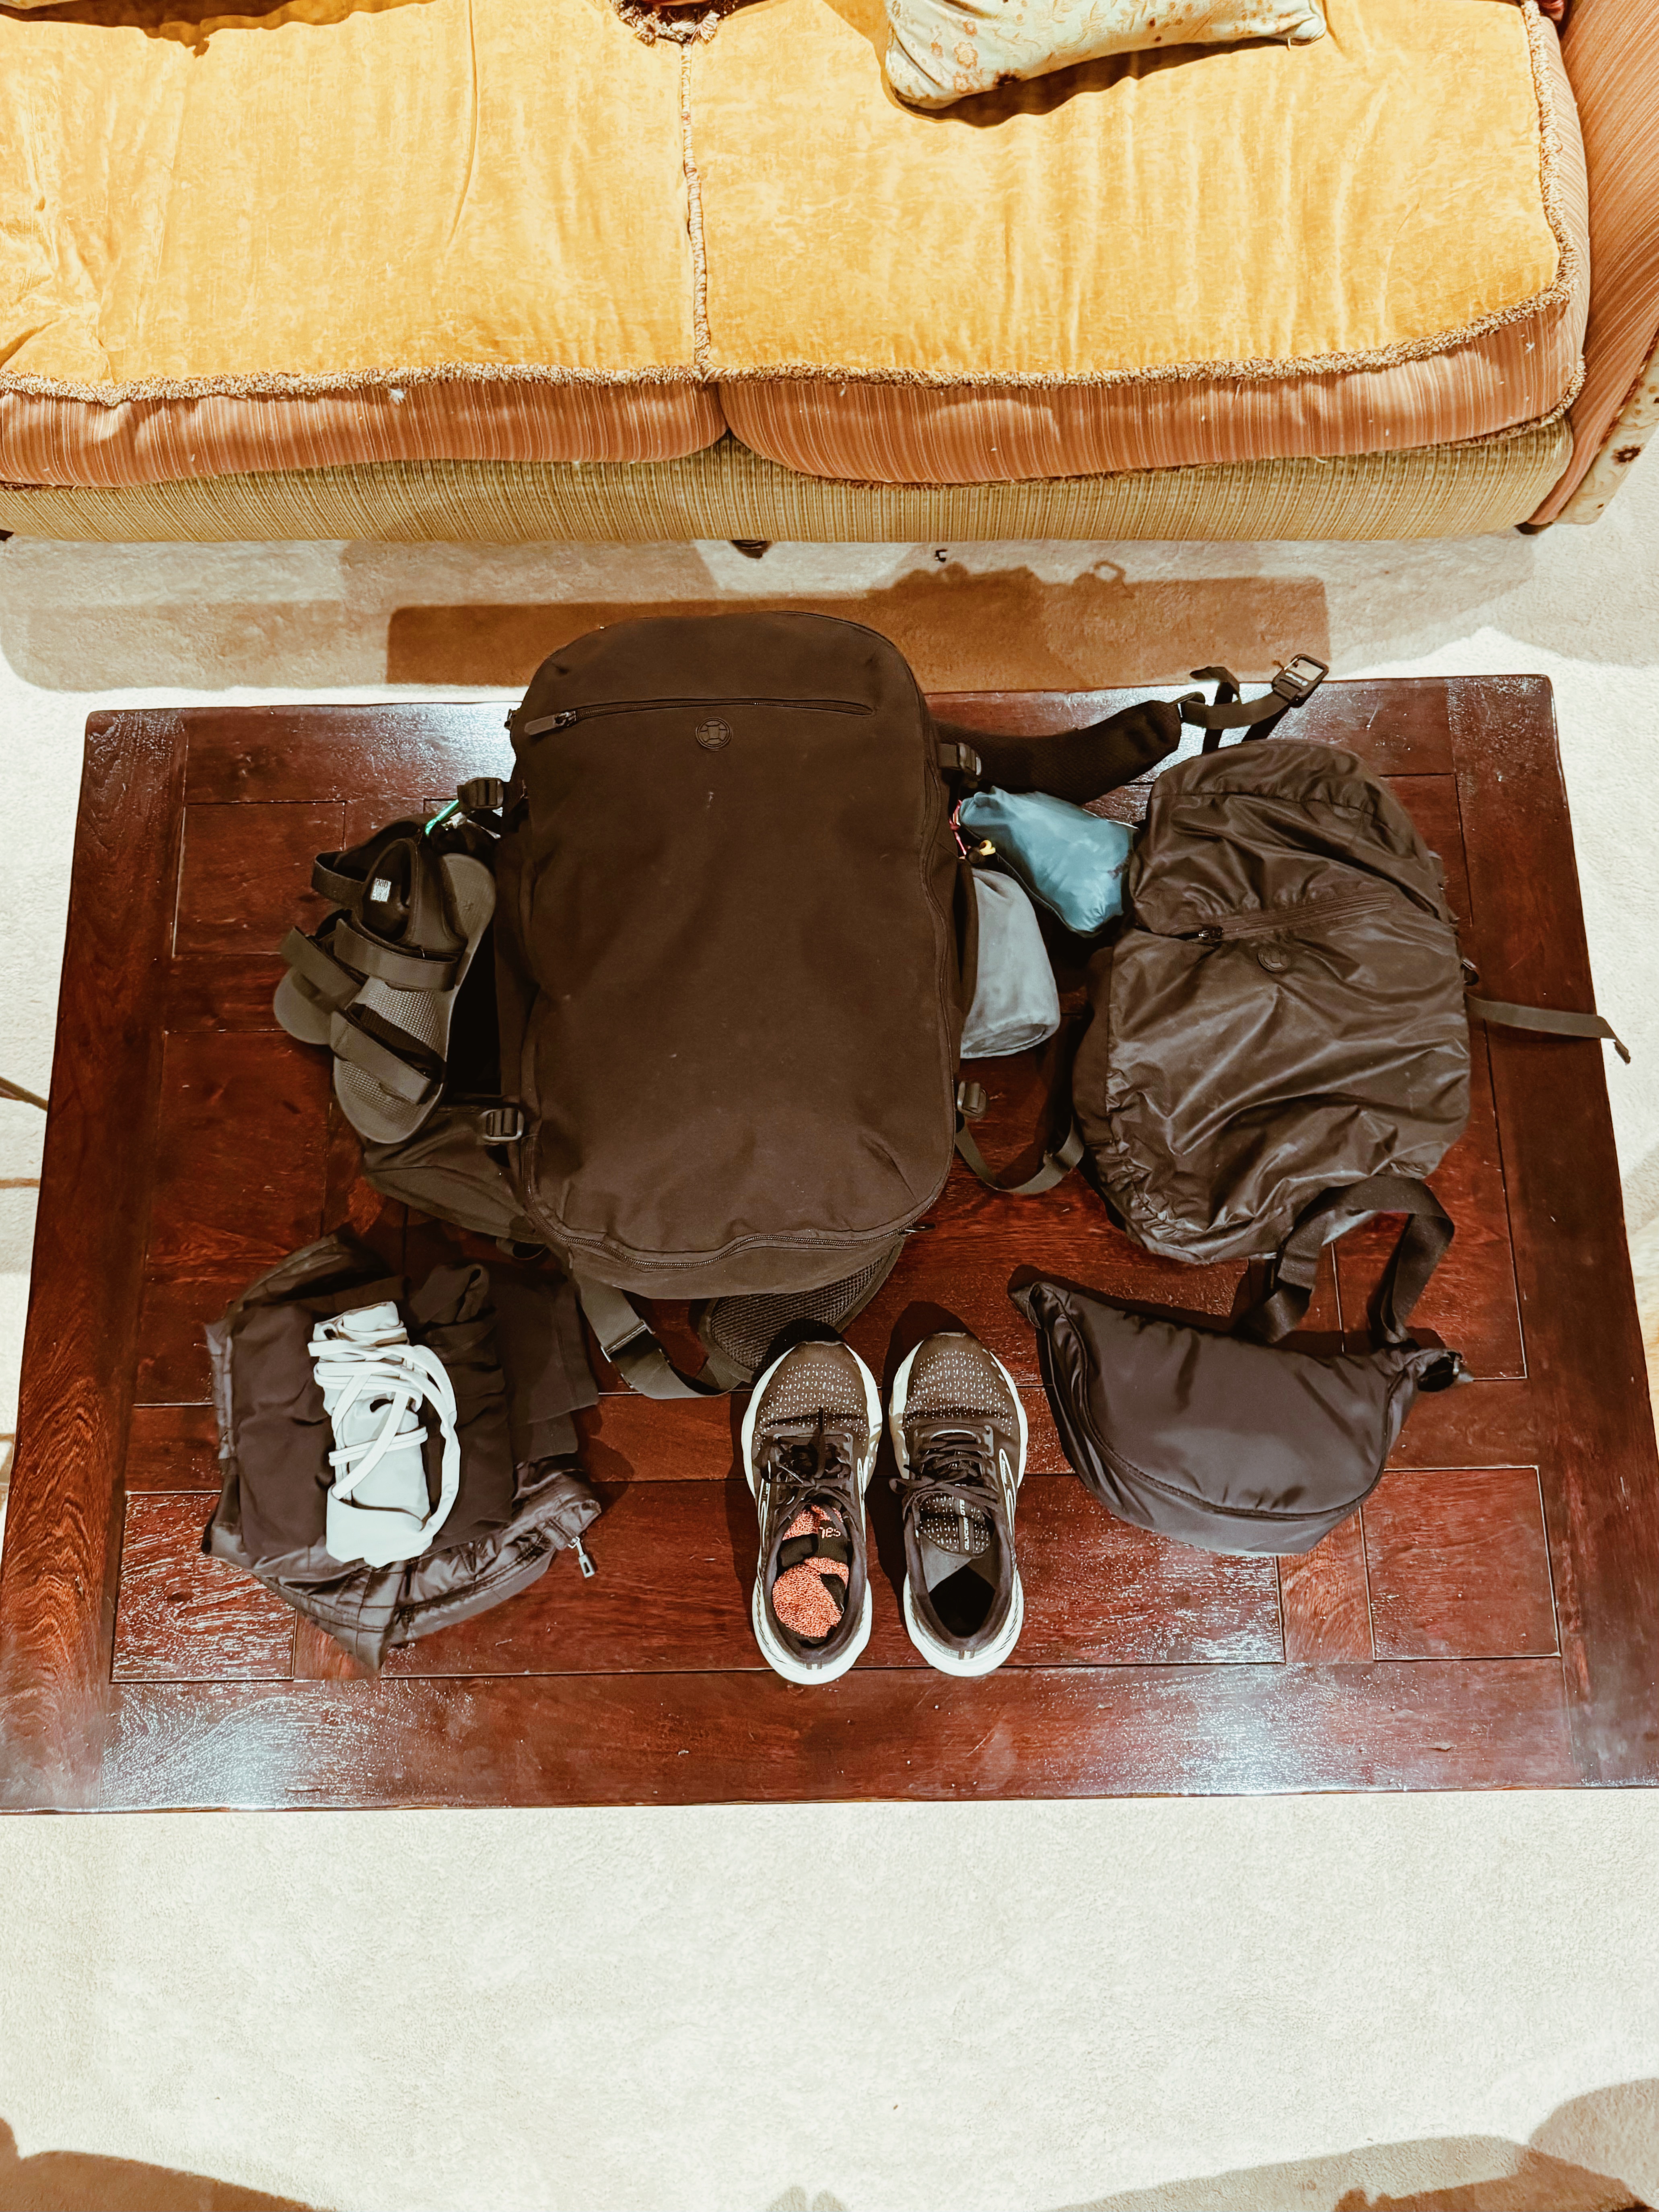
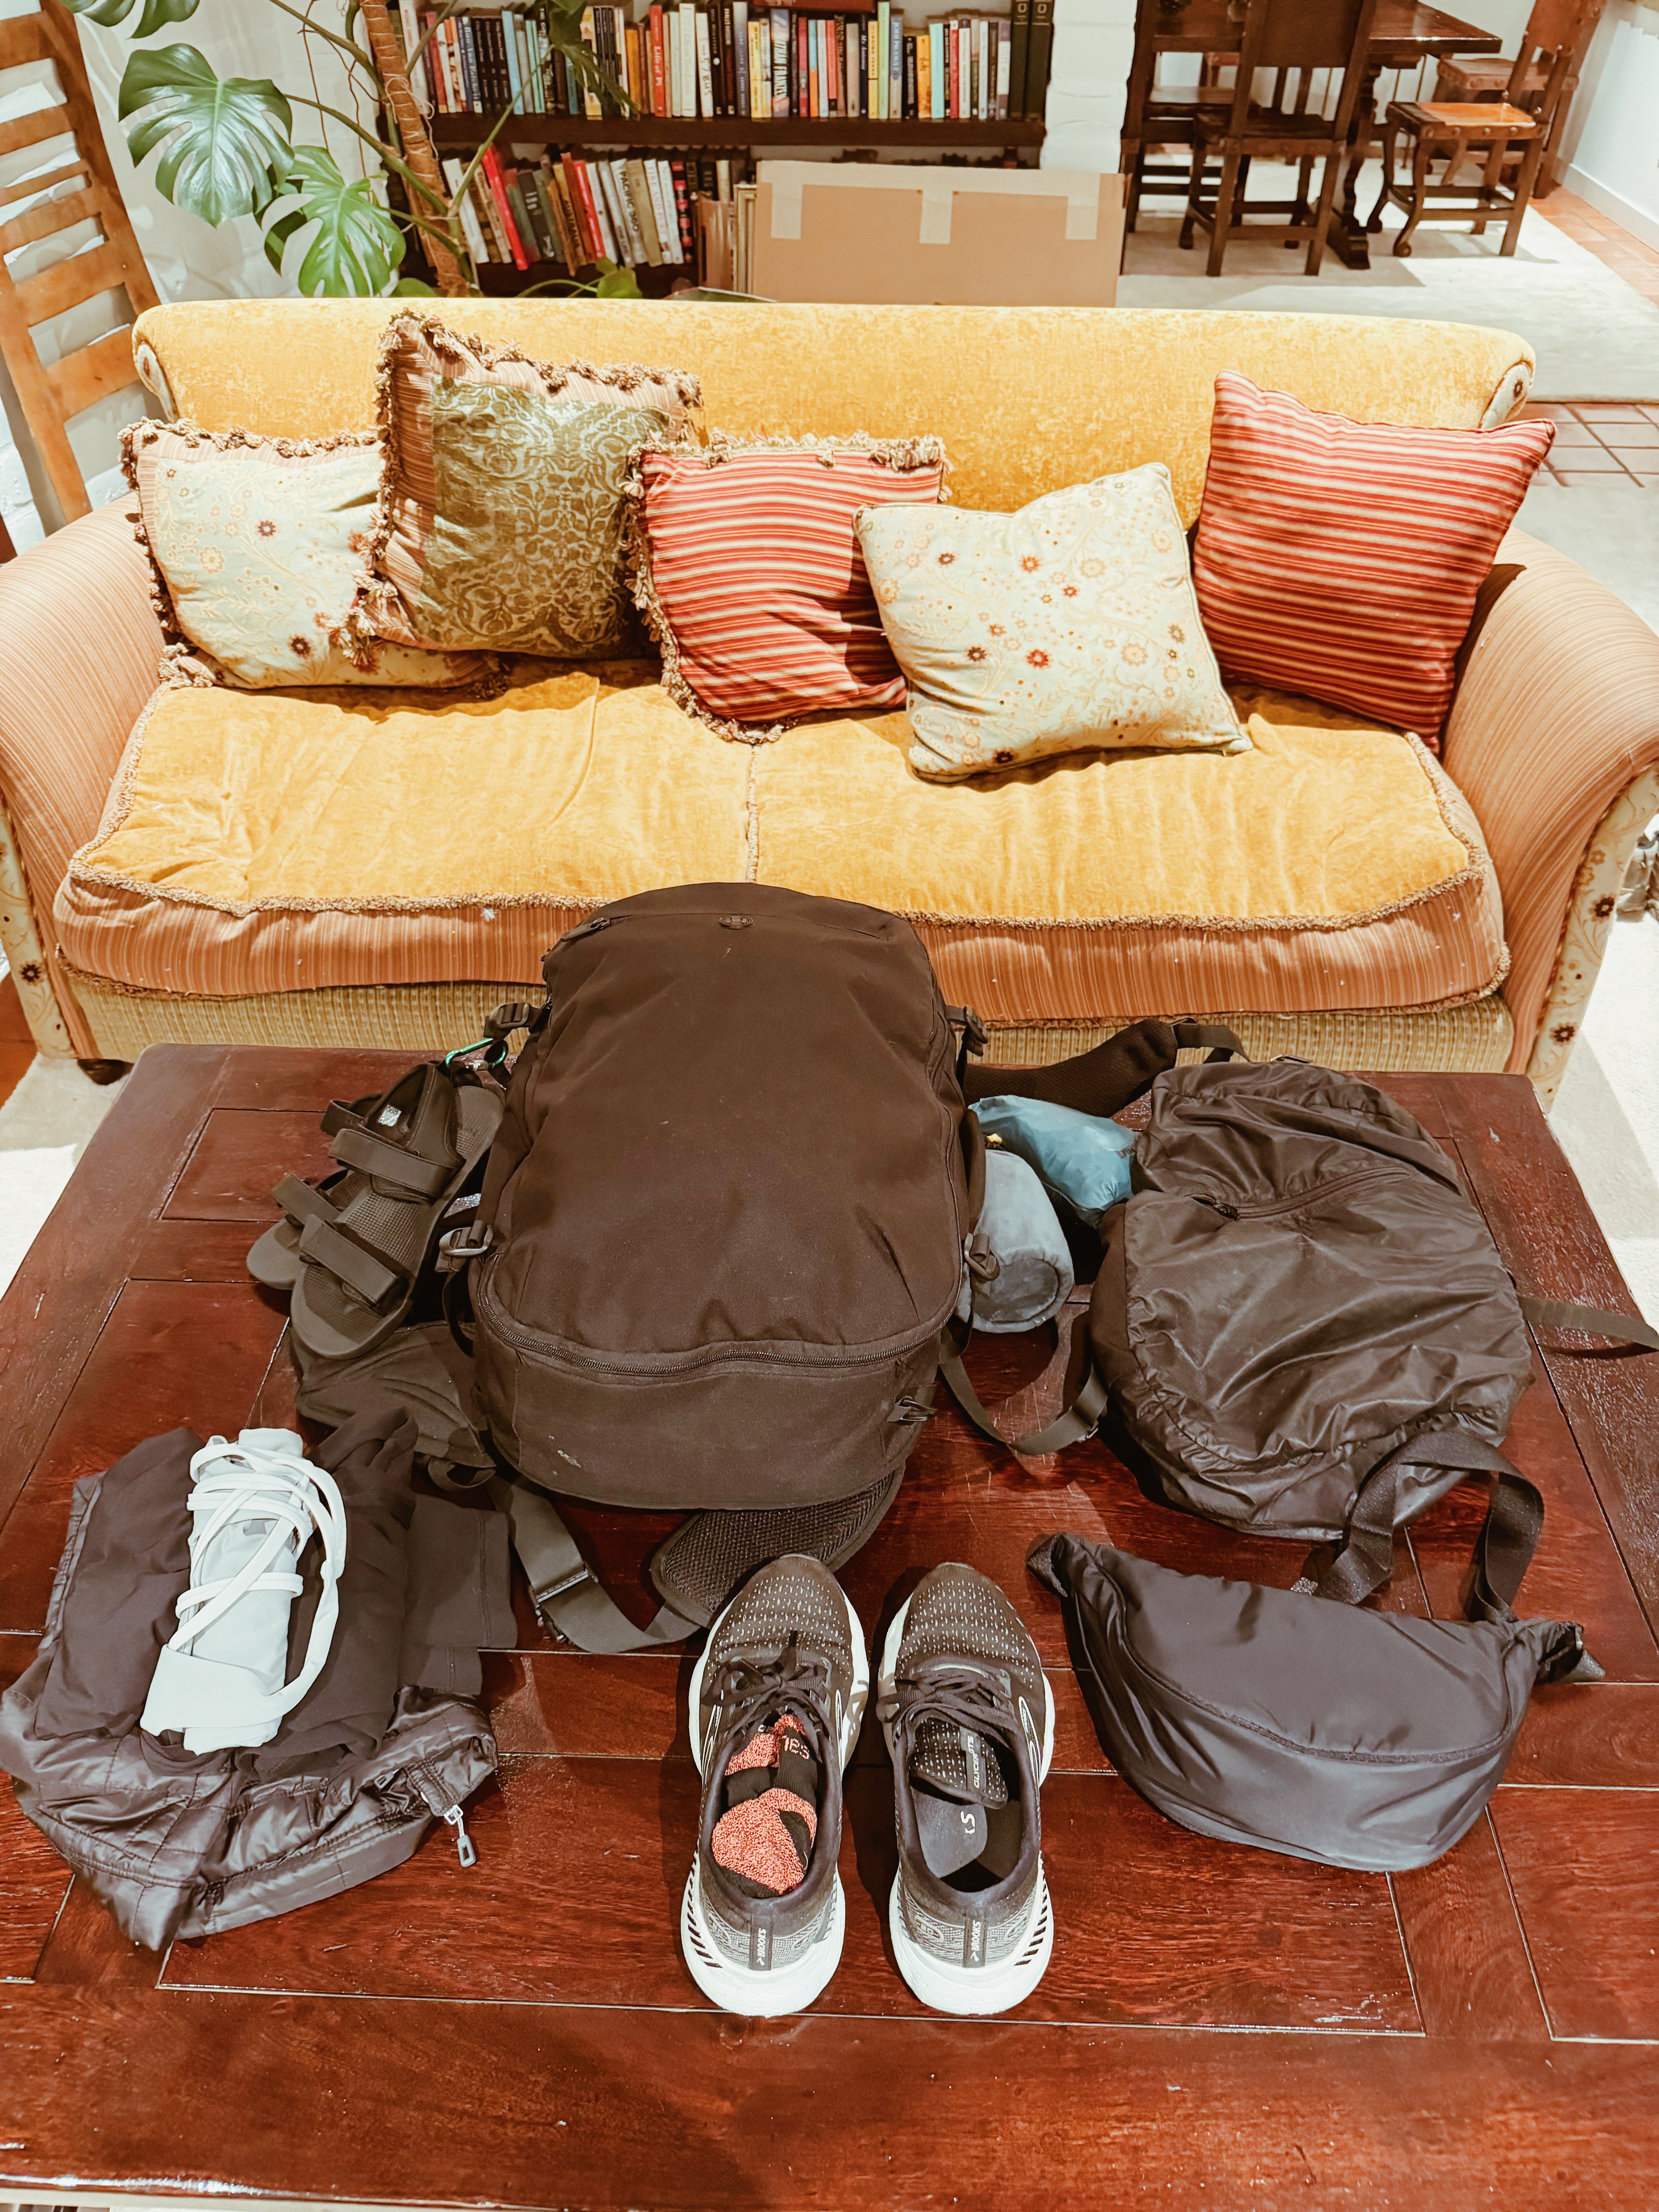
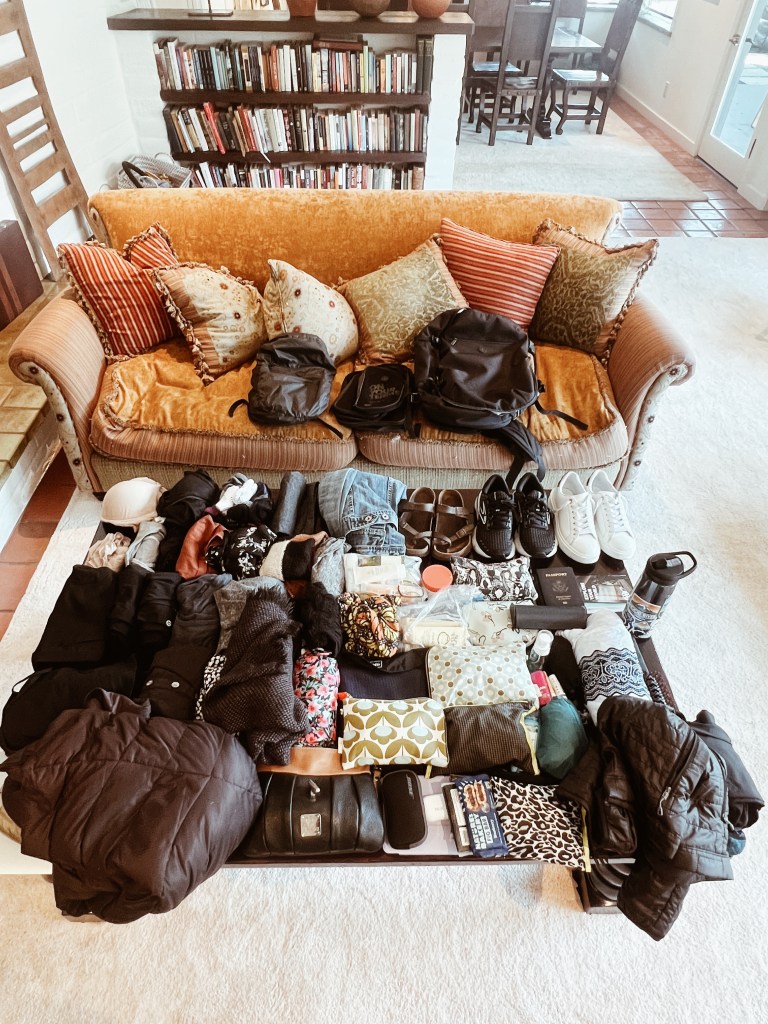
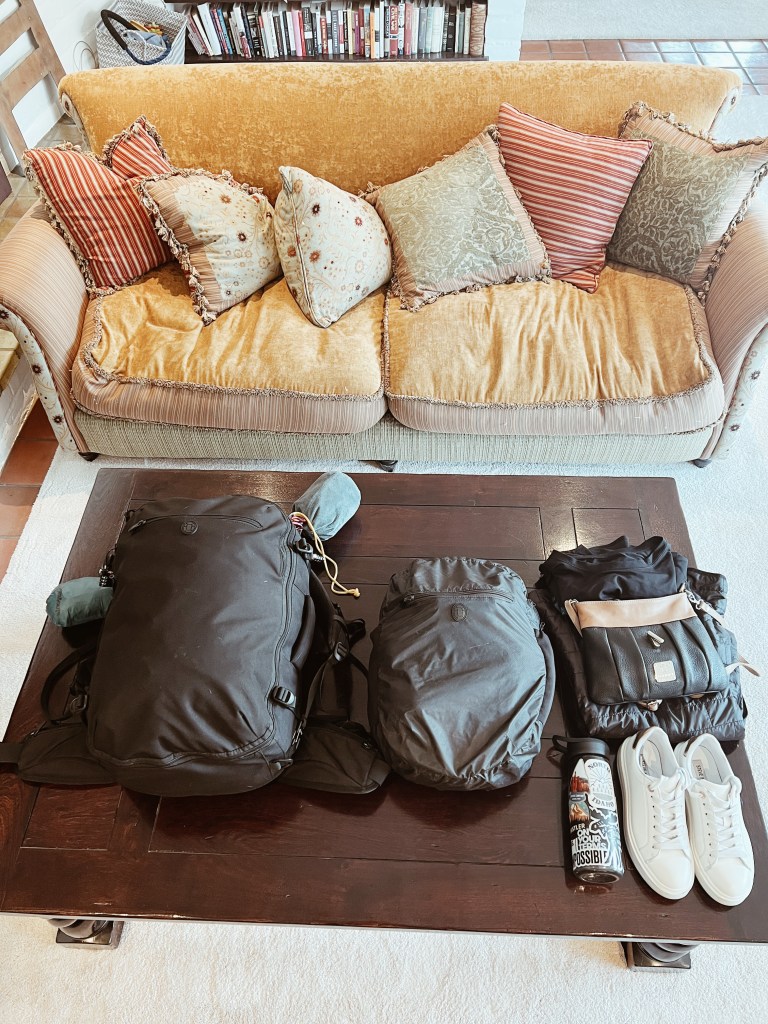
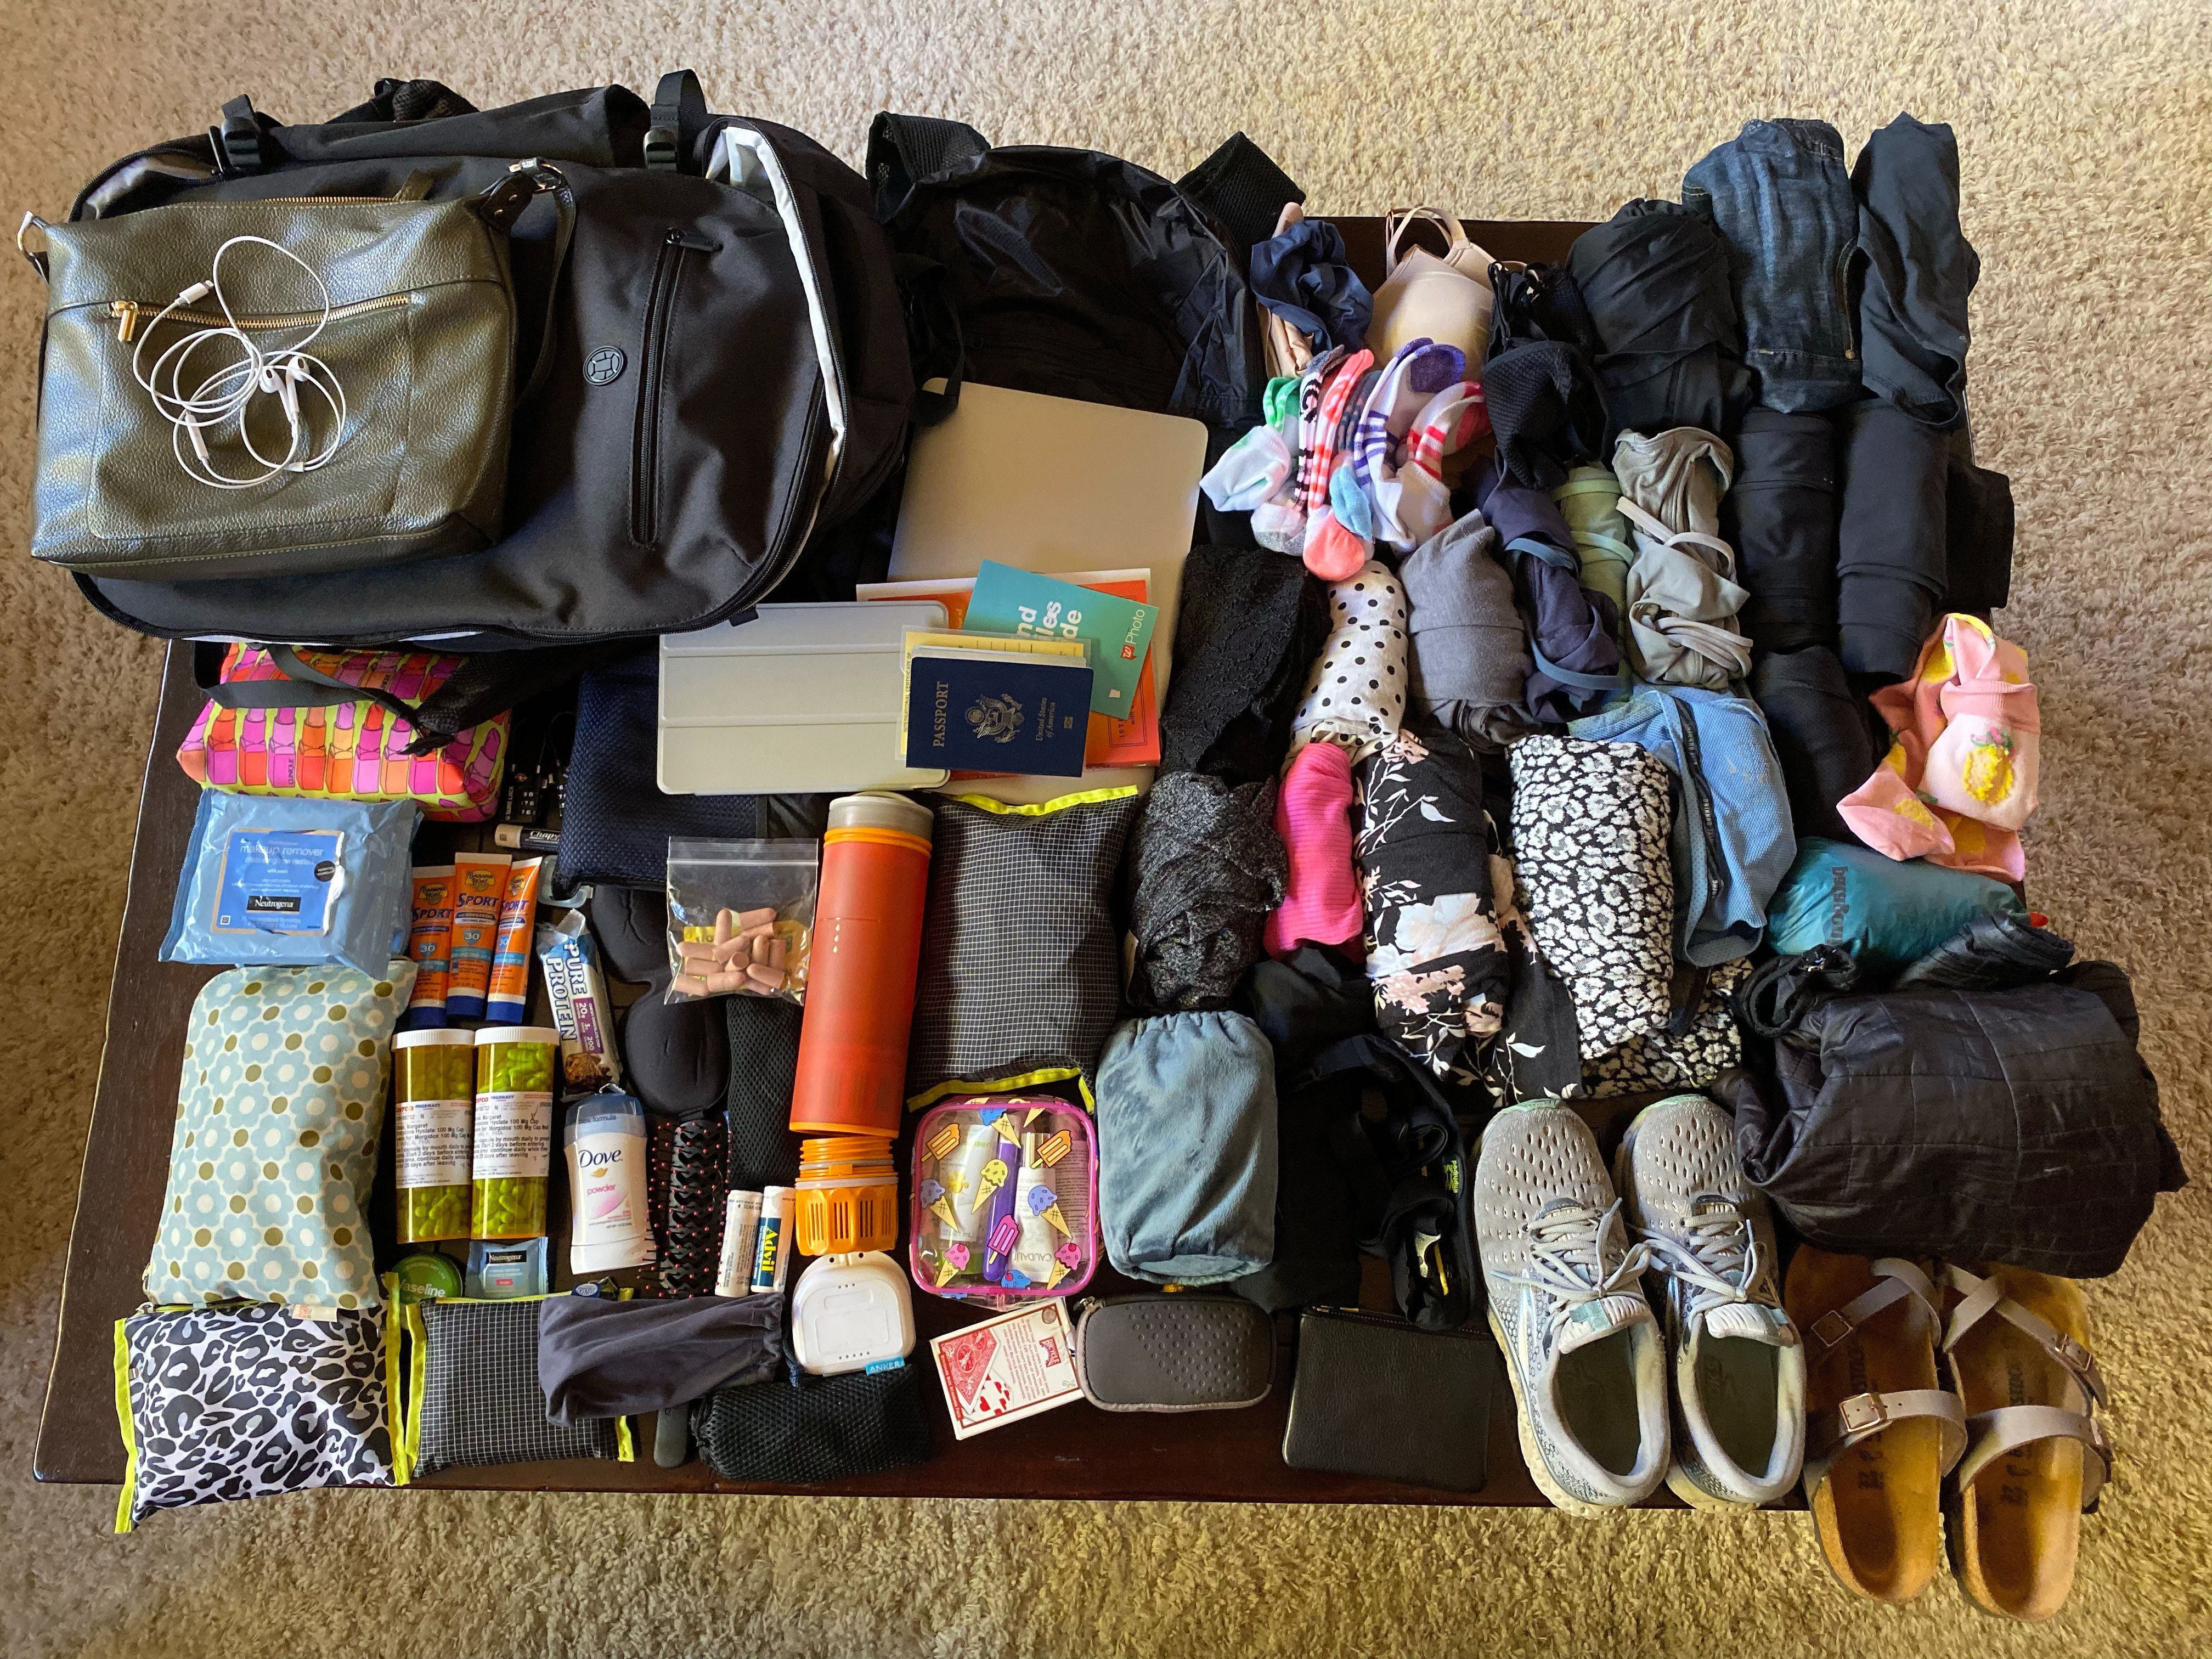
HERE IS EVERYTHING SPREAD OUT ON A TABLE!
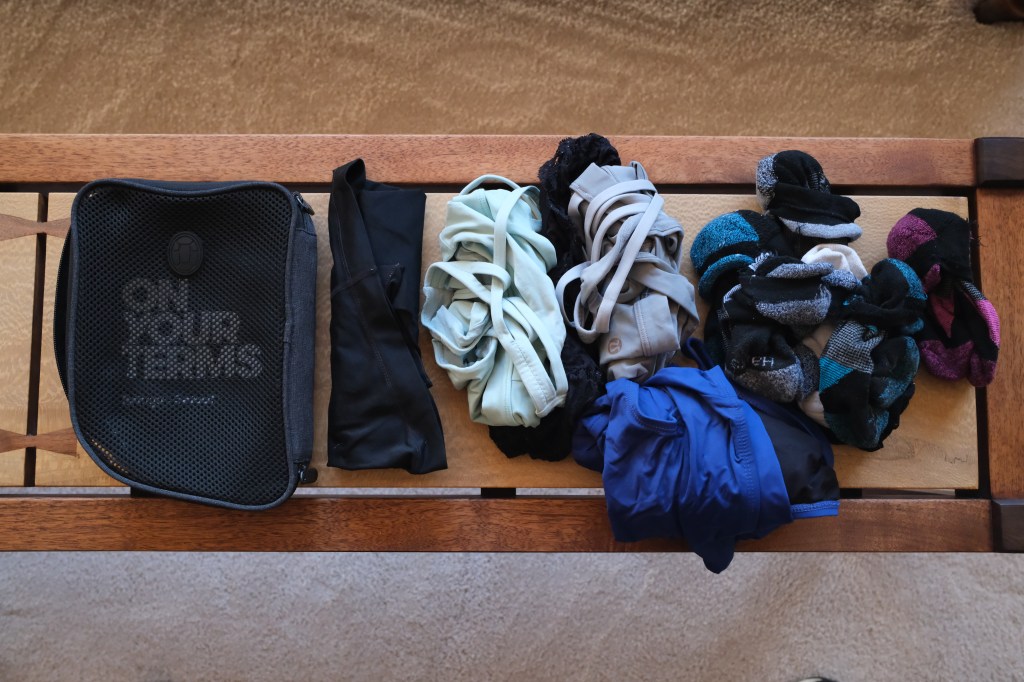
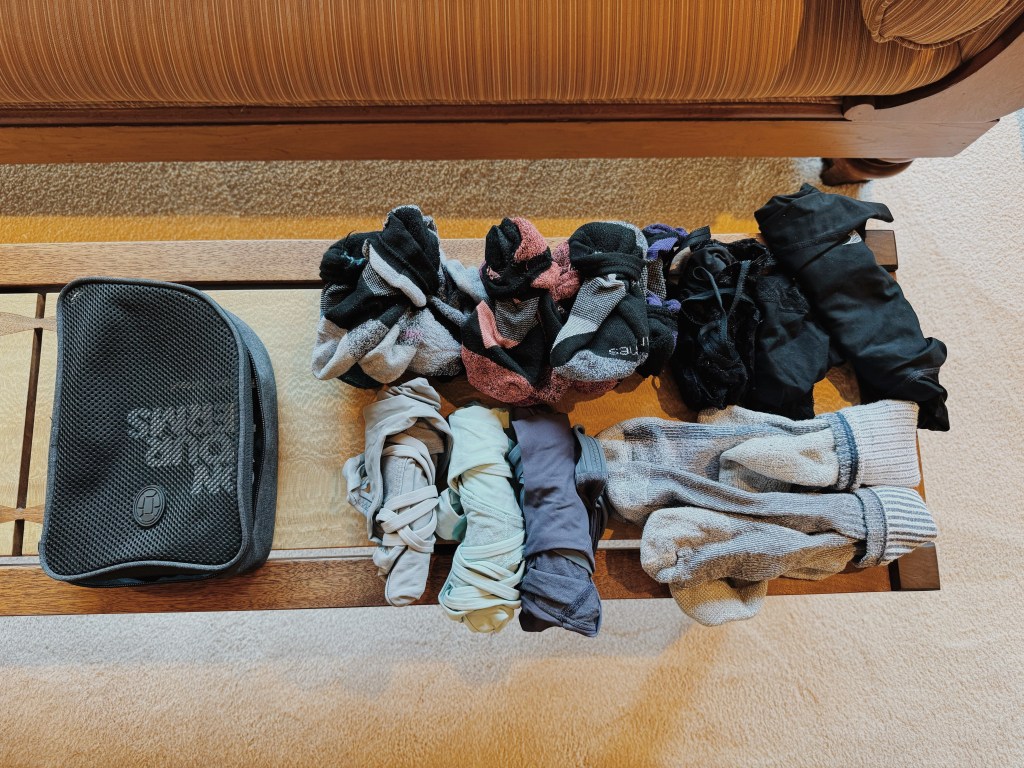
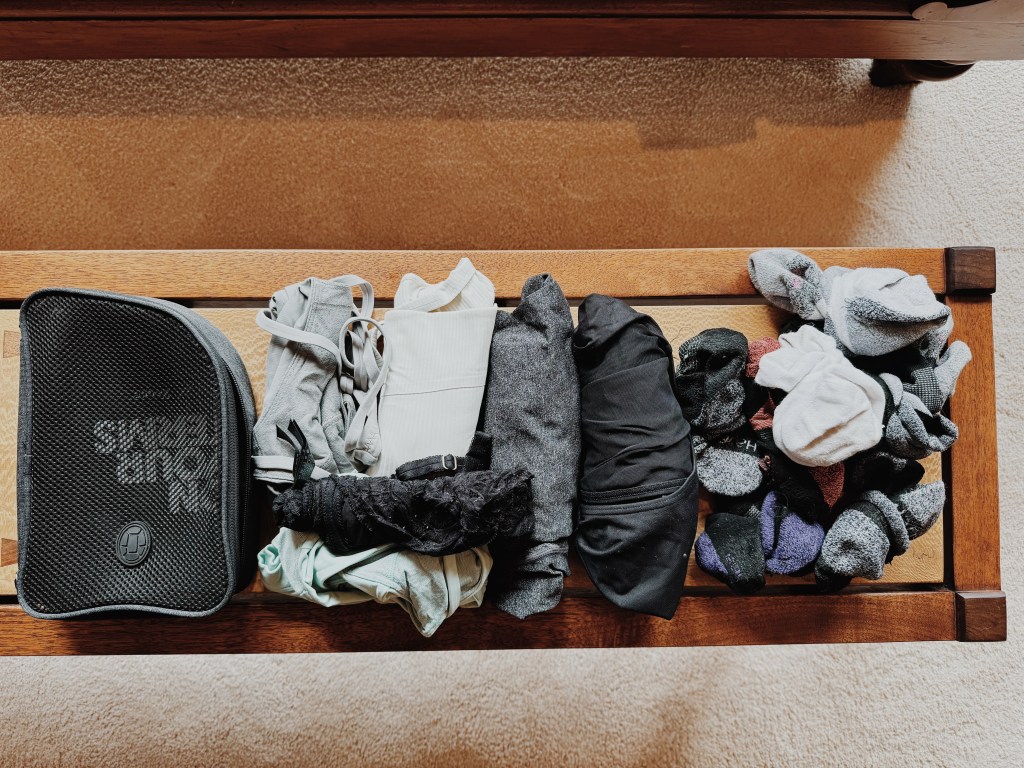
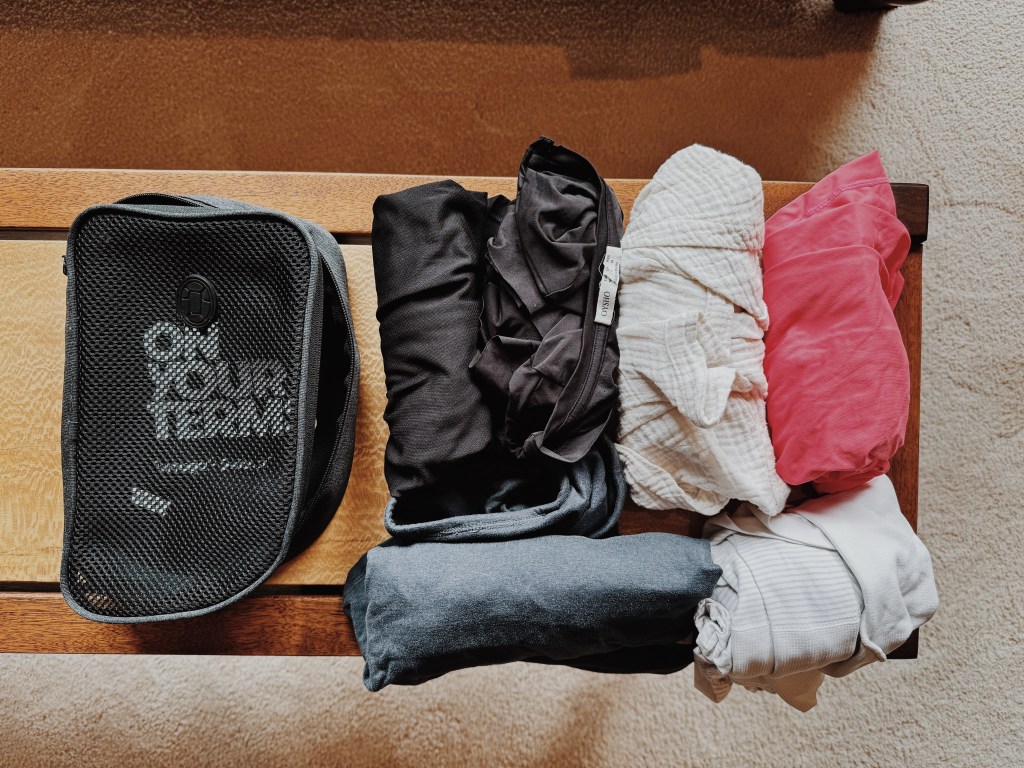
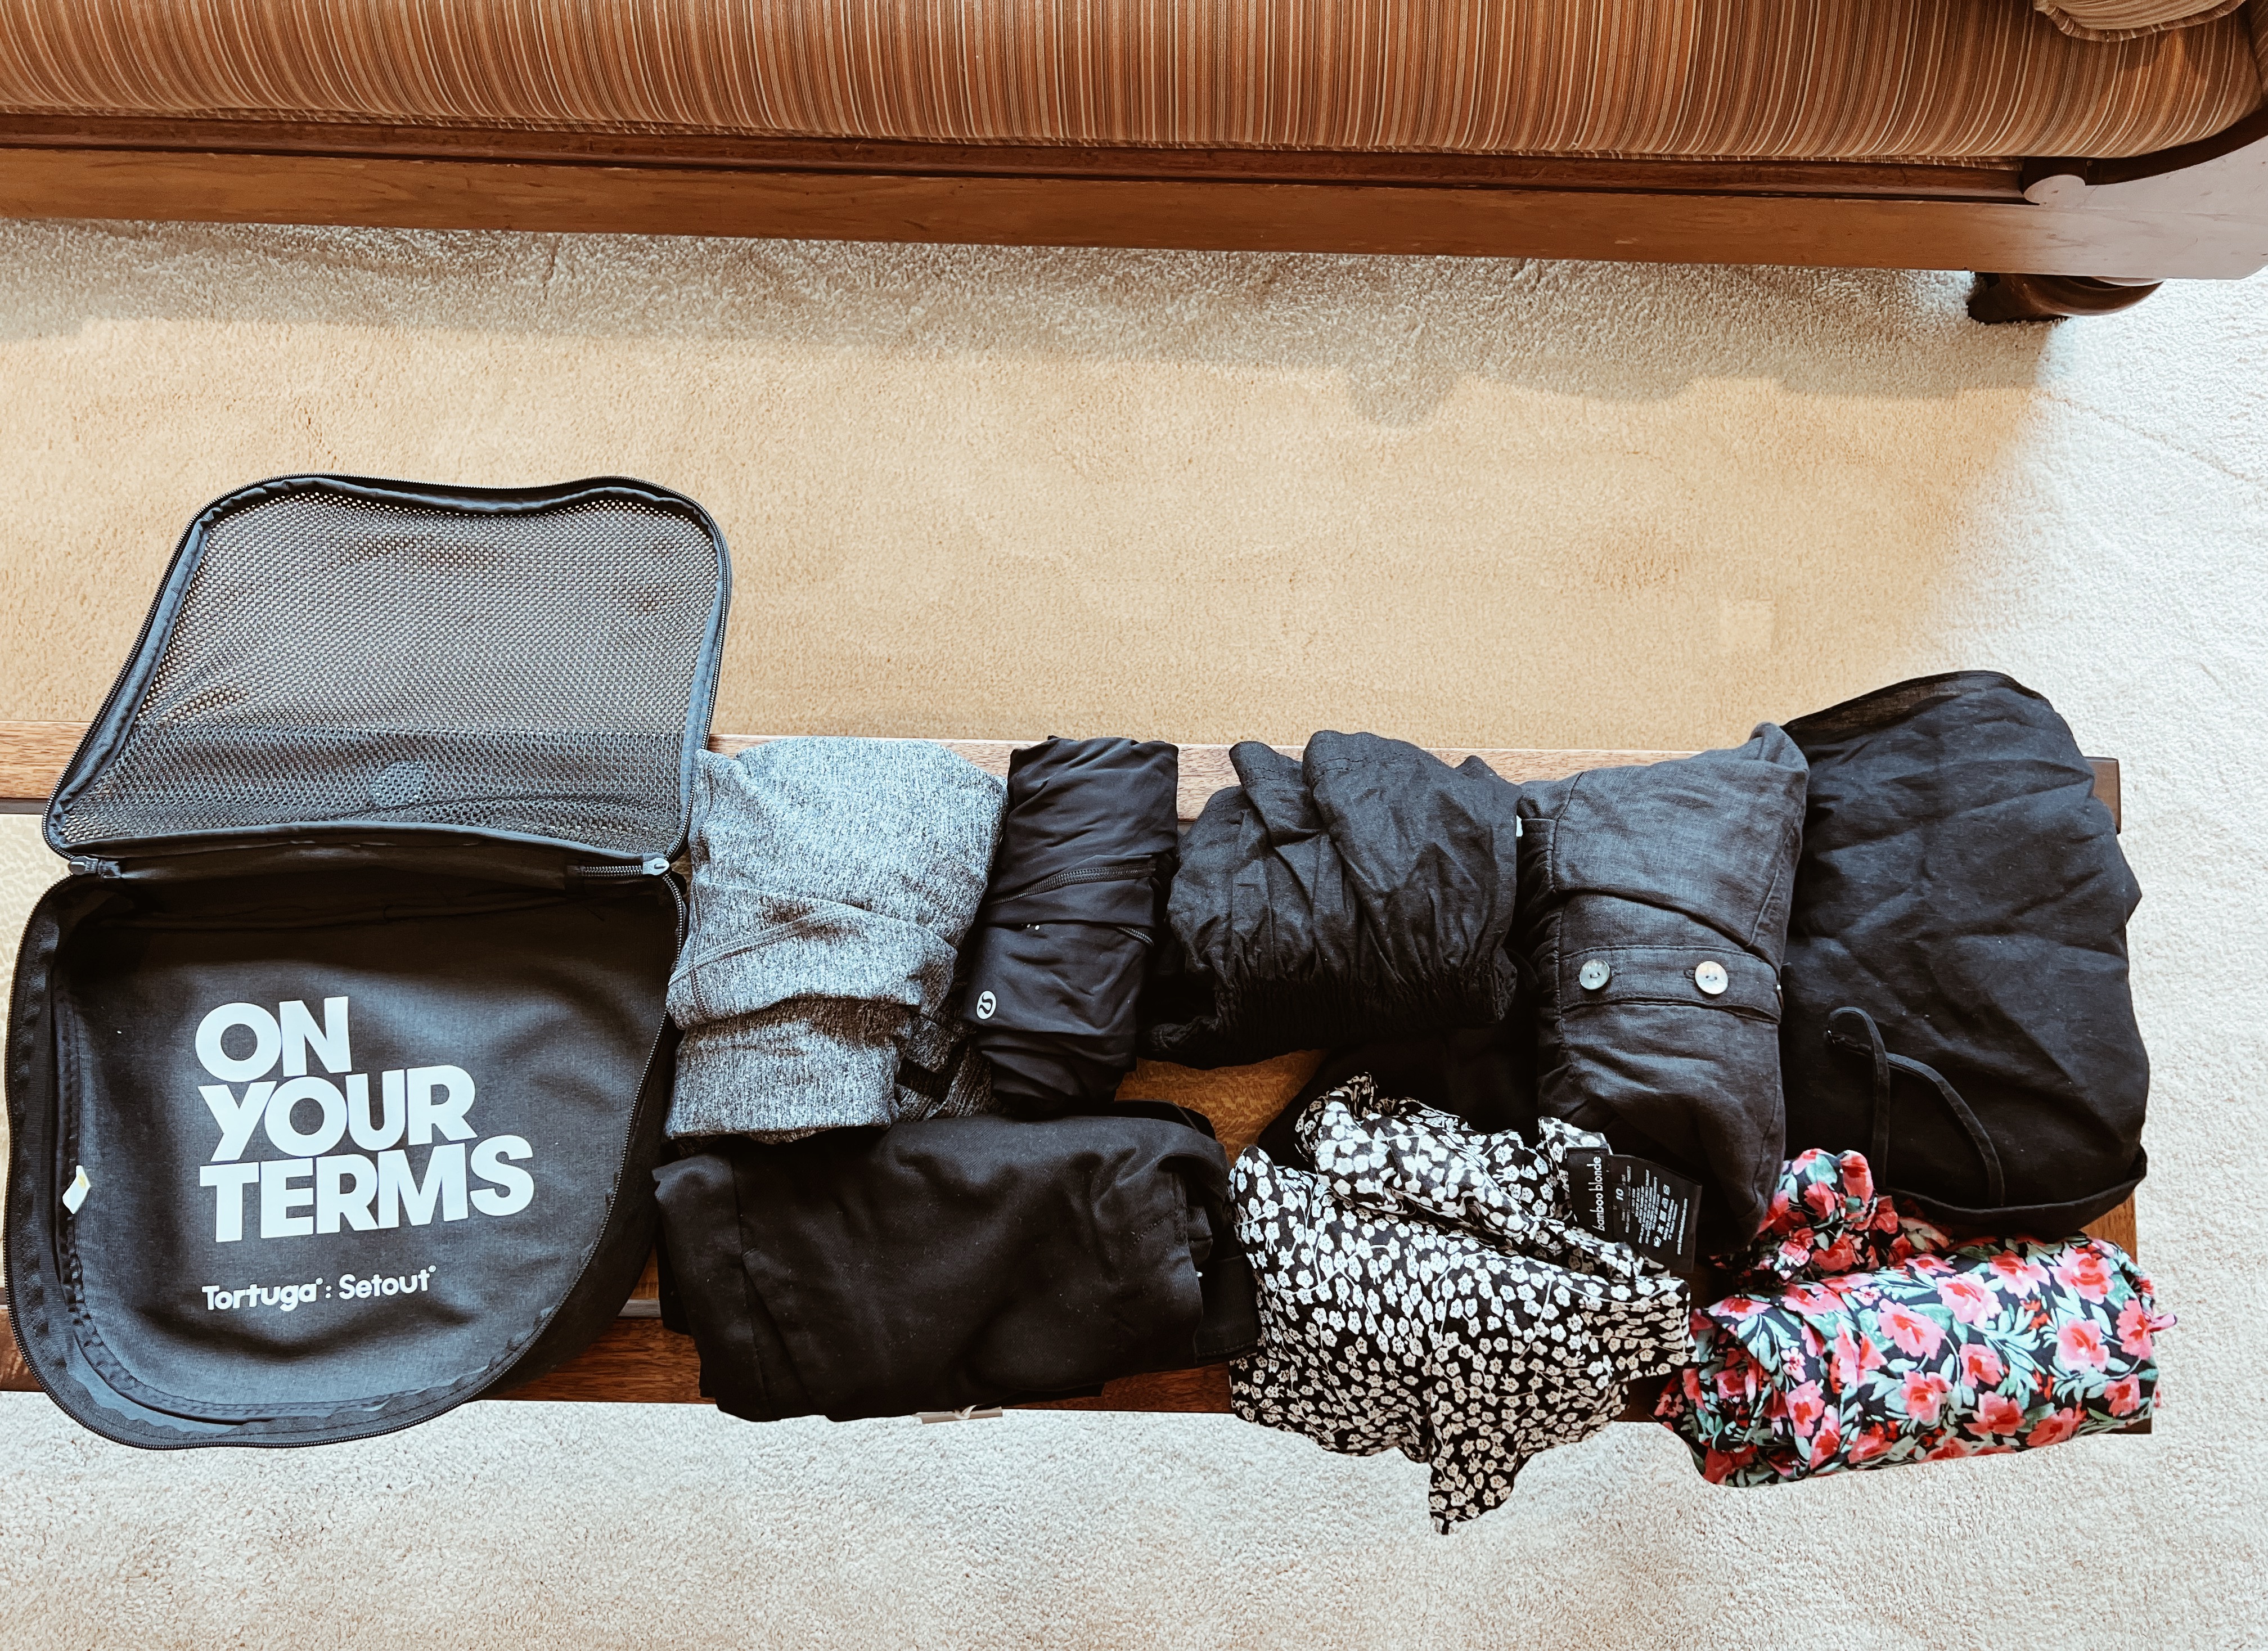
Here is what is packed in each packing cube:
Three sports bras, 9 pairs of socks, booty shorts & underwear3 long sleeve shirts, 2 short sleeve shirts, & 2 cute shirtsLululemon jacket, 6 pairs of pants, swimsuit & jumpsuitAll packed up
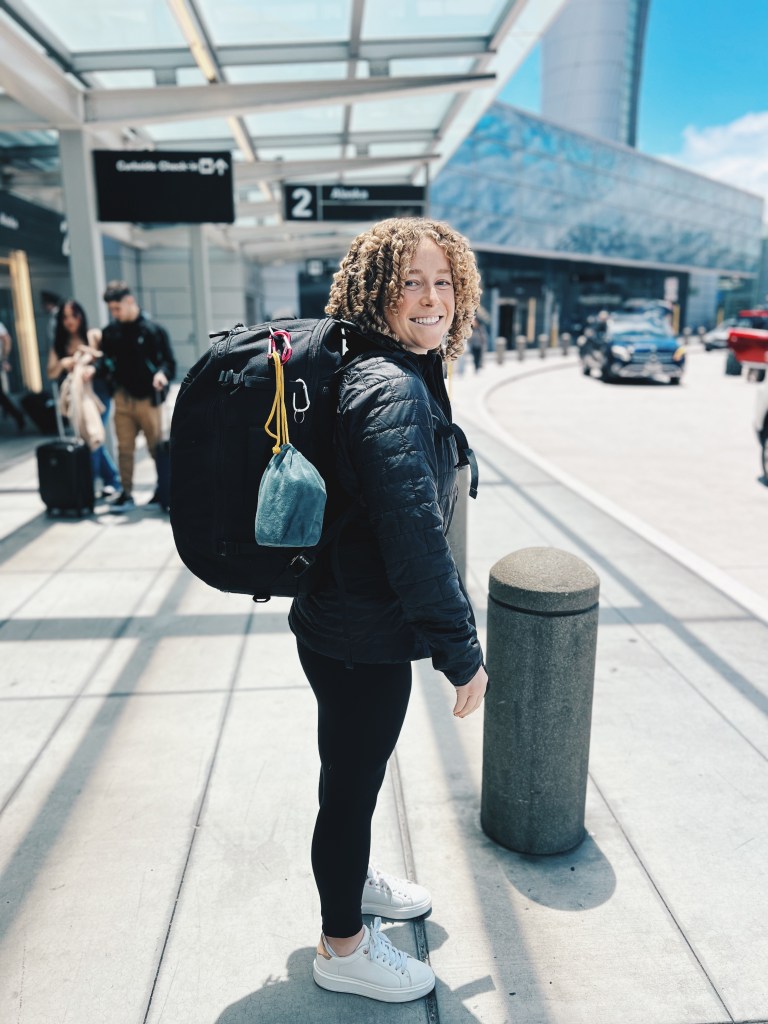
All packed up and ready to go on another adventure!
Well I’ve officially been on the road for over a year!! I can’t believe how fast time flies when you are having fun… & jet setting around the world! If you know me at all in real life, you know there are two topics that get me more excited than anything else: Travel & Personal Finance. So I thought it would be fun (for me anyway haha) to put together a post on what one year of international travel can look like from a financial perspective.
Some considerations:
This is only for one person (me)
I travel fairly cheaply (mostly staying in hostels) & in general don’t have expensive taste in food or transportation, but I also am saying yes to any experiences that I want to say yes to
I am traveling fairly quickly so taking lots of flights + moving locations every 3-5 days usually. It’s much cheaper to travel slower
I am not traveling in a super logical route. For example, while in Europe I went to England, then Northern Ireland, then France, then England, then Switzerland, then England, then Ireland… I was meeting up with different friends at different points so while it wasn’t logical, it made sense for what I was doing. However, again this is an area that one can make cheaper if they don’t travel in circles like I did haha
I am flying home to California quite often for Christmas, my 30th birthday, and for some weddings. Again this is driving up some inefficiencies.
Here’s the trip summary leaving in June 2023, covering 30 countries across 6 continents:
6 months in Europe + Egypt – 19 countries
.5 month CA visit for Christmas
1 month Fiji & New Zealand with my family – 2 countries
3 months Southeast Asia + Japan – 6 countries
.5 month CA visit for my birthday
2 months Mexico + Colombia – 2 countries
In full transparency, my parents kindly paid for Fiji, NZ & Japan since I was with them for those three countries (very, very lucky!!) so this analysis will cover roughly 10 months (FJ, NZ, Japan + CA visits were roughly free). Also on this trip, I have tried to add what I spent in each country to its dedicated blog post so hopefully that’s helpful (for example: scroll to the bottom of this blog post to see how much I spent for 3 weeks in the Philippines).
Here we go…
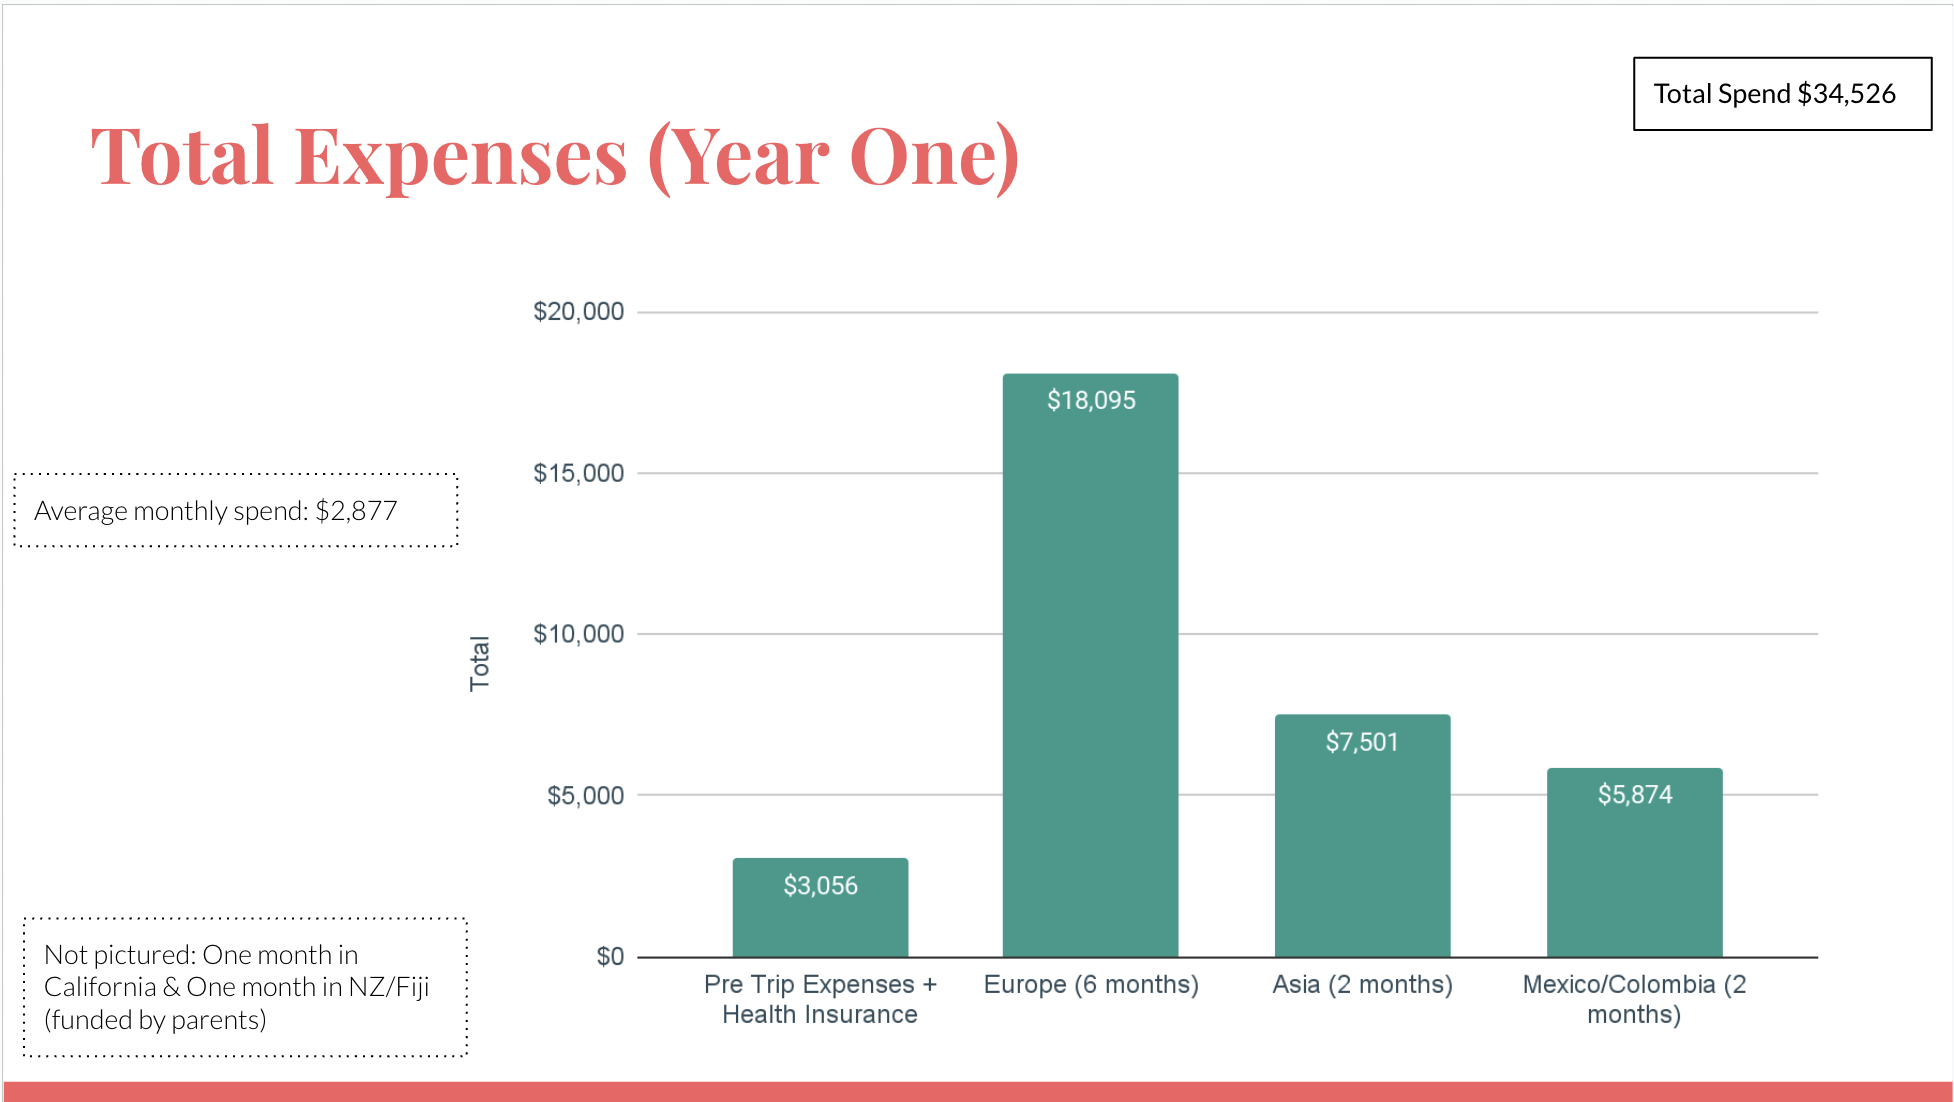
Total Spend: $34.5k USD
Spend by Segment
This shows a breakdown of the total spend by trip segment. Obviously Europe will be the highest since that was the longest segment of the trip so far. Pre-trip expenses include: clothes, Workaway membership, initial flights, & electronics. Health insurance for the duration of the trip was $170 per month ($2,040 for the year).
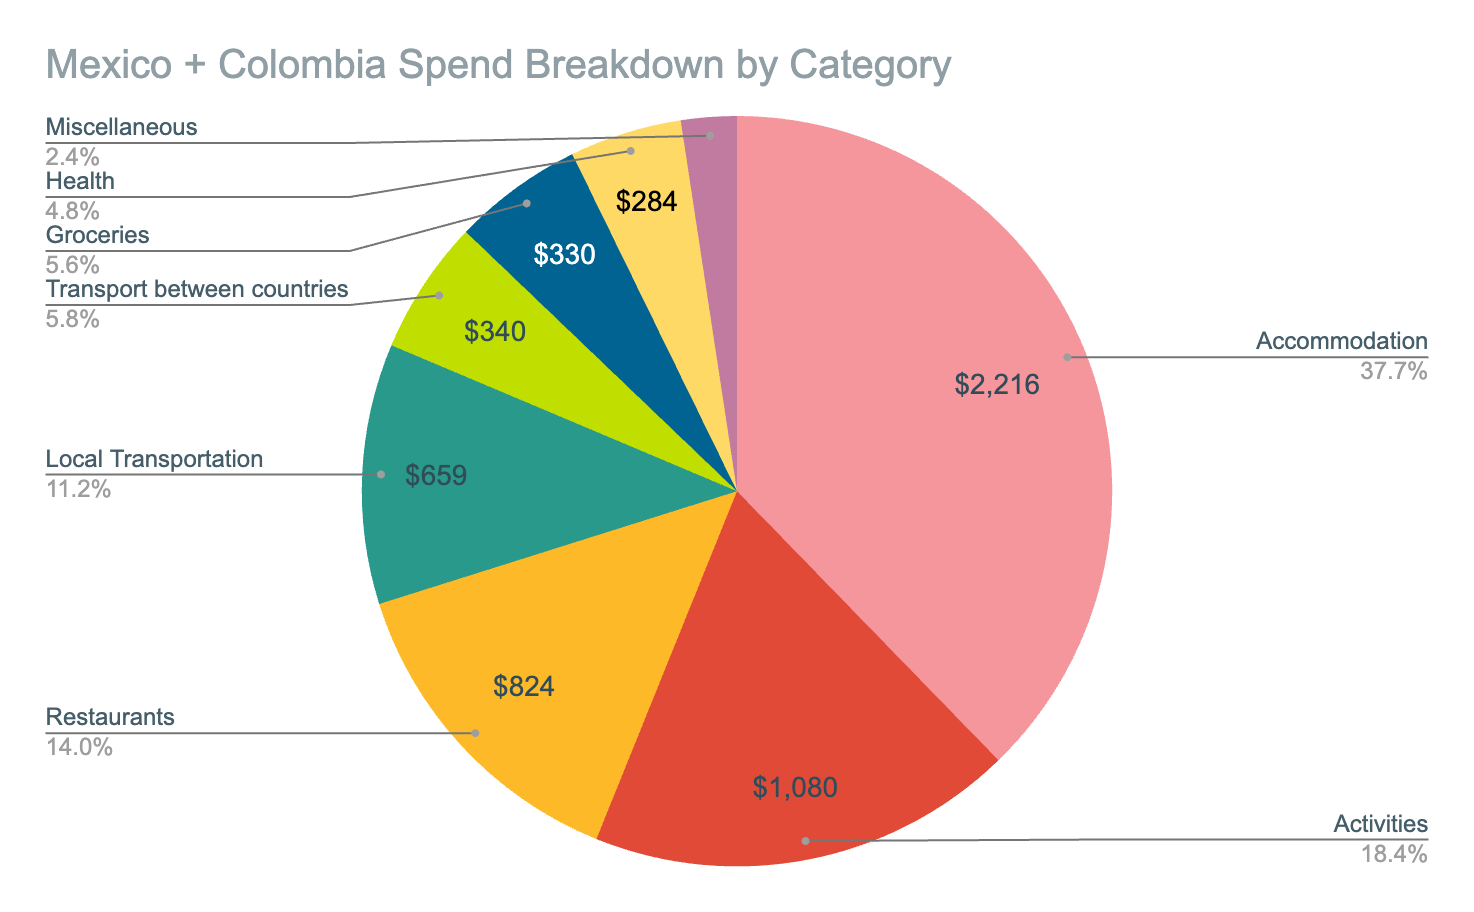
Average Daily Spend by Region
This shows the daily cost by region, which makes it far easier to compare the costs agnostic of time spent in each spot. It’s no surprise that Mexico was the most costly since I did pay for my sister to join me 🙂 It’s amazing to me that Southeast Asia was my cheapest average spend, as I was living my best life while there.
I spent $351 on 22 hours of massage (average of $16 per hour).
I spent $577 on 13 dives (average of $44 per dive).
I did a 3 day sailing trip around the Philippines ($570)
I did a 3 day cruise of Ha Long Bay ($250)
I did a 4 day motorcycle ride through Northern Vietnam ($300)
I spent $450 on tailor made clothes in Hoi An.
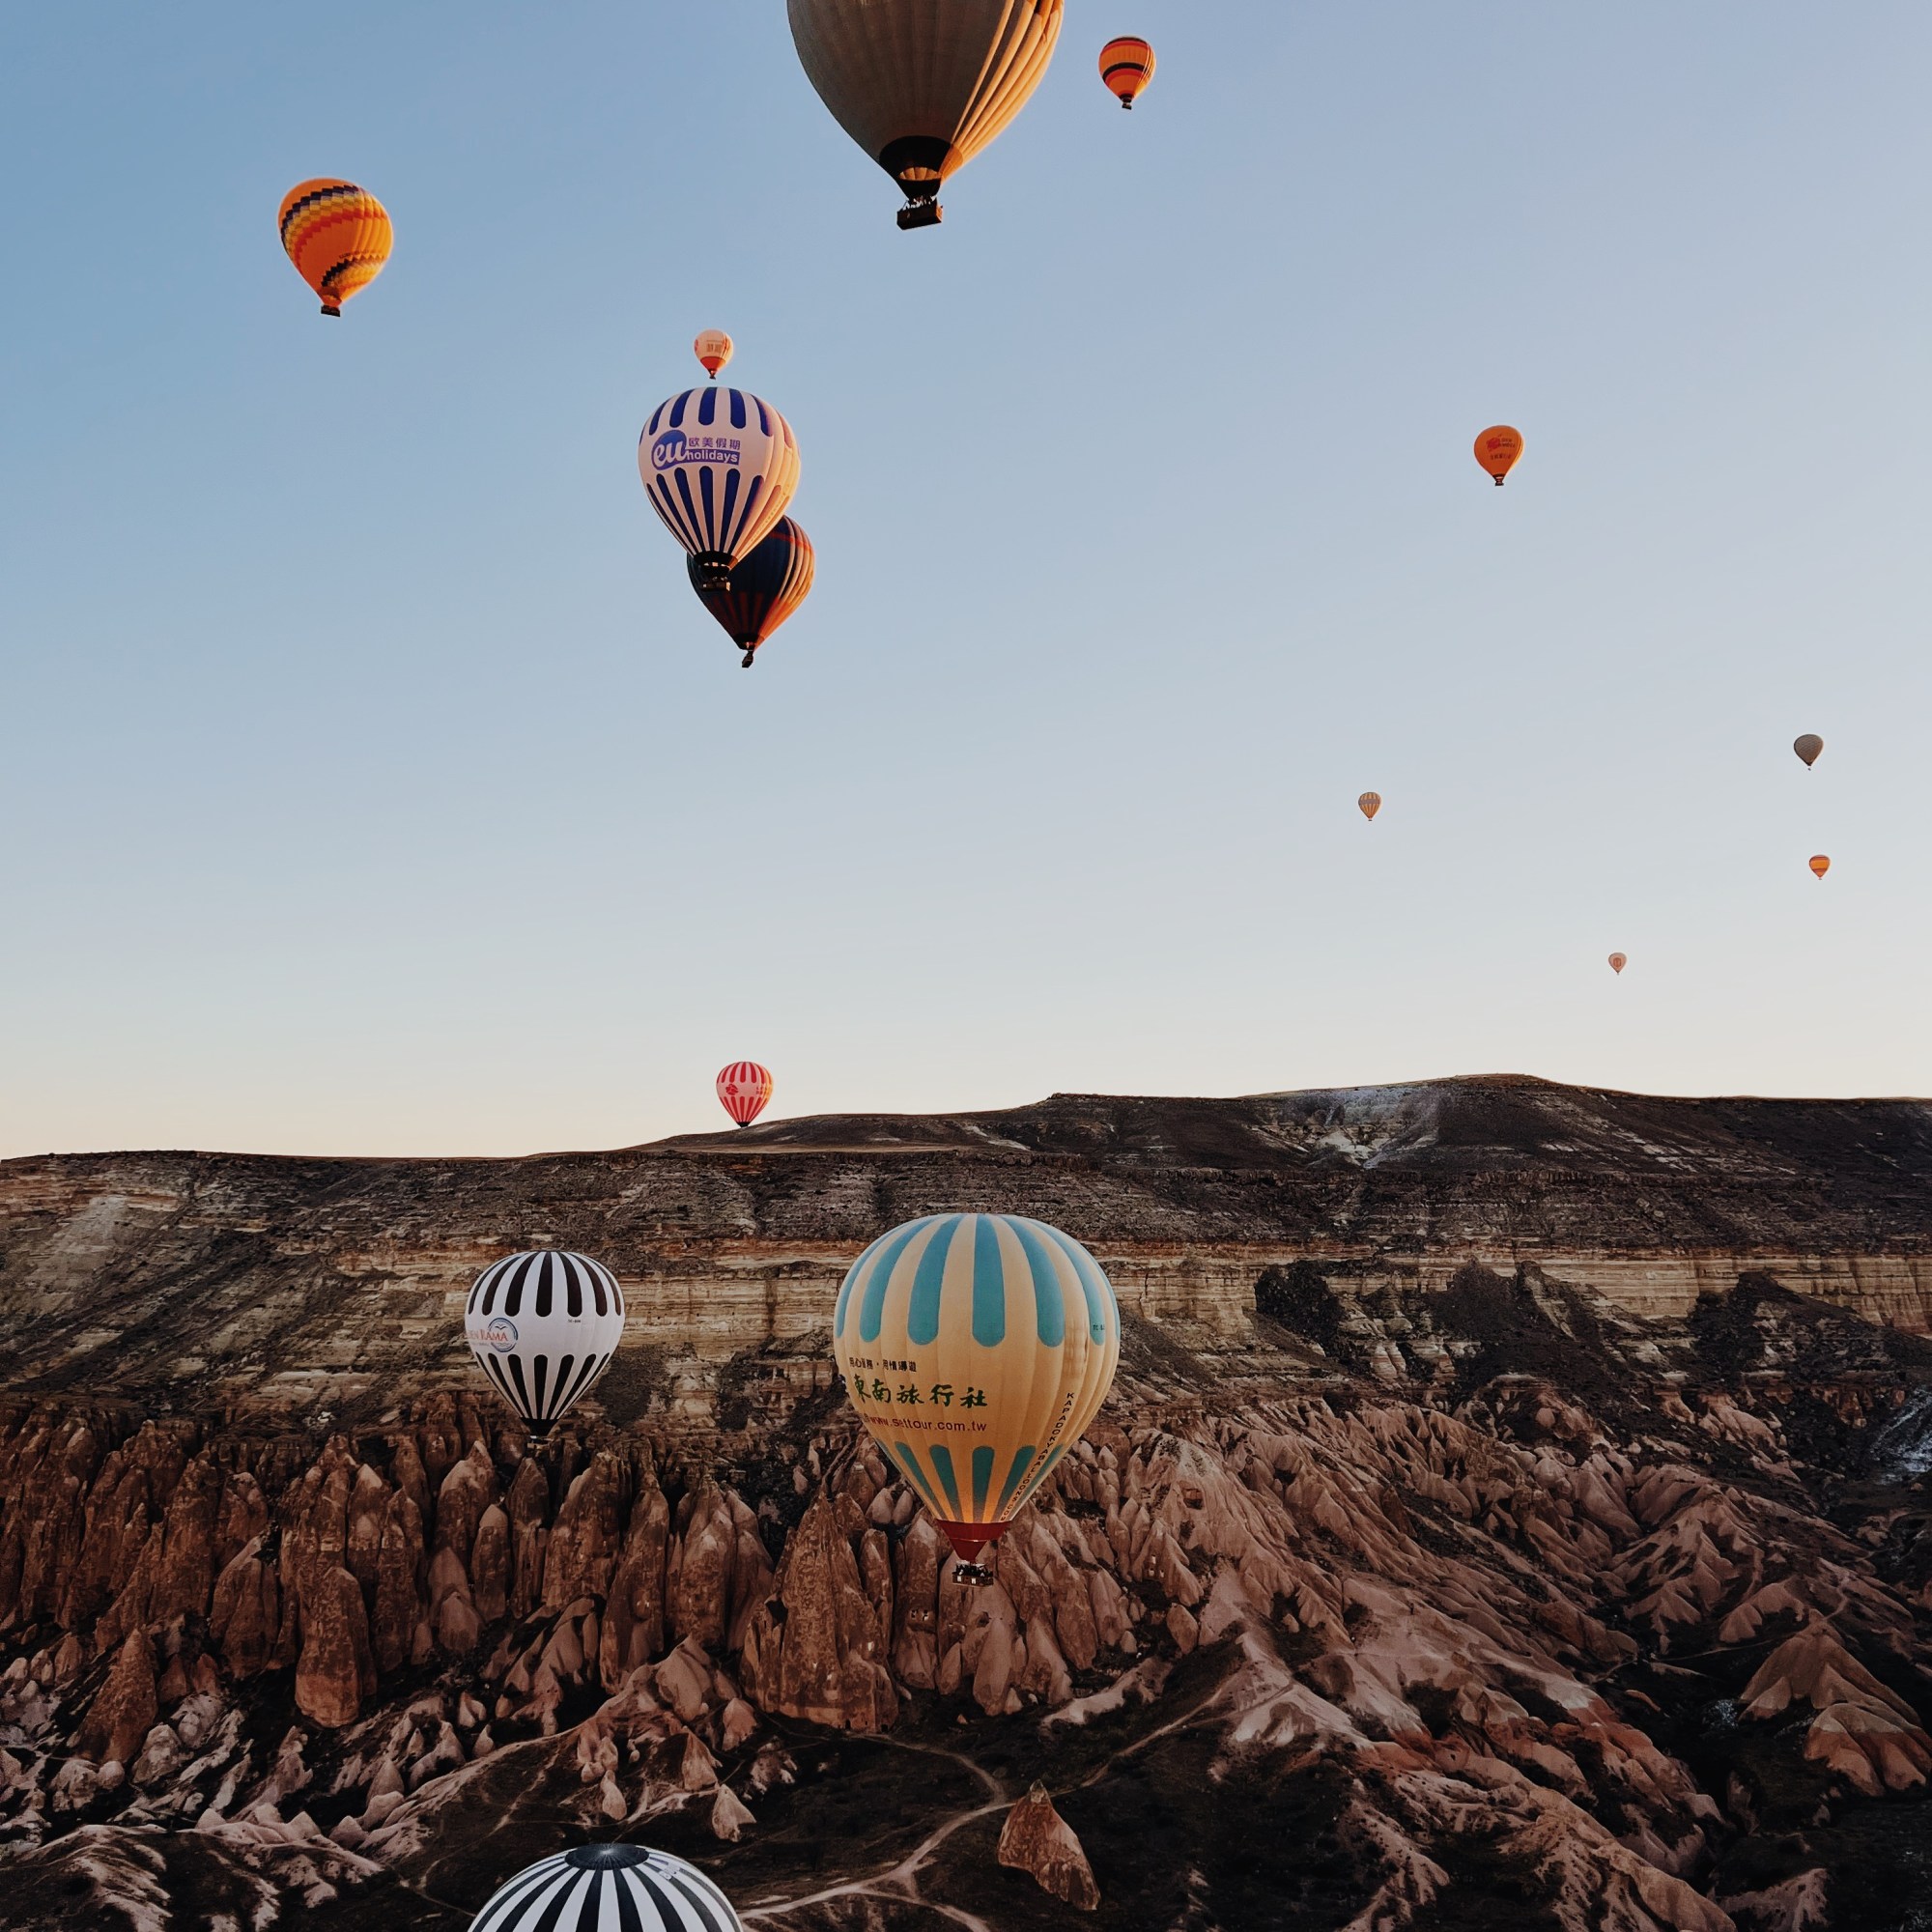
This is opposed to Europe where the only “experience” I spent money on was the hot air ballon ride in Turkey ($210 per person). Put another way: in Europe, the activities category made up 15% of total spend. In SEA, the activities category made up 35% of total spend.
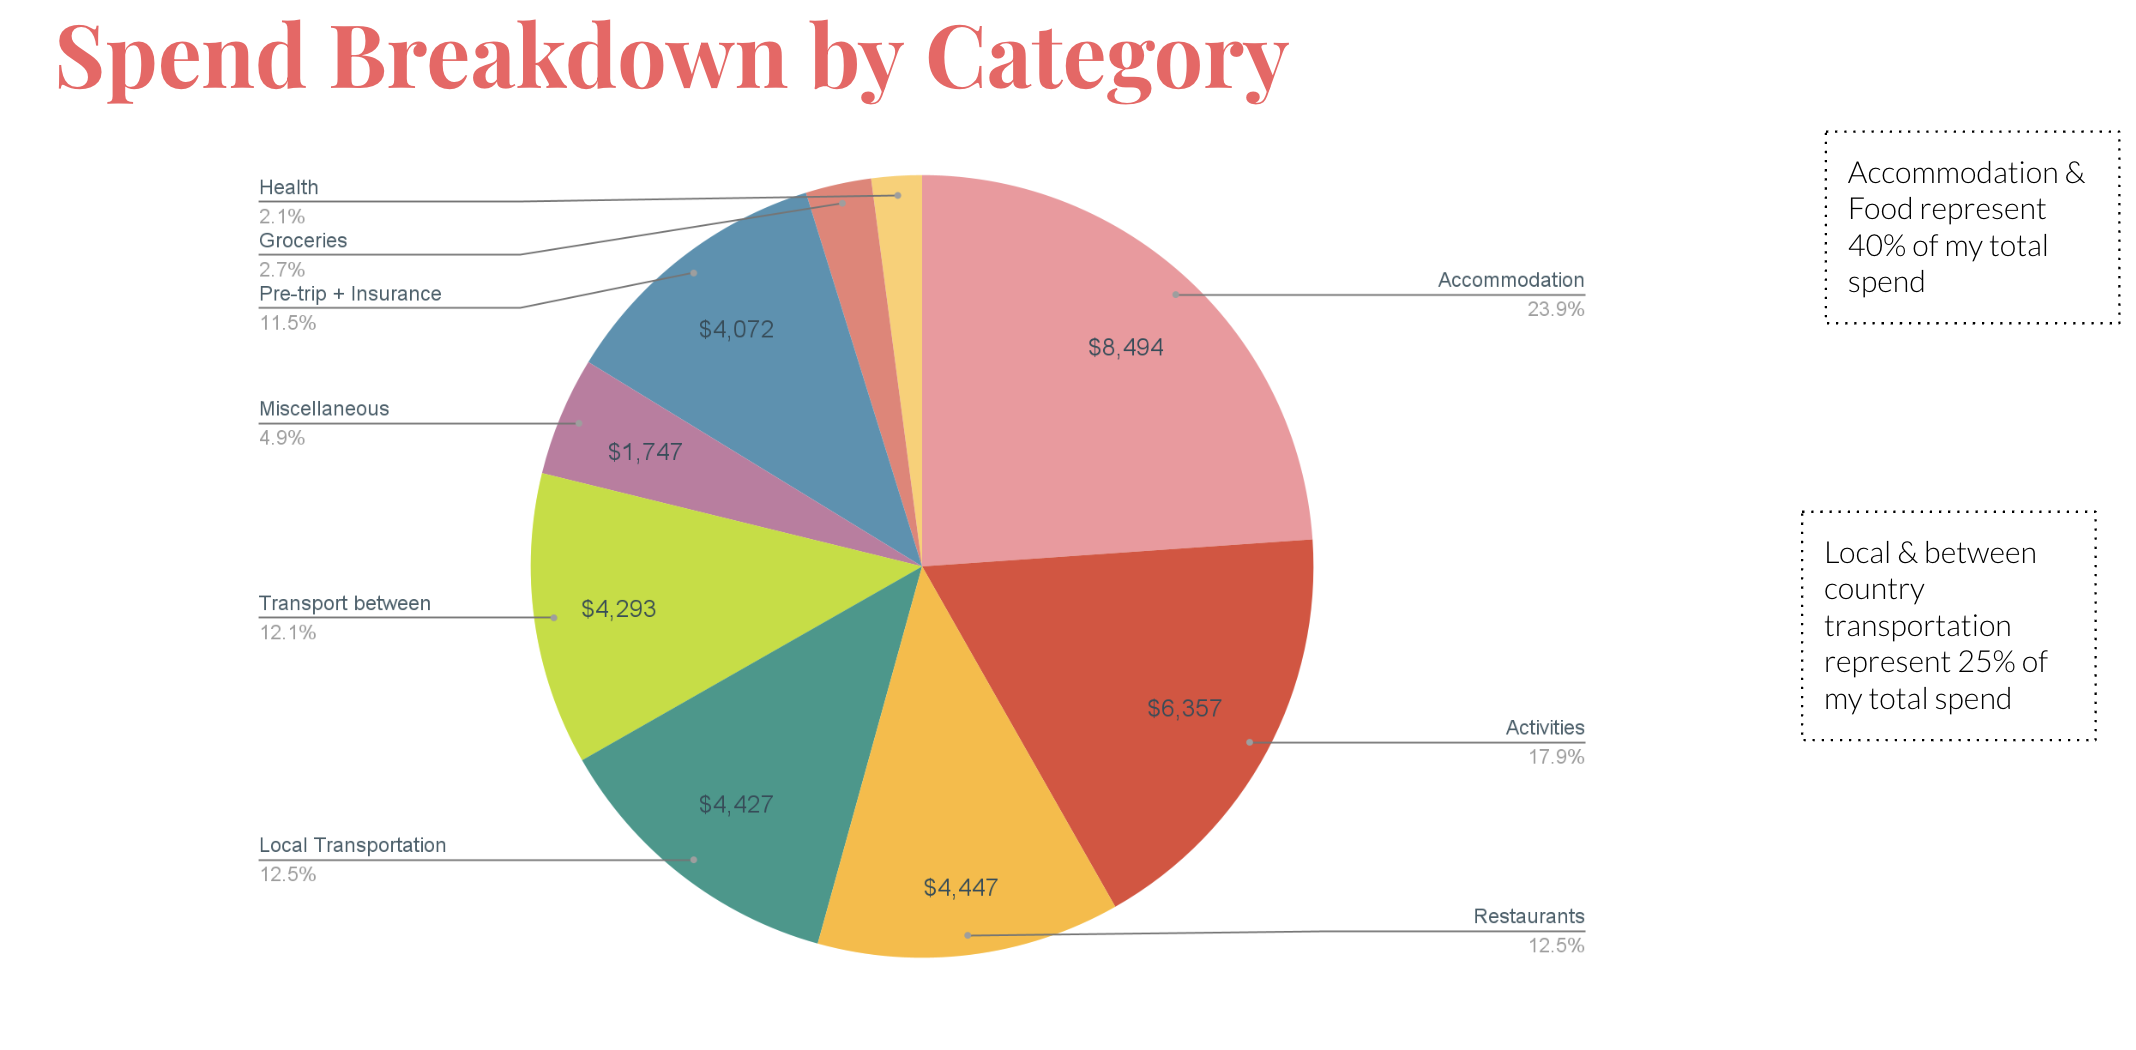
Spend by Category
This is a breakdown of how much I spent by category. As expected, accommodation is my largest spend, but I am actually proud of myself for spending so much on activities! I can be pretty stingy with spend so I love that I have said yes to so many experiences on this trip. A lot of them ended up in my top 5 memories of the trip 🙂 You’ll find the breakdown for the trip overall as well as by region.
Europe (6 months): $18.1k
Southeast Asia (2 months): $7.5k
Colombia & Mexico (2 months): $5.9k
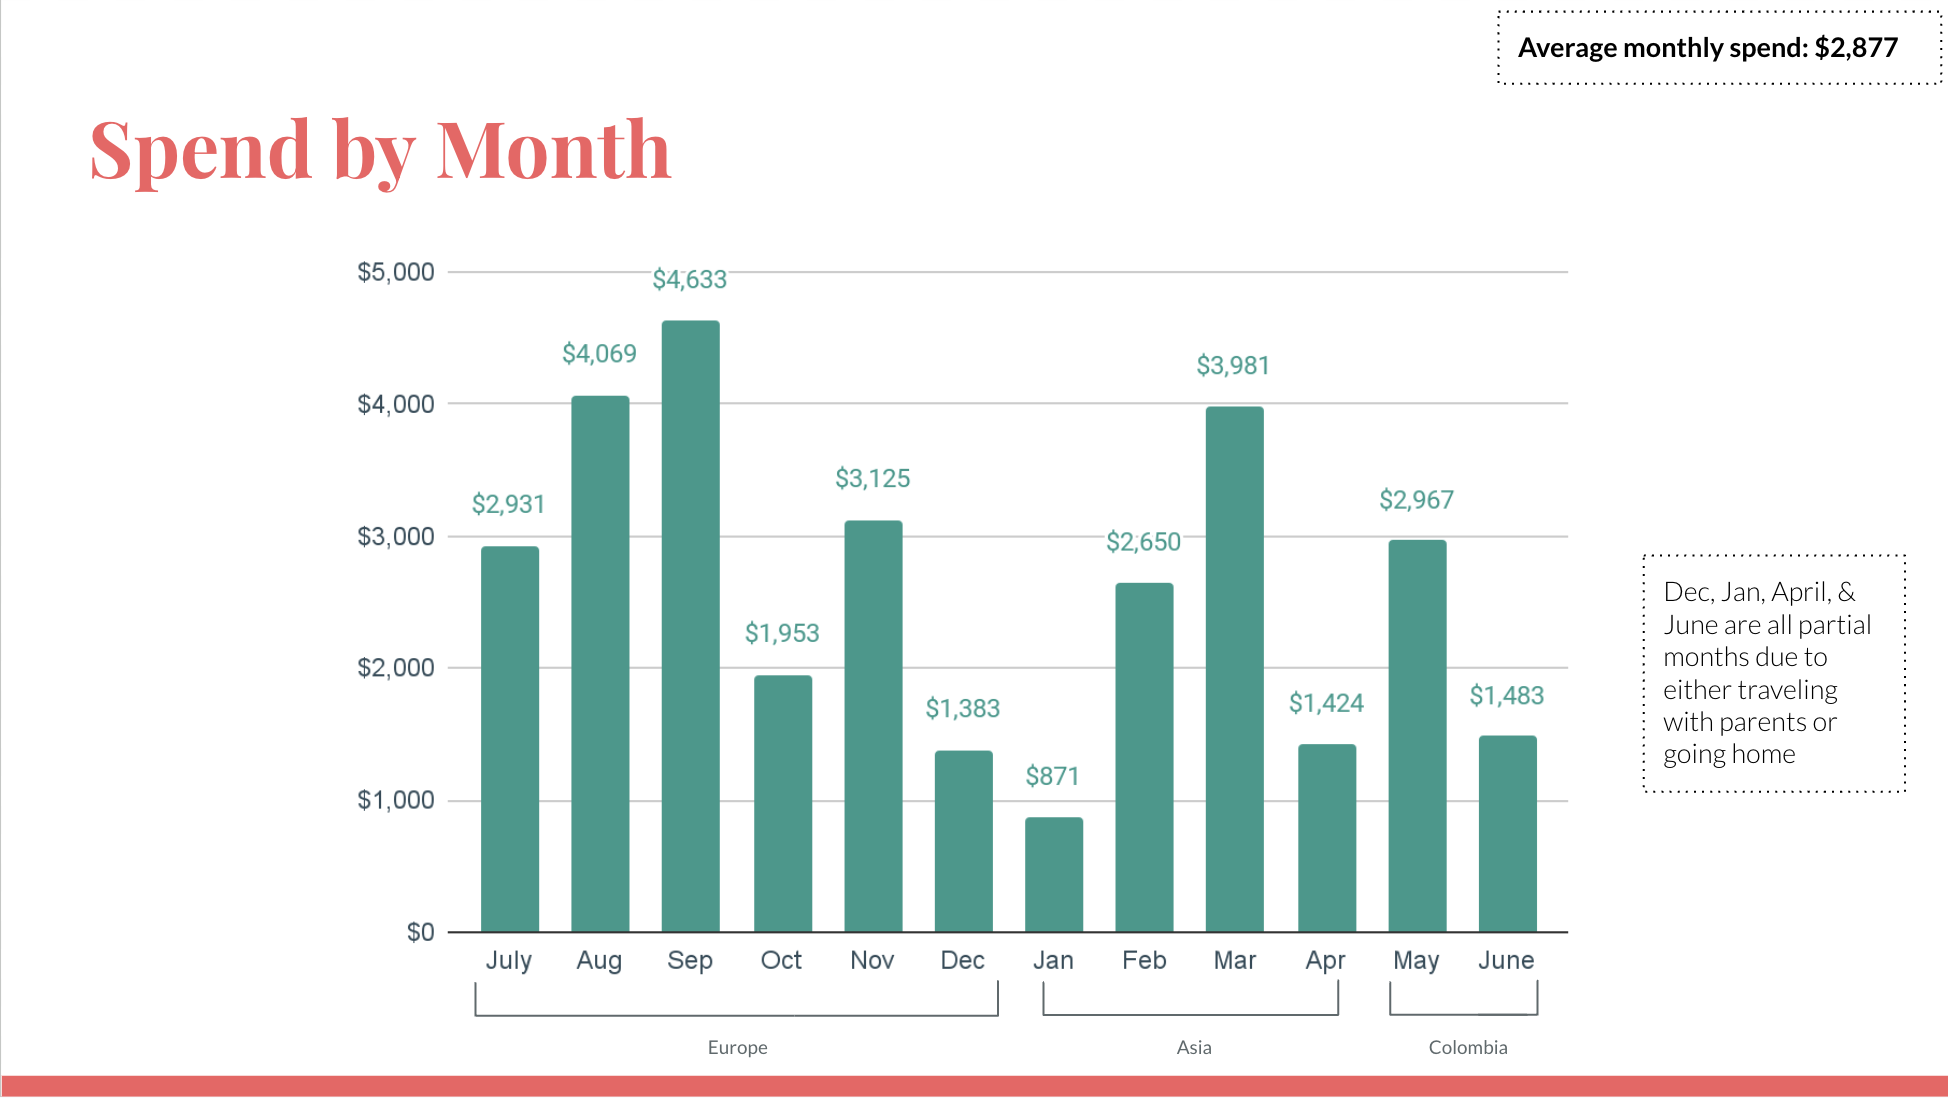
Spend by Month
This breaks down my spend by month! Sept was particularly high because I managed to spend $1400 in 3 days in Switzerland (thank you last minute rental car & expensive destination). October was lower because 3 weeks of that I was au pairing in Spain with living expenses covered. As noted on the graph, Dec, Jan, April & June are all low spend months because either I spent 2 weeks at home or my parents were with me. I averaged $2,877 per month over the course of this year, which when you compare it to what I spent just living in San Francisco, this is actually cheaper!
Top 5 experiences of the trip so far:
Hiking Milford Track in New Zealand ($2,045 USD, but my parents paid for this)
Riding Motorbikes through the Ha Giang Loop in Vietnam ($300 USD)
Scuba Diving with Thresher Sharks in the Philippines ($88 USD)
Hot Air Balloon Ride in Turkey (~$200 USD per person)
Hiking in Switzerland (~$35 USD)
Top tips for traveling cheaper:
Stay in dorms in hostels – you might sacrifice a bit on quality of sleep but in general the cost savings + meeting so many cool people makes this a great resource for traveling on the cheap.
You’ll notice I spent almost $4500 on eating out. If you are staying in airbnbs or hostels with kitchens (more common in Europe, NZ & Australia), buy groceries!
Travel slower. As I mentioned, you’ll save a lot on accommodation costs if you can book a month long airbnb rather than hotels/hostels for a few nights at a time. This also will bring down your transportation costs.
Fly less! Unfortunately I am doing a lot of flying. I’d be saving a ton of money if I was doing bus/train travel.
Only take a carryon backpack. You’ll save on baggage fees every time you do have to fly.
Use credit card points to book flights.
Consider doing WOOFING or Workaway to save money in exchange for working a few hours a week (usually ~20).
Make friends on the road and then go visit them in their hometowns. It’s the best way to experience a place in a (usually) non-touristy place & you save money on accommodation: it’s a win-win!
Hope this was helpful!!! Wish me luck on my next year of adventures, starting with more time in South America 🙂
Once again, I am about to head out on the road! After a whirlwind visit home in California for my 30th birthday(!!!), I am taking off for a slightly different stint of my trip. I have a week in Mexico with my sister for a wedding, but then I take off solo to Colombia where I’ll be staying in Medellin for 6 weeks to study Spanish at a language school! I’ve talked about this before, but at the three month mark of backpacking, I get really burnt out and need to stay still to recuperate. I built this part of the trip in very intentionally. I’ll be staying at an airbnb, where I’ll have my own room and going to class everyday. I’ll be cooking and signing up for a gym. I am SO excited to have a bit of a routine and not have to pack up over & over again. In fact, I get to unpack for 6 weeks!! Truly what a dream.
Because this is quite the different type of trip, I get to pack a little differently. Other than needing outfits for a wedding (which thankfully was casual enough that I could wear clothes that I’ll also wear out & about in Colombia), I only need to pack fairly generic outfits for school, going to the gym, and an outfit or two to go out to dinner, etc. Additionally, I am not going to a bunch of different climates, so overall it’s a relatively simple packing approach.
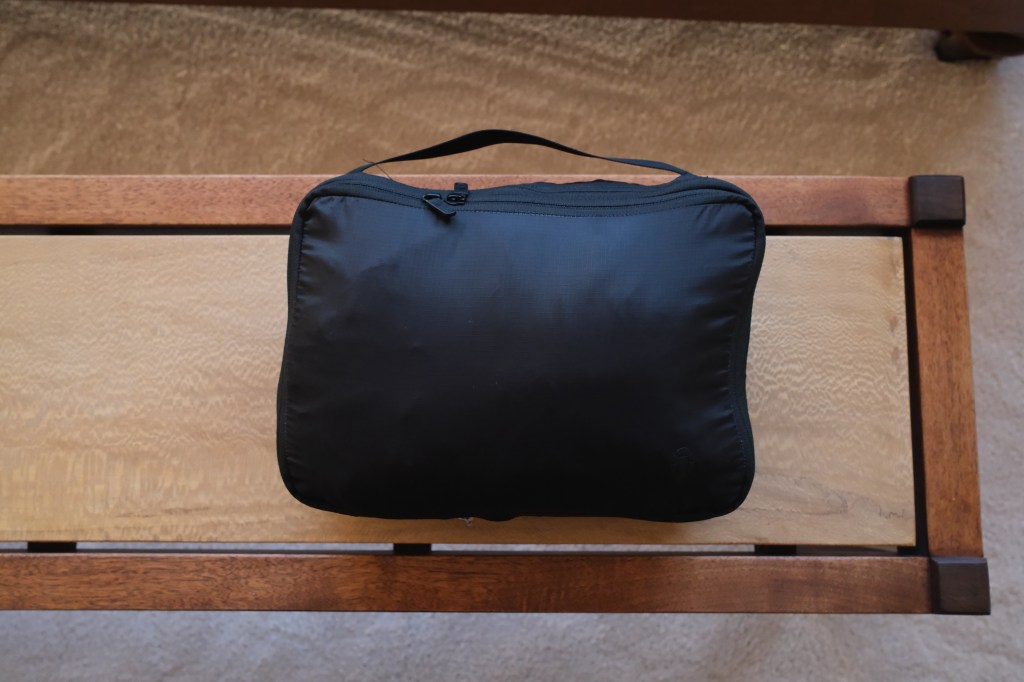
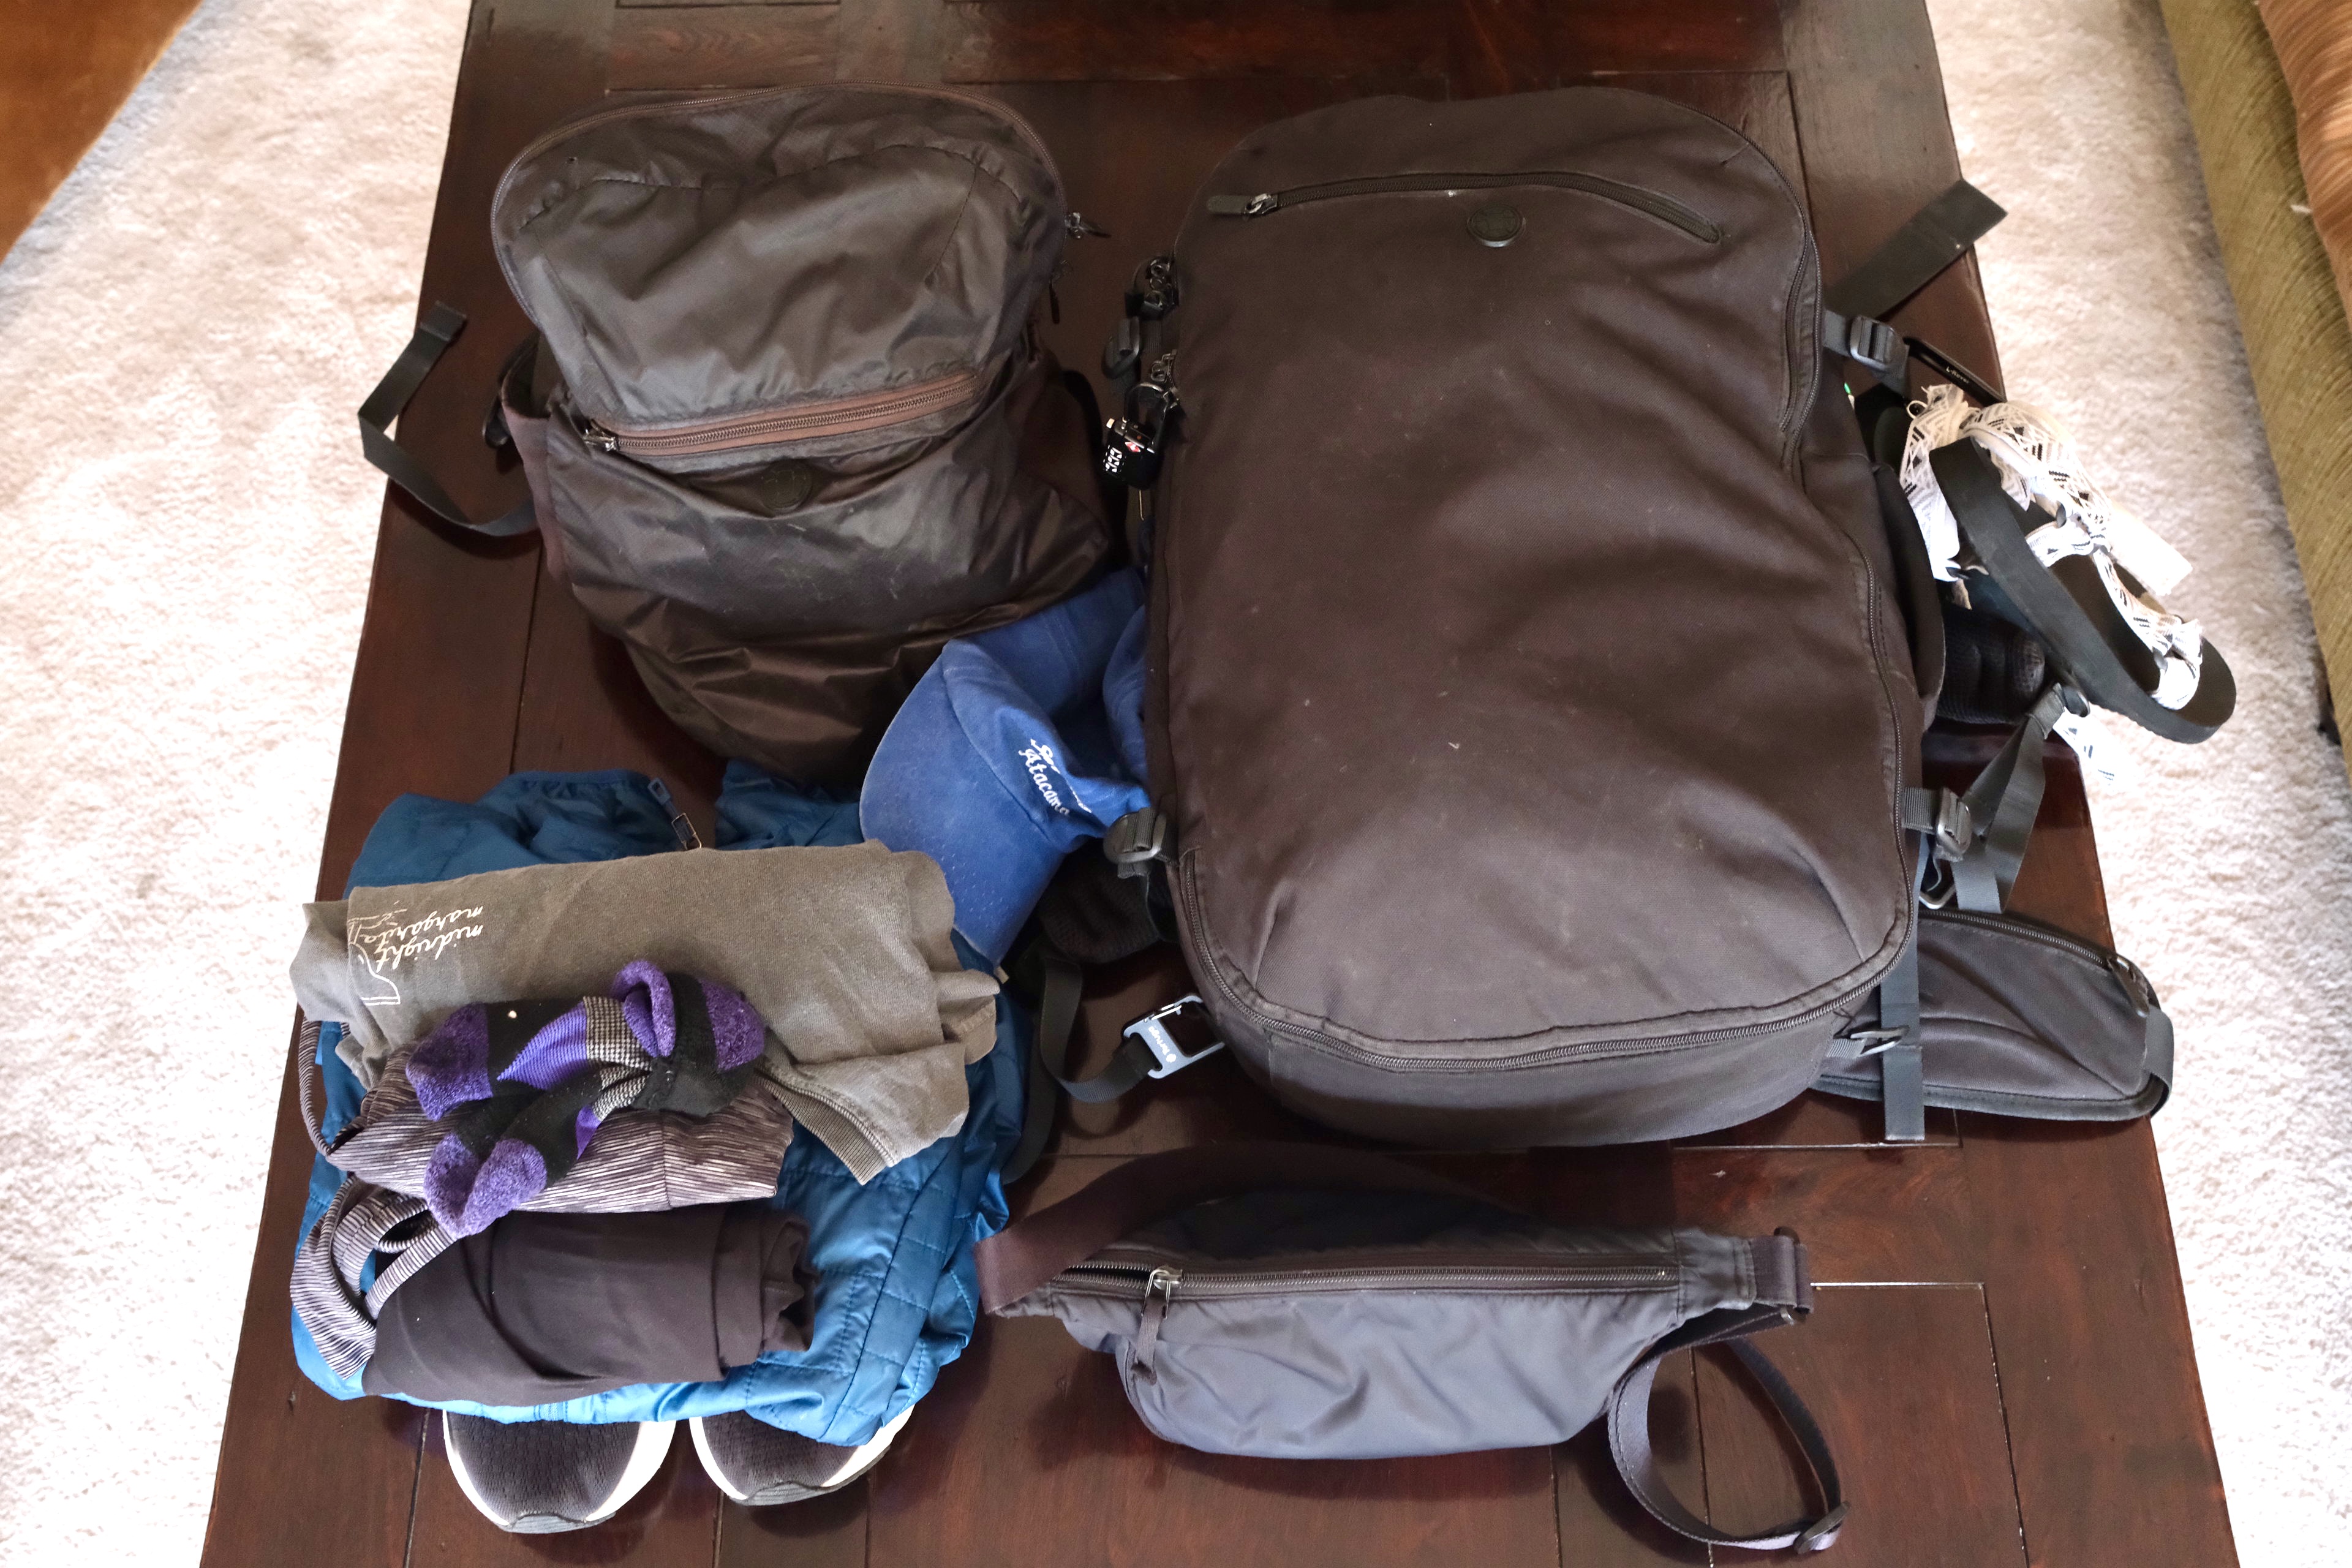
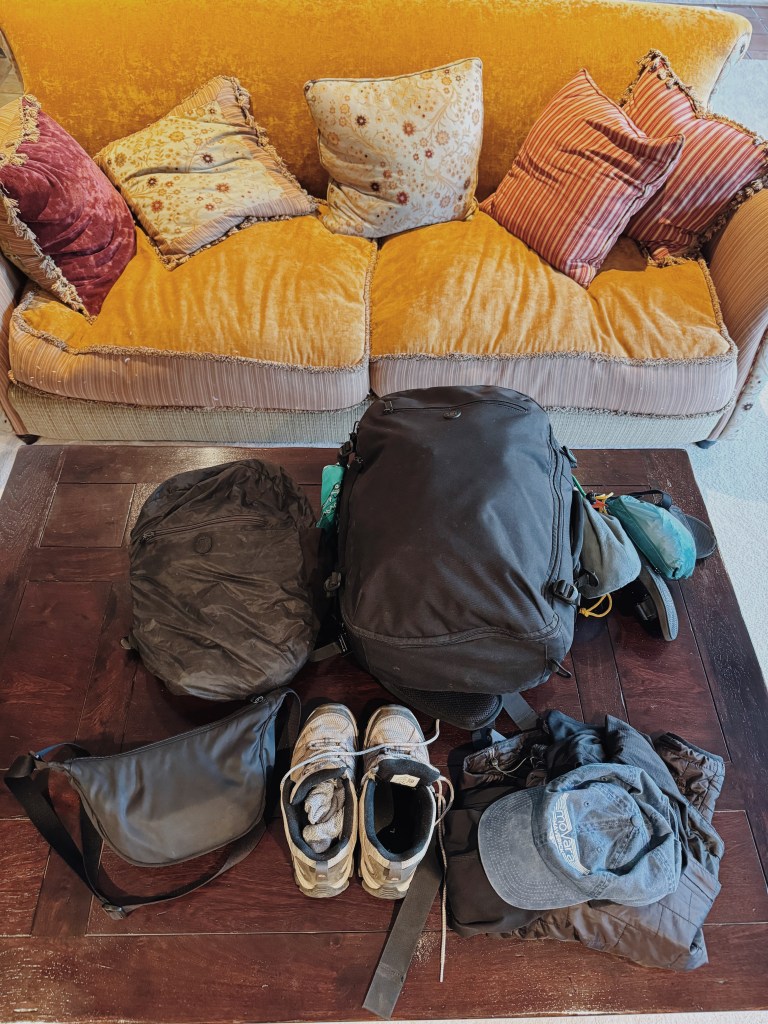
Big news: I am trying out Tortuga’s newest backpack, the Travel Backpack Lite 40L. It’s the updated version of my last backpack of theirs (the Setout). Nice to travel with a brand new backpack! It’s the perfect carry on size & with their packing cubes, you can optimize every square inch of it. I actually had room leftover when I packed all the below into it. I’ve also added the Tortuga Travel Sling, the new Tortuga Packable Daypack (to replace my 5 year old one), & the Tortuga Tech Organizer, which means I’ve achieved my goal of being a walking evangelist for all Tortuga products haha.
Think through how the clothes will feel in heat. Linen & lightweight materials will be best.
Make sure that every top works with every bottom and works with every shoes. Use a capsule wardrobe as inspiration.
Less is more! I can’t emphasize this enough. You CAN do laundry. You CAN buy anything you feel like you ended up needing on the road. I promise!
If you are planning a longterm trip, don’t forget to check out all the things I wish I had known before setting off on my first big trip!
PACKING LIST FOR Colombia:
CLOTHES
3 pairs of Lululemon Fast & Free Crop’s – I’ll be joining a gym while in Medellin so I need more workout leggings than I normally take.
1 pair of Lululemon Align pants – can be used for working out/walking around town or I can dress it up.
1 pair of Lululemon joggers- since I’ll be living in an airbnb, I wanted a more casual, comfy pair of pants to throw on when I am home in the evenings.
1 pair of jean shorts
2 Rompers (one is just a copy of the other that I had made in Hoi An)
2 jumpsuits I had made in Hoi An (inspired by my Madewell Jumpsuit)
2 Cute shirts (one linen for the heat, one basic cute grey shirt)
4 sports bras
5 athletic shirts (for running + sleeping in). One is from Vuori & one is from Lululemon. I need more of these shirts this time around since I am planning to go to the gym everyday in Medellin
Waterproof sandals (will act as my water shoe as well as my cute shoes- I never said the backpacker lifestyle was glamorous haha)
Pair of white sneakers (bought these in Japan)
Light Patagonia puffer – good for chilly planes/busses & for when I visit countries that are a little cooler, even in the summer. It also smushes down fairly small so it’s a great backpacker jacket. I’ve also used it as a pillow in a pinch.
1 Swimsuit (I don’t foresee doing much swimming on this trip, but it’s always smart to bring one)
Sunglasses (Warby Parker)
Hat
Rain coat (Patagonia; you can pack it up into its pocket so I can easily attach it to the outside of my bag via a carabiner)
Running belt – I don’t use it often since my Lululemon Fast & Free’s have a pocket for my phone, but every once in a while it comes in handy.
Tortuga Packable Daypack – This is their latest version of their daypack! Very excited to try it out. It packs into itself if you don’t want to use it. This is my personal item for flights.
Tortuga Travel Sling crossbody bag (I put it into my daypack on travel days). I use this out and about on a daily basis. It fits my iPad mini & passport in the back zipper pocket. In the main pocket I can put keys, credit cards, cash, AirPods, chapstick, sunscreen, etc.
ELECTRONICS
Computer + Charger
iPad
iPhone + Charger (I get a 6 ft cord so I can always reach the plug from my hotel dorm bed!)
AirPod Pro’s
Headphones (Bose; noise-cancelling for travel days)
AirTag (This is a no brainer these days; provides peace of mind incase I am forced to check my bag or when it’s below me in a bus. Always nice to confirm it’s still with me!)
TOILETRIES (I USE A BUNCH OF LITTLE TOILETRY BAGS TO KEEP THESE ALL ORGANIZED)
Toothbrush
Toothpaste
Floss
Any medication you take
Retainer
Deodorant
Tiny roller perfume
Makeup
Makeup Remover (I’ve become obsessed with cleansing balm for this because it isn’t a liquid, & it’s highly effective at getting makeup off at the end of the day!
Razor
Conditioner + Shampoo (Get containers to put your products into & refill on the road!!)
Face wash
Hair Brush
Pocket Hand Sanitizer– I keep one in my backpack and one in my sling/purse. Great in general, but also for when inevitably there is no soap at a random bus stop bathroom 🙂
Tiger balm (I picked this up in Southeast Asia and it’s now a staple in my bag. Great for mosquito bites and just feeling a little sick. It’s kinda like Vick’s vapor rub).
Ibuprofen
Hair ties and bobby pins
Moleskin
Bandaids
Cough drops
Topical steroid cream for bed bug bites or regular bug bites to help with itchiness
MISCELLANEOUS
Passport – no explanation necessary 🙂
ID (I bring my driver’s license)
Travel Credit Card (no foreign transaction fee; I have the Chase Sapphire Reserve (hello lounge access!)+ Capital One Venture Card)
Debit Card (Charles Schwab has the best one because it reimburses ATM fees from any ATM in the world 🙂)
Record of your plans (I make folders within my email inbox to keep track of everything or you could print out a copy of your itinerary)
Extra Passport photos
Thumb drive with all documentation if desired
Sarong/beach blanket- My roommate got this for me! Perfect for any countries where I need to cover up more as well as the beach or to dry off from a swim. I didn’t bring my quick dry towel with me this time since my apartment/airbnb provided a towel for the duration of my stay.
Water Bottle
Ear Plug
Eye Mask (you can either go the classic eye mask route or get one like this that almost acts like your eye mask + ear plug since you can play white noise through the built in bluetooth speaker- pretty cool!)
Lock (for staying in hostels or locking my bag.) Get the combo lock so you don’t have to worry about tiny keys. I take two to be able to lock two different compartments in my bag AND so I can keep my computer/passport/iPad compartment still locked when I use the other one to lock a locker within a hostel.
3 carabiners – I just attach them to my backpack and over the course of the trip they will hold everything from my water bottle, shoes, rain jacket and more. You will not regret having a few on hand.
Pack of playing cards
Face mask (I’ve used this while feeling sick as well as on a dusty motorcycle ride)
2 pens for writing postcards & for my Spanish classes
Everything I’m taking with me!
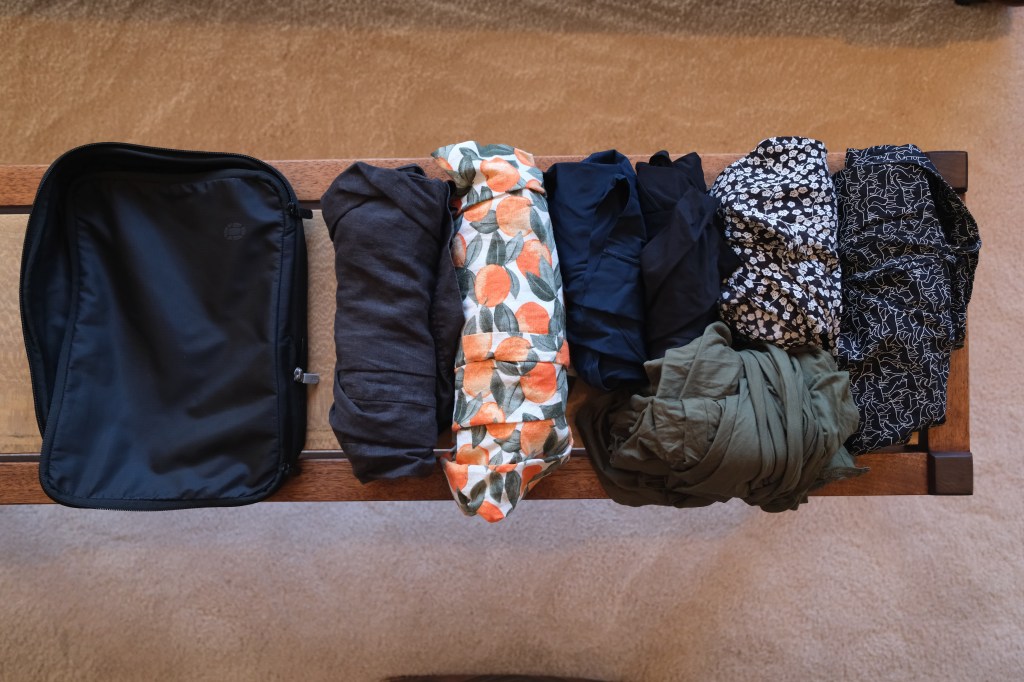
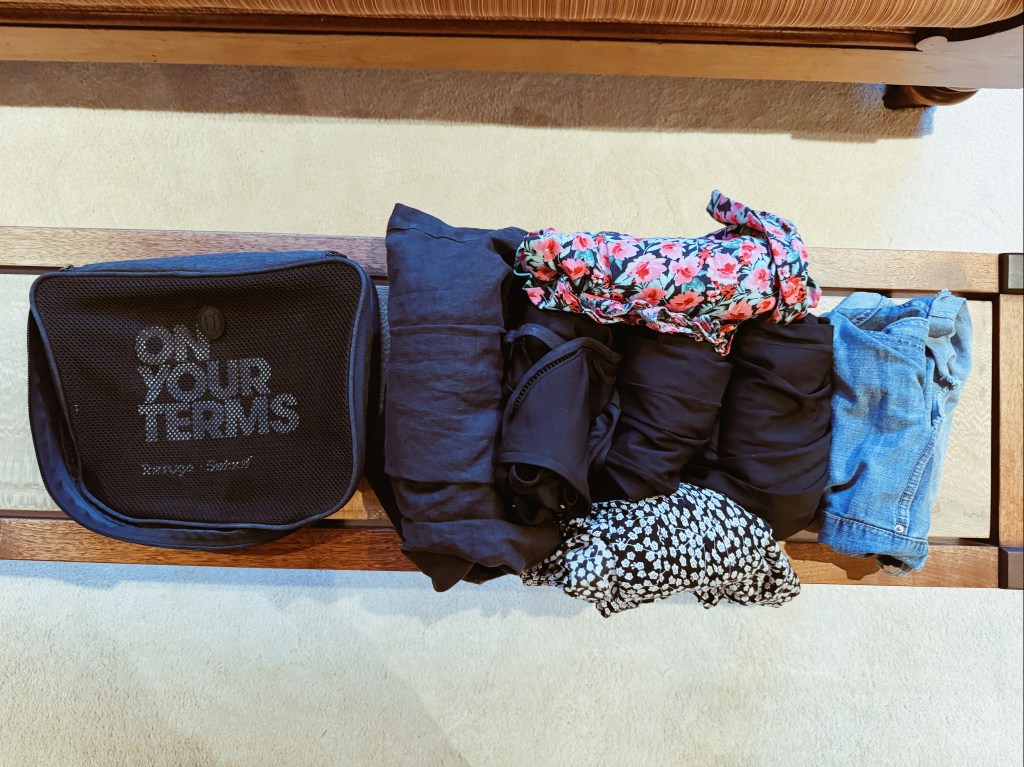
Here is what I packed in each packing cube:
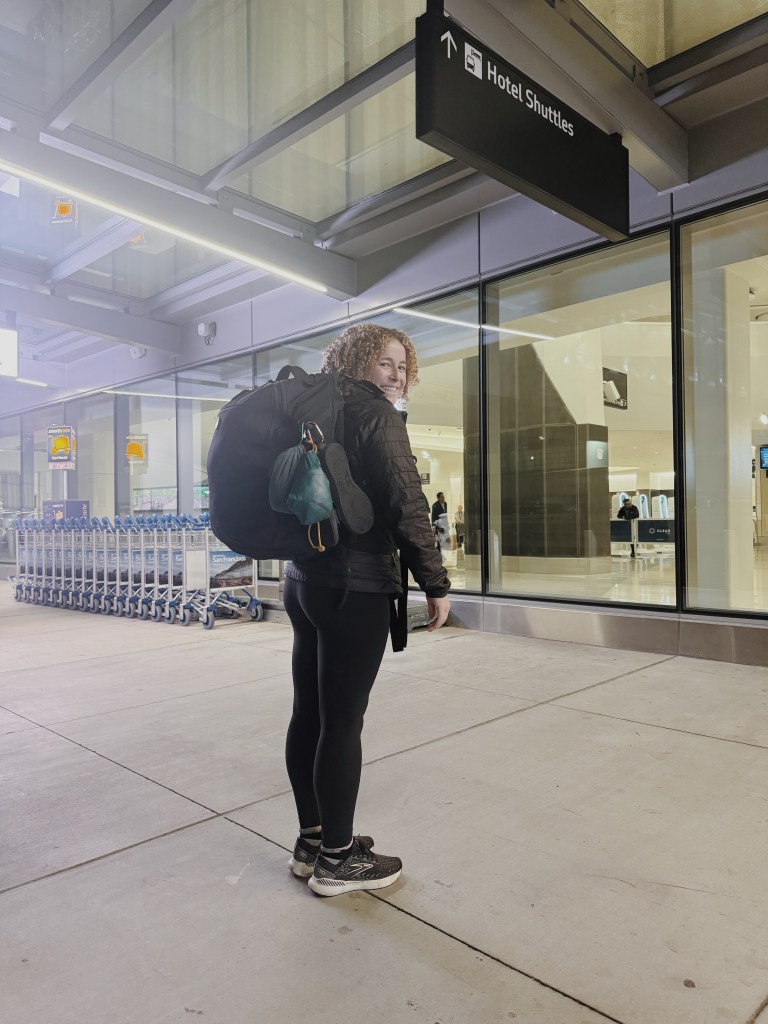
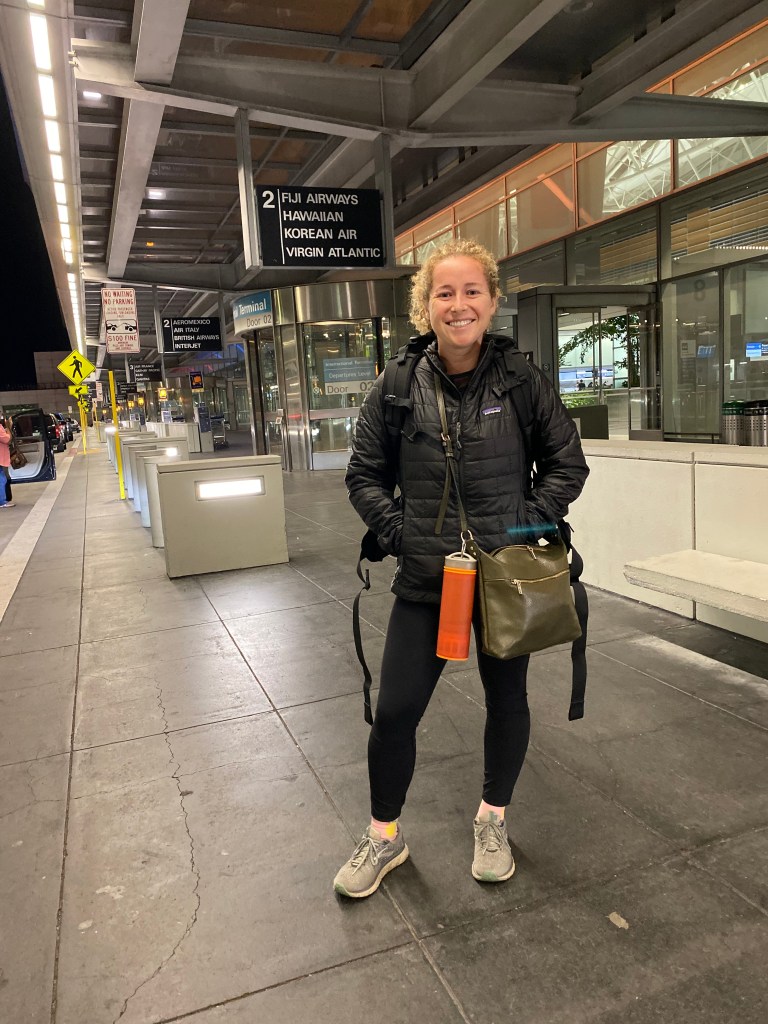
Swimsuit, 3 sports bras, 8 socks, booty shorts, bralette5 shirtsTwo jumpsuits, two rompers, jean shorts, 5 pairs of leggingsPacking cubes all packedAll packed up! 40L Tortuga Lite Backpack, Tortuga Packable daypack (personal item), Tortuga Sling bag, and my airport outfitBack on the road, all decked out in Tortuga gear 🙂
Once again, I am about to head out on the road! This time I am going to Fiji (1 week) & New Zealand (2.5 weeks) for a true vacation with my family, and then I will split off to travel to Southeast Asia solo for 3 months. The beauty of traveling to these locations from Jan to April is I can keep my clothes light & airy, and I don’t need tons of layers & jackets. In general, it’s much easier to pack for hot temperature locations!
Of course I am using my 35L Tortuga Setout backpack 🙂 They don’t sell the exact backpack I have anymore, but here is their latest & greatest! Can’t recommend their bags more. I have used a Tortuga backpack on each of my longterm trips!
Overall tips:
Use packing cubes!
Think through how the clothes will feel in heat. Linen & lightweight materials will be best.
Make sure that every top works with every bottom and works with every shoes. Use a capsule wardrobe as inspiration.
Less is more!
PACKING LIST FOR Southeast Asia:
Clothes
2 pairs of Lululemon Fast & Free Crop’s – I’m trying to make it easy to workout while on the road this time around.
1 pair of Lululemon Align pants – can be used for working out/walking around town or I can dress it up.
1 pair of jean shorts
1 pair of athletic shorts
1 dress
1 Romper
1 Jumpsuit (Madewell) – I’m obsessed with this jumpsuit. Hopefully it holds up well through the backpacker lifestyle.
5 Cute shirts
2 sports bras
2 athletic shirts (for running + sleeping in). One is from Vuori & one is from Lululemon
Waterproof sandals (will act as my water shoe as well as my cute shoes- I never said the backpacker lifestyle was glamorous haha)
Light Patagonia puffer – good for chilly planes/busses & for when I visit countries that are a little cooler, even in the summer. It also smushes down fairly small so it’s a great backpacker jacket. I’ve also used it as a pillow in a pinch.
1 Swimsuit (feel free to bring 2-3 if that’s your thing)
Sunglasses (Warby Parker)
Rain coat (Patagonia; you can pack it up into it’s pocket so I can easily attach it to the outside of my bag via a carabiner)
Tortuga Daypack (they don’t sell it anymore sadly). This acts as my personal item for flights and I can use it for adventures during the day.
Sling crossbody bag (I put it into my daypack on travel days). I use this out and about on a daily basis. Tortuga just released their version and I can’t wait to check it out!
Running band
Electronics
Computer + Charger
iPad
iPhone + Charger (I get a 6 ft cord so I can always reach the plug from my hostel dorm bed!)
AirPod Pro’s
Headphones (Bose; noise-cancelling for travel days)
AirTag (This is a no brainer these days; provides peace of mind incase I am forced to check my bag or when it’s below me in a bus. Always nice to confirm it’s still with me!)
Toiletries (I use a bunch of little toiletry bags to keep these all organized)
Toothbrush
Toothpaste
Flosser
Any medication you take
Retainer
Deodorant
Makeup
Makeup Remover (I’ve become obsessed with cleansing balm for this because it isn’t a liquid, & it’s highly effective at getting makeup off at the end of the day!
Razor
Conditioner + Shampoo (Get containers to put your products into & refill on the road!!)
Face wash
Brush
Pocket Hand Sanitizer– I keep one in my backpack and one in my sling/purse. Great in general, but also for when inevitably there is no soap at a random bus stop bathroom 🙂
Topical steroid cream for bed bug bites or regular bug bites to help with itchiness
Miscellaneous
Passport – no explanation necessary 🙂
ID
Travel Credit Card (no foreign transaction fee; I have the Chase Sapphire Reserve (hello lounge access!)+ Capital One Venture Card)
Debit Card (Charles Schwab has the best one because it reimburses ATM fees from any ATM in the world 🙂 )
Record of your plans (I make folders within my email inbox to keep track of everything or you could print out a copy of your itinerary)
Extra Passport photos
Thumb drive with all documentation if desired
Travel Towel (this one has a cool carrier that you can attach to the outside of your backpack with a carabiner)
Sarong/beach blanket- My roommate got this for me! Perfect for any countries where I need to cover up more as well as the beach or to dry off from a swim. It may be redundant with the travel towel but I brought both so time will tell 🙂
Water Bottle
Ear Plug
Eye Mask (you can either go the classic eye mask route or get one like this that almost acts like your eye mask + ear plug since you can play white noise through the built in bluetooth speaker- pretty cool!)
Lock (for staying in hostels or locking my bag.) Get the combo lock so you don’t have to worry about tiny keys. I take two to be able to lock two different compartments in my bag AND so I can keep my computer/passport/iPad compartment still locked when I use the other one to lock a locker within a hostel.
3 carabiners – I just attach them to my backpack and over the course of the trip they will hold everything from my water bottle, shoes, rain jacket and more. You will not regret having a few on hand.
One sports bra, one bralette, underwear, socks, & booty shortsFive shirtsOne jumpsuit, one romper, one dress, one pair of jean shorts, one swimsuit, two pairs of leggings
All packed up and ready to go on another adventure!
How exciting! You are about to head off on an adventure! Taking long trips is such a rewarding experience, but it can also be overwhelming to leave the comforts & routine of home. Here are some of my best recommendations in order to set yourself up for success!
Warning: this will be a long post, but I never said planning a long adventure would be easy 🙂 These are all my best tips that have been floating around in my head after backpacking for a cumulative 4 years (so far!).
Right before taking off for 6 months in Europe!
Before the trip:
Decide where you want to go! There are many things to consider:
Do you want to travel fast or slow? Traveling slow is better for your budget & sanity (haha), but traveling faster means you get to see more of whatever country/continent you are exploring.
What is the weather the time of year you will be there? Traveling in Europe during the winter brings short days & cold weather, but less crowds & cheaper prices. Traveling during the summer in Europe brings the heat, sun & enormous crowds. Traveling in Southeast Asia or Central America during rainy/monsoon season might not be your thing.
Any violence/political upheaval/safety/medical concerns in the countries you are considering? I always check the US State Department website (but because I sometimes find it to be too alarmist, I also check the UK version).
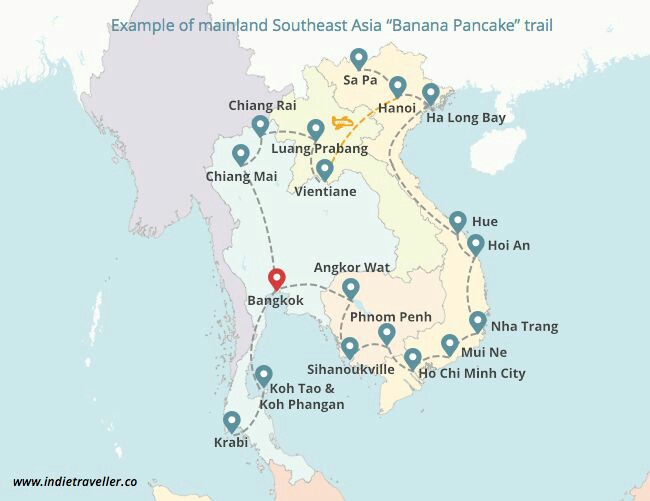
I use blogs as a great resource to get started on what itineraries can look like. I usually search things like “three months in Southeast Asia” or “one month in Eastern Europe” or “three weeks in Turkey,” etc. It’s a great starting off point because you likely won’t be the first person to have ever set off on a 5 month trip in Southeast Asia so why not let someone else give you an idea of what the logical route is. For example, the Gringo Trail in Central America or the Banana Pancake Trail in Southeast Asia are well known & well worn paths. Makes it easy to start your plan based on what’s been done before. Reddit & TikTok also can be incredibly useful resources for travel planning.
As you research, start saving all the restaurants, hostels, attractions, etc you come across into google maps. I create different lists by country to keep it organized. This makes it easier to remember before/during/after your trip what you want to do/did do.
Have a valid passport 🙂 This seems obvious, but what might not be as obvious is a lot of countries require you to have a certain amount of time remaining of validity AFTER your trip. For example, lots of countries in Asia require this. Be sure to look up the exact rules for any country you are planning to visit. You can read more about this rule here. Another consideration is to make sure you have enough pages for any future visas or stamps. Some countries will callout that there needs to be one full page available for this visa/stamp. Again just look up the rules for wherever you are specifically going.
(PSA I am speaking about my experience as a US citizen in this section).Double check the need for visas & how long you are allowed to stay. Every country has a different set of rules! When you are going on a long trip, you’ll want to think ahead in case you need to apply for any visas at a consulate or online or whether you can get it on arrival. For example, in the Schengen region in Europe, you don’t currently need to apply for a visa ahead of time, but this could change in the future (it’s being considered). For NZ/Australia, you need to apply for an ETA (electronic travel authority) ahead of your arrival. It’s pretty easy, relatively cheap, and doesn’t take too long to process, but you DEFINITELY need to do it. Also, you need to pay attention to how long you can stay! For example, in the Schengen region in Europe, US citizens can stay for 90 days out of any 180 days. It’s common for long term backpackers in Europe to pop to non-schengen countries like the UK, Albania, Ireland, North Macedonia, Turkey, etc for 90 days to bide their time until they can go back to the Schengen region (each year the options get smaller it seems as more countries join the Schengen region; be sure to look up current info). Pro-tip: if you are interested in staying longer in the schengen region, the best & cheapest way might be to get a student visa and go spend 3 months learning a language or any other type of course!
In Thailand you can get a visa on arrival and that allows you to remain in the country for up to 30 days. You can apply for a longer visa if you’d like, but it requires more effort. The point is, it’s very important to look up the requirements of every country you are going to! You never know what random thing you might have to do. Some have required me to have a specific amount of money in US dollars (kinda funny that they require USD), some have required me to have certain vaccines (more on that later), & some require me to have extra passport sized photos (so I always take extra with me).
Vaccines! While in Europe there aren’t any vaccine requirements or recommendations, if you are heading to Southeast Asia, Africa, South America, and other parts of the world, there is research to be done on what vaccines you should have before you go. This list isn’t comprehensive so you should do your own research, but here are a few that you might need to consider:
Yellow Fever
Rabies
Japanese Encephalitis
Hepatitis A & B
Typhoid
Meningitis
Malaria pills (not a vaccine, but consider taking these with you)
Protip:Getting vaccines in the US (because these aren’t usually covered by insurance) can be very expensive. One option, if your trip plan allows it, would be to get these while in another country. For example, if you are heading to Australia first & then heading to Southeast Asia, perhaps you plan to get the vaccines while in Australia. Even without insurance, the out of pocket costs tend to be way less than the US.For context, I spent almost $1800 on vaccines before my first trip to Southeast Asia. Never again will I do that. However, the good news, is that most of these are one & done vaccines so once you have them, you don’t need to get them again.
Decide on trip insurance coverage! This covers both trip delay/cancellation coverage as well as medical insurance. I personally don’t worry about trip delay/cancellation coverage as my credit card (more on this later) provides a base level of coverage AND given I am backpacking with very little plan/stress, if things go haywire, it’s not too big of a deal. I’d rather save my money for the actual traveling. HOWEVER, I’d highly recommend you have some level of international medical coverage. If you have health insurance from the US, it’s not likely to cover you while outside the country. Given this, at a minimum you’d want to get a “catastrophe coverage” plan, where if something really bad happened, you’d have some coverage. For example, if I was in a car accident or needed to med-evac’ed out from a fall on a hike, I wouldn’t have to pay for that out of pocket. The good news is that practically everywhere except the US has a reasonably priced medical system, so when I have had to go to a doctor or pharmacy for more rudimentary stuff, paying for it out of pocket is no big deal (just make sure to budget this in for your trip!). For example, I felt very, very sick in North Macedonia and finally went to the doctor & got some blood tests done. Turns out it was Anemia and I just need to take some iron pills for a bit. The two doctors visits + the blood test + the iron pills all together cost me $85 USD. This seemed insane to me given this would be thousands of dollars in the US, but I guess this is just beautifully normal outside of the US. Point being, covering an occasional doctors visit shouldn’t scare you, but you’d want coverage if an ambulance or helicopter is involved. Check out this review of some options. I personally have used GeoBlue & Seven Corners in the past, but luckily haven’t had to use either policy (yet!). I have also used Safety Wing, and it’s what I plan to use going forward. I’ve made one claim and it was super easy – just MAKE SURE you know what documents you’ll need to ensure you get them while at the doctors 🙂
Budget for the trip – figure out how much money you have vs how much money the trip is (roughly) going to cost. You’d hate to get on the road and quickly realize you don’t have enough money to finish the trip you had your heart set out on. I always like to overestimate how much I’ll need so I can say yes to things without worry/stress.
Pro tip:I always take one or two hundred dollars bills as an emergency fund of cash. Sometimes you’ll be in a random situation where they only take USD & you’ll be glad for that random $100 bill in your bag.
Credit Cards – Given how much money you are going to be spending over the next XXX amount of months, I highly recommend you get a travel credit card for a few reasons:
You get some limited trip cancelation/delayed coverage.
You get a 0% foreign transaction fee (aka you don’t pay a fee for using it internationally)
You get points for the money you are spending, which in turn you can use for buying some flights!
Some have travel perks like paying for TSA-precheck or Global Entry
My favorite perk for my credit card is a free Priority Pass membership, which means I get to go to a lounge (& bring up to two friends for free) whenever I am at the airport. Free food + a comfy spot to hang (especially on layovers) is such a game changer!
Pro tip: when paying with credit card in foreign countries, it sometimes asks you whether you’d like to pay in the local currency or in USD. Always pick the local currency. The exchange rate never favors you.
I personally use the Chase Sapphire Reserve. It’s considered one of the best travel cards out there. Don’t be too alarmed by the high annual fee (I feel like it more than pays for itself). You can read an in-depth review here. In summary for the $795 annual fee, you get:
Earn 125,000 bonus points after you spend $6,000 on purchases in the first 3 months from account opening.
$300 Annual Travel Credit as reimbursement for travel purchases charged to your card each account anniversary year.To me, since I will always spend more than $300 on travel per year, this means the annual fee is $495.
Earn 8 points per dollar spent on Chase Travel purchases and 4 points per dollar spent on flights and hotels booked direct.
Get 50% more value when you redeem your points for travel through Chase Ultimate Rewards®. For example, 60,000 points are worth $900 toward travel
1:1 point transfer to leading airline and hotel loyalty programs. This is considered the best way to utilize points.
Access to 1,300+ airport lounges worldwide after an easy, one-time enrollment in Priority Pass™ Select and up to $100 application fee credit every four years for Global Entry, NEXUS, or TSA PreCheck®. My favorite feature.
Count on Trip Cancellation/Interruption Insurance, Auto Rental Collision Damage Waiver, Lost Luggage Insurance and more. An underrated perk
Over $2,700 in total annual cardmember value, including credits for StubHub, Apple Music, Apple TV+ and DoorDash
If you are interested in this card, you can use this link to sign up (I get a referral bonus if you do – wahoo!)
Pro tip: Always bring two credit cards in case you lose one or one gets stolen (and keep them in different places)! In the past, my parents put me as an authorized user so that I could use that as my back up. Luckily, I never had to use it!
Accessing local currency aka cash. Most places in Europe are often cashless, however many other parts of the world cash still runs the world. While you can always order some local currency before you leave on your trip, in my opinion it’s better to just head to the ATM once you arrive. Also, don’t exchange USD for currency (unless it’s the only option) as this is not a very efficient way of getting money (aka it’s expensive). My number one recommendation is to get a Charles Schwab Checking account which comes with their all powerful ATM card. Its magic comes from the fact that they will reimburse ATM fees ANYWHERE IN THE WORLD. No more worrying about getting the exact amount of money so you don’t have to pay the $5 fee again. This has helped me avoid accidentally ending up with way too much Macedonian Denars or Thai Baht as I am about to leave the country. This is another game changer! Not sold yet, read a review here 🙂
Decide what you are going to do for cell phone coverage. There are a few options.
Most economical: Turn off cellular data & just use wifi. You do get the perk of being completely present wherever you are + it’s free. I did my first two big trips like this, but I decided on my most recent trip that I wanted to be able to do research on the fly & be able to be in contact with both people I meet while on the road + people from home. Wifi is plentiful in most places as your accommodation, most cafes/restaurants, & airports all are going to have wifi.
Recommended option: Get local sims or e-sims. This is going to be what most backpackers do as it’s relatively affordable but still gets you connected. The downside, is sometimes the e-sims work seamlessly, while other times folks have said it doesn’t work all that well. It can also be annoying to constantly be getting a new sim/e-sim every time you cross a border (less of an issue in Europe as most it covered under one sim). Airalo is the one I hear the best things about. One note: you do have to have an unlocked phone for this option to work.
Easiest option: Use your US carrier’s international coverage option. You basically don’t have to do anything. I called AT&T and made sure the international coverage was active on my plan and I was good to go. They charge $10 per day, up to 10 days per billing cycle. Essentially, it’s $100 per month (on top of the normal monthly cost). It’s definitely not cheap, but my phone works EXACTLY as it would in the US, which is so nice. I can call anyone, FaceTime anyone, download Netflix, hotspot my computer or new friends, not worry about calling international numbers, etc.
If you plan on renting a car, consider getting your International Driver’s License (also known as an International Driver’s Permit/IDP). It’s only about ~$20 from AAA and took me 15 min at my local AAA office. I haven’t been asked for it every time I’ve rented a car, but I have been asked sometimes. They last a year, and it doesn’t hurt to have it with you.
How to even pack for a long trip! This admittedly can be quite difficult. I go in depth of what I bring here & here. I lay out what I bring as well as my overall approach. I recommend reading those posts, but here are few top tips:
Use a carryon sized backpack (40L or less). I KNOW I KNOW it’s hard, but your back & wallet will thank you. Also, it’s comforting to always have your bag with you vs risking it getting lost on that tight layover. I am obsessed with any of Tortuga’s backpacks. It’s obviously not the cheapest bag you can find, but it’s designed for exactly this type of travel! Every detail is designed for organization, maximizing space, & easy access. It’s also very high quality & isn’t going to fall apart on you. Double check the dimensions on whatever bag you get, to see whether it’ll work as a carryon item. Osprey is another reputable brand in the backpack space.
Consider what season you are traveling. It’s much easier to pack light for summer than it is for winter. I tend to “chase summer” on my trips since I obviously prefer sunny, warm days, but also because the clothes and shoes tend to be smaller & easier to pack.
Packing or compression cubes will be your best friend. Not only can you fit way more in with packing cubes, it also helps keep you organized when you are living out of small spaces like hostels.
Learn what a capsule wardrobe is. Every top needs to be able to be worn with every bottom! Same with every shoe and every jacket. You get the idea 🙂
Throw a AirTag (or other tracking tile) so you always know where your bag is! It was super helpful when my bag didn’t make it on a connecting flight, I didn’t have to wait endlessly at the carousel. I just immediately went up to the lost bag carousel and was on my merry way (it luckily got delivered to my friend’s house 1 day later). It always provides me some peace of mind when I have to put under a bus that I can always see that it’s still traveling with me.
Less is more! Whatever you forget or realize “oh wait I actually need that,” chances are you can probably buy it wherever you are going. But honestly, you’ll probably quickly realize that you don’t need nearly as much stuff as you think. Also, you’ll be so much happier with a small, lighter bag. I honestly enjoy the lack of choices of clothing. Most hostels will have laundry machines and it’s usually free or fairly cheap.
A few must haves: comfy shoes to walk around in, good basic jacket (I use this one), a tiny lock for my bag’s zippers, noise cancelling headphones (I have AirPods + Bose headphones), AirTag to keep track of your backpack, iPad for reading + watching Netflix on long travel days), portable charger, plug adapter, inflatable neck pillow & more (see here).
2 months in Colombia2 months in Colombia2 months in ColombiaAll packed for 6 months in Europe!All packed for 6 months in Europe!
Booking hostels or accommodation: I mostly stay in hostels, although as I get older, I am definitely sprinkling in more airbnbs and hotels haha.
For hostels: I recommend doing research on hostelworld so you can find the best option for you & read real reviews, but whenever possible I book directly with the hostel. It usually has a better price and the hostel makes more money (yay for helping small businesses): a win-win. Some other tips for booking hostels:
Decide if you prefer a coed or same sex room. Coed tends to be slightly cheaper. Personally, I tend to book coed as I save a little money & I find that people are friendlier & it gives me the best opportunity to meet cool people.
The bigger the room, the cheaper it will be, but your sleep will likely suffer. Definitely bring ear plugs + eye mask to help.
Private rooms are always an option if you want the access to socializing that a hostel provides, but don’t want to share a room with strangers. They are obviously more expensive but a good option if you don’t want to be completely solo at a hotel. I have also used this option when I am traveling with friends as we want to meet people and don’t want to pay for a hotel, but want a good nights rest.
Things I look for in the reviews: ease of meeting people, quality of common areas + kitchen, comfiness of bed, cleanliness of the hostel, + location. Ideally there are lockers as well to store your bag or valuables.
Booking airbnbs is pretty self-explanatory, but don’t forget that they have rooms available (vs the whole apartment) as a cheaper option. I have stayed at some pretty cool airbnbs over the course of my travels. It can provide a really cool, more local experience.
Booking hotels: I try to use credit card points where I can since hotels are expensive in Europe. Luckily Southeast Asia is much cheaper. I tend to look at Hotels.com or Booking.com when I am going to book a hotel stay. I’ve found luck getting apartment stays as well so I can have a kitchen.
Booking transportation between destinations: Rome2Rio is lifesaving! I usually find transportation between locations to be cheapest by bus, then plane then train. This is just general though, so I always start my planning with what Rome2Rio shows me.
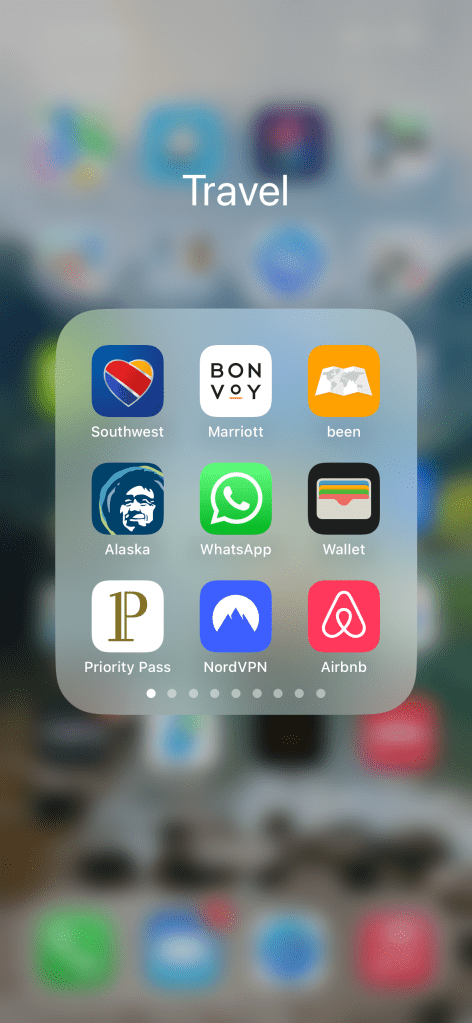
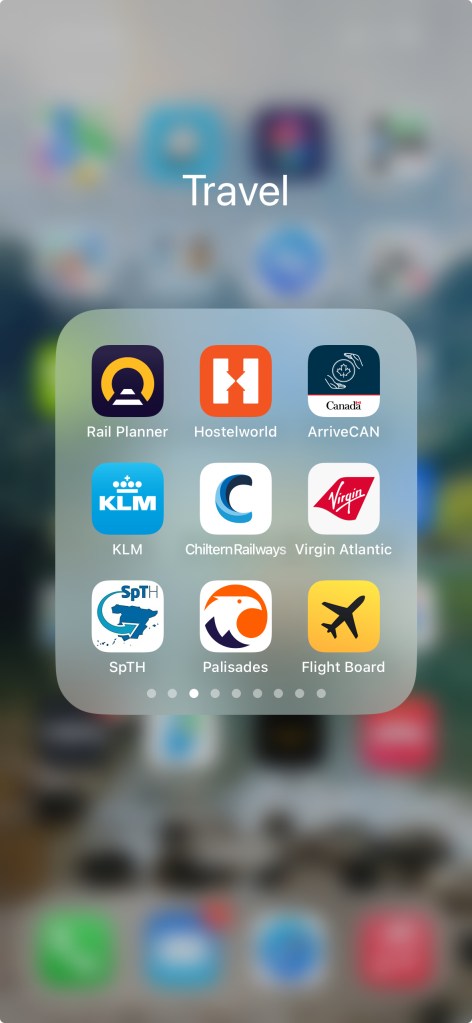
Start a Travel Folder for any apps on your phone. I download airlines & train apps so I have access to my tickets/boarding passes, VPN apps, apps that track my travels like Been & Flighty (these are very fun & cool), uber equivalents in other countries like Grab or Gojek, e-visa apps (like for Canada, Australia, or NZ), and accommodation apps like Airbnb, Hostelworld, Booking.com, & Agoda. By keeping them in a folder, it’s easy to find all my travel info.
During the trip:
Even if you have a good plan for cell-phone coverage, it’s always a good idea to download an offline map of each city/town you are headed to on Google Maps. I just batch do this for the next few cities I am headed to. This way if I am out of service or the service gets wonky, at a minimum I can still see where I am & where I need to go.
Pick up a few phrases in the local language. If you are in native English speaker, just appreciate your privilege now. We are incredibly lucky that with most places you will go, people who are working at the restaurants, hotels, & anything else related to tourism, tend to speak at least a basic level of English. That being said, it’s smart to do two things: learn the important phrases like Hello, Goodbye, Please & Thank you in the local language. This obviously goes a long way in being a good guest in a country. The other important thing is to download Google Translate or Papago so when you come across someone who doesn’t speak English, you will easily be able to communicate what you need help with, whether it’s ordering food or finding out where the bus leaves from. Google translate also allows you to take a picture of a menu or description and it will translate the written text into English for you. This is a game changer and I am so grateful it exists.
Free walking tours are my go to on my first day in a new city. Easy way to meet people and you get a good summary of what to do. Also it’s a cheap activity (just make sure to leave a tip afterwards)!
When people you meet along the way offer to host you when you are in their country, take them up on it! I have made so many great friends by actually saying yes when they invite me & it’s a bonus that you save money! It always makes the visit to the new place that much more enriching.
I always leave my passport locked up in my bag, locked in the storage locker in my hostel/hotel room. I’d never want it on me in case I got pickpocketed. Along these lines, I always keep on credit card on my person (although Apple Pay is increasingly available), and one back at the hostel so that if either my room got broken into or I got pick pocketed, I will always have a back up.
Travel fatigue/burnout: Like clockwork, I personally always get burnt out of backpacking (aka packing up and moving cities every week), so I try to proactively build in some opportunities to rest & remain in one place for a bit into my itinerary. In 2016, I spend 3.5 months at a language school in Barcelona (this helped me to get a student visa so I could stay in Europe for a year!). In 2017, I spent 2.5 months as an au pair in Spain. In 2023, I was au pair again in Spain. In 2024, I studied Spanish in a language once again, this time in Medellin Colombia for 6 weeks! Can you tell I am trying to learn Spanish??! Each time, I had my own room (so nice after being in hostels), I could unpack all of my stuff, there was a built in community (either the other students or the families), I had a routine, and I can just rest. Fairly quickly the decision fatigue & research fog dissipates. It also helps to get me excited about getting back on the road after. Check out Workaway for tons of opportunities to spend some time settled in one place doing anything from being an au pair, working on a farm, pet sitting, volunteering at a hostel, and way more. You can also take a look at housesitting through Trusted Housesitter.
Pro tip: Doing a Workaway is also an incredible way to save money while still getting an experience abroad. Kill two birds with one stone: you can recharge from the burnout & almost completely diminish costs for a bit.
Commemorating your trip! How will you memorialize all your fun adventures? There are many ways to do this:
Keep a diary
Write a blog
Send an email blast to your loved ones
Send postcards to your loved ones
Get a postcard in every city or country you go to. Postcards a great souvenir to collect because they are cheap & easily fit in your tiny backpack 🙂 Protip: I have started writing on the back of the postcard as if it’s almost a little diary entry. I also add the month/year. When I am home, I am going to hole punch them all together.
Ask everyone you meet to add their favorite song into a Spotify playlist
Keep apps like Been or Flighty up to date. Been tracks what countries & US States you’ve been to. Fun to see the map get colored in over time. Flighty is great because if you input all the flights you take, it creates a map of all your flight journeys as well as some fun statistics like how many miles you’ve flown or how much time you’ve lost due to delays.
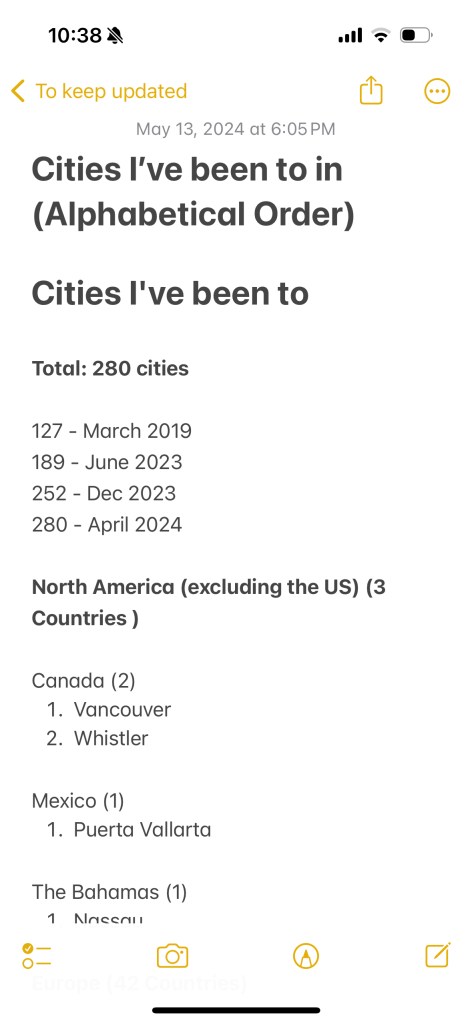
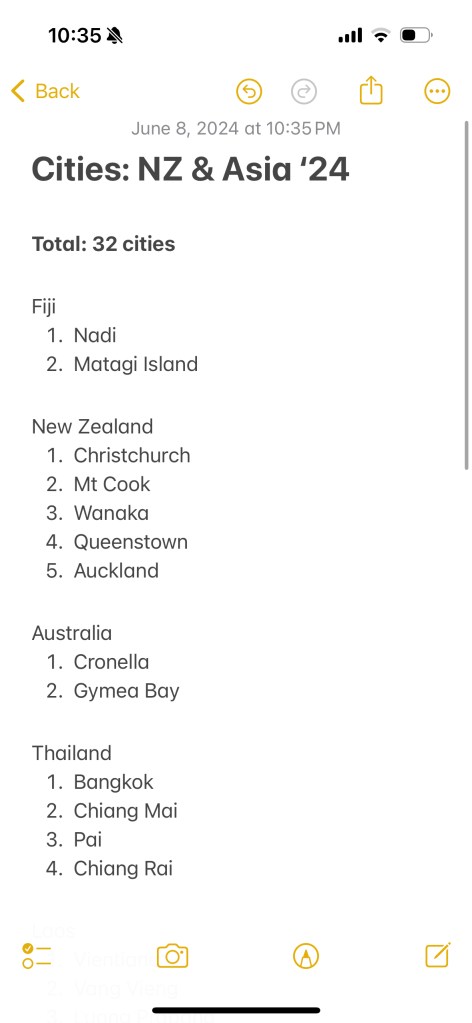
I keep a few Notes in my Notes app on my iPhone that track where I have been. For example for each long-term trip I go on, I have a note that lists out all the cities I go to by country with a running total at the top. I also have a note that lists the countries of each trip. I have a running list that shows every city & country I have EVER gone to. I have a list of countries I’ve been to in alphabetical order and in chronological order. This may be crazy, but I love tracking this stuff haha. Some examples:
Summary
This is going to be a fabulous adventure + you are going to learn so much about the world & yourself! What an incredible gift you are giving yourself 🙂 While it might feel overwhelming to navigate all that long term traveling entails, it is SO worth it. Feel free to reach out via Instagram dm (@meglnichols) or through the blog if you have any follow up questions!
I can’t believe I am about to spend 6 more months in Europe – I feel incredibly lucky! While this packing won’t look all that different to the one I used in 2016, I wanted to share the most up to date version of what I take while traveling. The length of trip matters less since there’s virtually no difference in what I would take for a 2 week trip vs a 12 month trip; you just do a lot more laundry!
Once again I am using my 35L Tortuga Setout backpack. They don’t sell the exact backpack I have anymore, but here is their latest & greatest! Can’t recommend their bags more. I have used a Tortuga backpack on each of my longterm trips!
Overall tips:
Use packing cubes!
Make sure that every top works with every bottom and works with every shoes. Use a capsule wardrobe as inspiration.
Less is more!
Packing List For Europe:
Clothes
Two pairs of Lululemon Fast & Free Crop’s – I’m trying to make it easy to workout while on the road this time around.
One pair of Lululemon Align pants – can be used for working out/walking around town or I can dress it up.
Birkenstock’s – A classic backpacker shoe; comfy & cute
Light Patagonia puffer – good for chilly planes/busses & for when I visit countries that are a little cooler, even in the summer. It also smushes down fairly small so it’s a great backpacker jacket. I’ve also used it as a pillow in a pinch.
1 Jean Jacket for when it’s a little cooler but I still want to look cute
1 Swimsuit
Sunglasses (Warby Parker)
Rain coat (Patagonia; you can pack it up into it’s pocket so I can easily attach it to the outside of my bag via a carabiner)
Tortuga Daypack (they don’t sell it anymore sadly). This acts as my personal item for flights and I can use it for adventures during the day.
Small purse (I put it into my daypack on travel days)
Running band
1 winter scarf + winter coat (dropping these off at a friend’s house when I arrive in Europe and will pick them up in Nov when the weather turns)
Electronics
Computer + Charger
iPad
iPhone + Charger
AirPod Pro’s
Headphones (Bose; noise-cancelling for travel days)
Plug adapter
Portable charger
Toiletries (I use a bunch of little toiletry bags to keep these all organized)
Toothbrush
Toothpaste
Flosser
Any medication you take
Retainer
Deodorant
Makeup
Eye makeup remover
Razor
Conditioner
Shampoo
Brush
Sunscreen
Chapstick
Ibuprofen
Hair ties and bobby pins
Moleskin
Bandaids
Cough drops
Topical steroid cream for bed bug bites or regular bug bites to help with itchiness
Miscellaneous
Folder of itinerary print outs (I don’t do this anymore, and instead make folders within my inbox to keep track of everything)
Extra Passport photos
Thumb drive with all documentation
Handbag (for personal item on planes as well as day-to-day use)
Travel Towel
Sarong/beach blanket- My roommate got this for me! Perfect for any countries where I need to cover up more as well as the beach or to dry off from a swim. It may be redundant with the travel towel but I brought both so time will tell 🙂
Water Bottle
Ear Plug
Eye Mask
Lock (for staying in hostels or locking my bag.) Get the combo lock so you don’t have to worry about tiny keys.
Passport
ID
Travel Credit Card (no foreign transaction fee; I have the Chase Sapphire Reserve (hello lounge access!)+ Capital One Venture Card)
Debit Card (Charles Schwab has the best one because it reimburses ATM fees from any ATM in the world 🙂 )
3 carabiners – I just attach them to my backpack and over the course of the trip they will hold everything from my water bottle, shoes, rain jacket and more. You will not regret having a few on hand.
Here is everything spread out on a table!
Everything + the two backpacks & packing cubes on the couch
Here’s some close ups of what I fit in each packing cube. Click the photos to see the caption for details on exactly what I put in each.
All packed up + ready to go! Pictured: Backpack + day pack + airport outfit
It’s been 2.5 years since my gap year in Europe, and after 2 years of working at a startup in Silicon Valley, I decided the travel bug was too strong to ignore so here we are! I am taking off for 6 months traveling through New Zealand, Australia and Southeast Asia. Luckily it will be warm while in most of these destinations so my clothes skew towards summer clothes and I don’t have to bring as many layers. I absolutely loved my 44L Tortuga backpack that I used on my last 12 month trip, but decided I wanted to challenge myself to take even less on this trip. Given my love for Tortuga, I immediately researched a few of the backpacks from their newest lines and ultimately chose the 35L Women’s Setout. I am thrilled with the size and new shape. It holds a ton of stuff for only 35L. I also bought the corresponding packing cubes because DUH. Lastly, given that this trip is more outdoorsy and adventure focused than the European trip, I knew I wanted to bring a daypack with me as taking my cross body purse (personal item) was not a feasible option for long hikes. Luckily for me, Tortuga thinks of everything! I bought their Setout Packable Daypack. It’s 19L so it’s big enough to hold a water bottle, swimsuit, and a towel, but it’s unstructured so can pack completely flat or in a ball stuff in a corner of my bag. I can’t wait to try it out!